Wednesday, February 29, 2012

Seize the day

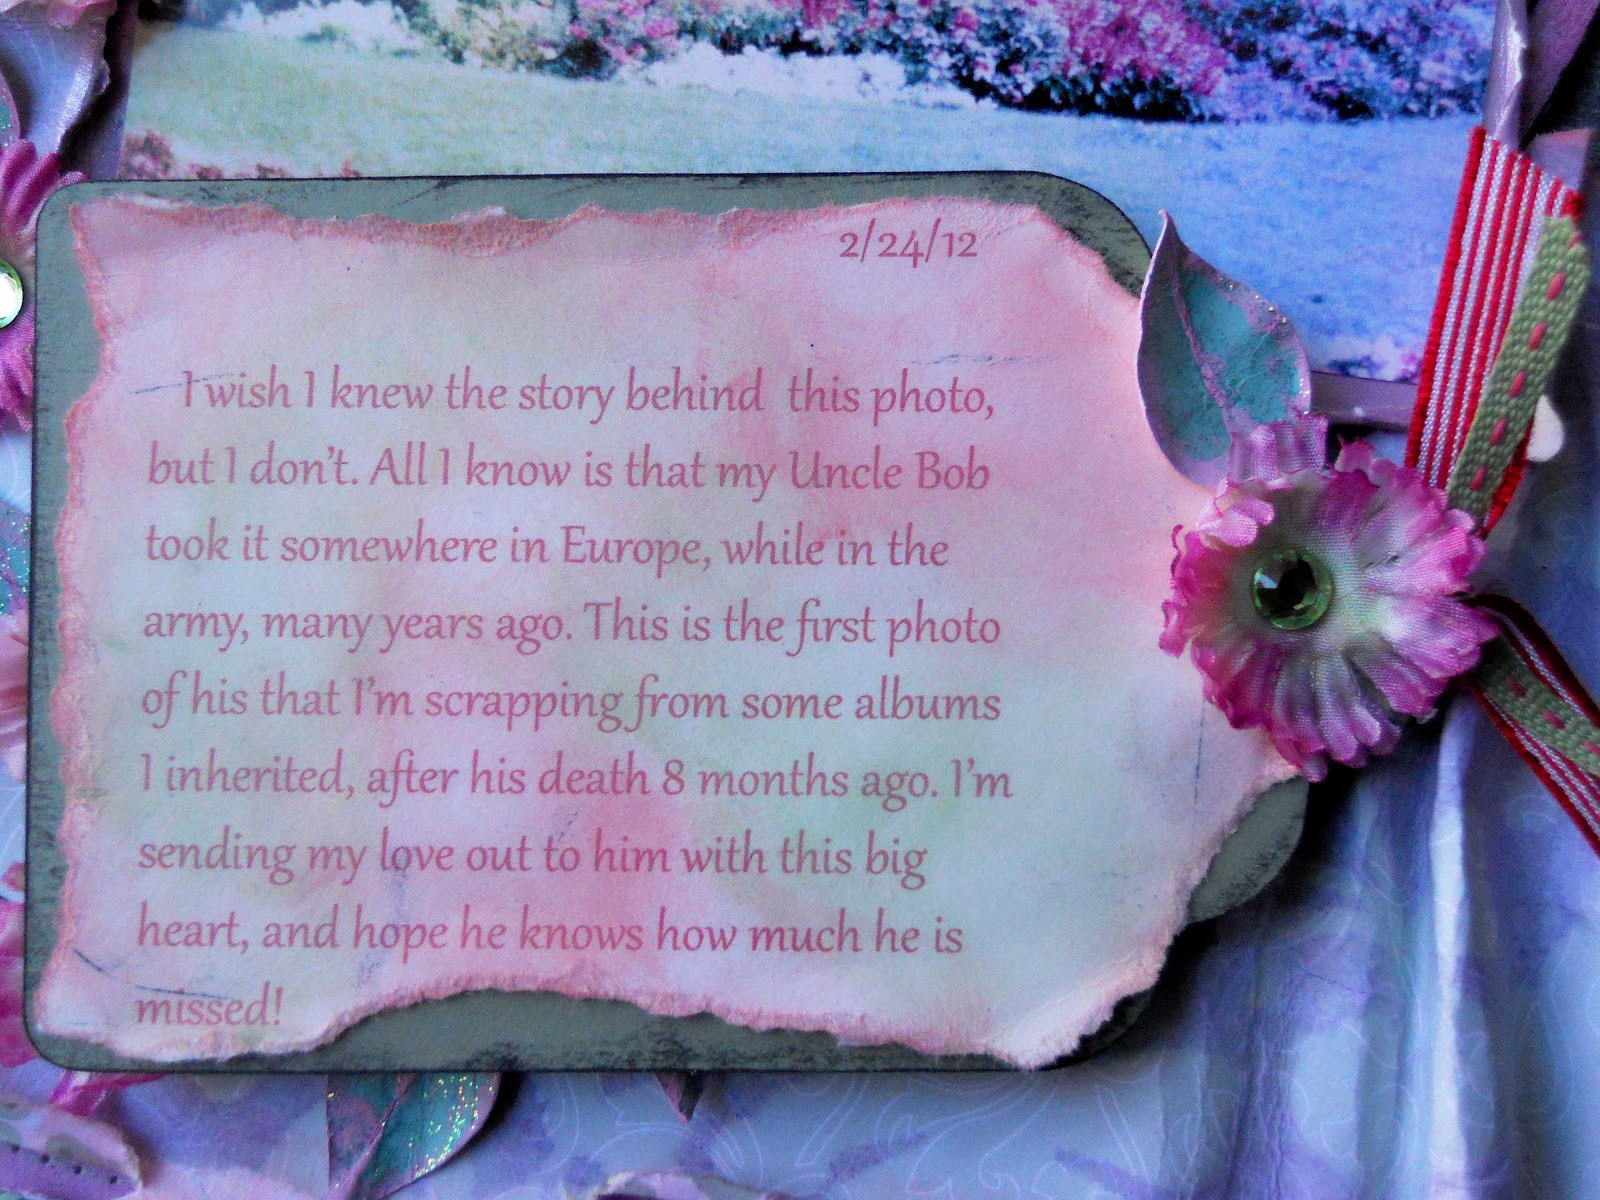
I was going through my Uncle Bob's photo albums again, and found these photos that worked perfectly with Bobunny's Etc. line. I wish I knew where this was! I do know it's in Europe somewhere. I masked the compass on top, embossed the key and globe, and stamped the small postcards on the right. I printed the column from an image I found on-line, and then inked it with my distress inks.The blue and cream roses I had in my stash of homemade flowers, and I misted them to dull them out a little. Along the right I also did some hand stitching, with a zigzag stitch. This was done for a challenge at Flying Unicorn, to use neutrals+one other color. Obviously I used blue. I also did a lot of fussy cutting with the column, and embellies, so I'm also entering it into Funtoolas February challenge for fussy cutting, which you can find here.
http://funtoolas.ning.com/forum/topics/february-fussy-cutting-challenge.
Here's a close-up of the embossed key. I wanted it to look rusty and old.
I also made the bling using liquid pearls in gold and baby blue.
Thanks for stopping by!

Saturday, February 25, 2012

C.S.I. Case File #7

Even though last week's colors for C.S.I. Case File #7 were WAY out of my comfort zone, after coming across this photo that my late uncle took, I knew I had to give it a go.

Here's a look at the case file.
This is how I used the
Evidence:
*Distressing
*Metals (the red brads)
*Container (I have hidden journaling behind the photo)
*Stripes (the ribbon on my tag)
*Cluster similar things ( I clustered the flamingo's, flowers, and leaves
*I have organic shapes with the large heart, and curvy lines

Testimony:
I used the inspiration word Natural in my title.

Here's a photo of my journaling tag.
I made the leaves by painting pink around the edges and finishing with stickles. I used lilac Glimmer mist for the background paper, and for the Prima floral mask that I used on a very light green pp.
I cut the flamingo's using my Cricut Life's a beach cartridge. I used charcoal grey puffy paint to make the eyes.

I'm so happy I challenged myself to do something I wouldn't have done on my own. It's through challenging ourselves that we can grow and learn. As for the new case file, I'm LOVING the colors, and can't wait to play again!

Tuesday, February 21, 2012

Unique Crafter's Spotlight

Woo hoo!!! I've been selected by Unique Crafter's for a special spotlight, featuring my California Happy Cows LO. Here's the link. http://uniquecrafterschallenge.blogspot.com/2012/02/spotlight.html


Here's a link to my original post with a flower tutorial.

http://dreasscrapsofinspiration.blogspot.com/2011/09/country-time-flower-tutorial.html

Thursday, February 16, 2012

Valentine's Day Card

I hope you all had a good Valentine's Day! Unfortunately I've been fighting a very bad fever and cold since last Sunday. At least I was able to enjoy my birthday. I did manage to make this card for my very sweet husband. I stamped and cut out all the hearts using decorative scissors. This is also my entry for the February Card Challenge at Funtoolas. Come check it out!http://funtoolas.ning.com/forum/topics/february-card-challenge

Sunday, February 12, 2012

C.S.I. Case File #5

I hope you all enjoyed your weekend! I celebrated a fabulous birthday yesterday! Here's a page I did for C.S.I. Case File #5. I struggled with this all week,  just letting it sit on my scrap table. Finally it all came together over the weekend. I started by painting the floral mask onto muslin fabric.


Here's the Case File.
For my evidence I used frames, cutting tools, (border punch, floral punch, and Cricut,) leaves, and corners. I made the frame around the whole page out of yarn, leaves, and flowers, which I made. I used my Mini Wildflowers Tutorial to make the centers http://dreasscrapsofinspiration.blogspot.com/2011/07/mini-wildflowers.html. The outside layers are flower #3 cut from the Mother's Day Bouquet Cartridge for the Cricut. I journaled around the frame which I have hidden behind the top photo. I also used the IW hidden.

TFL!

Saturday, February 4, 2012

Enchanted Love Blooms Tutorial

Hello! I've been on a roll lately making flowers, so I have another flower tutorial for you. I scrapped this photo of me and my hubby from our last wedding anniversary. I really wanted to incorporate the colors and gems for our 10 year anniversary. The colors were silver and blue, and since the gems were diamonds and sapphires, I choose to use a sapphire blue to accent these beautiful Bo Bunny papers from their Enchanted collection. All of the blue you see except for the bling and sparkly paper behind the photo is paint. I started by painting around the edges of the whole page, and used the same technique to paint my flowers.


Here's some close-ups of the flowers.


To make these you'll need some black and white cardstock, black ink, silver embossing powder, paint, a script stamp, a flourish or swirl stamp, and the Mother's Day Bouquet cartridge for your Cricut.For the purposes of this tutorial I'll be showing you how to make the largest black and silver flower. To make the white ones, you'll follow the same steps, but just omit the embossing and use black ink. So they're actually easier. I cut out 2 flowers #25 at 4" and 4 flowers #14 at 3/4", 1", 1 1/4", and 1 1/2" out of black cardstock.


Take the largest 2 flowers and stamp and emboss with silver, using any kind of flourish or swirl stamp. I used Basic Grey's Flourish Edges on mine.


Then do the same with the smaller flowers using a script stamp. If you don't have one, just use the same flourish or swirl stamps. 


Then paint around all the edges of your flower using a contrasting color of paint.


Take the larger flowers and curl the petals up, giving a slight pinch at the ends. 


Curl up all your petals on the smaller flowers too. 

Now just glue all your layers together starting from largest to smallest. I added a rhinestone in the center. I love how elegant these flowers look! Thanks for stopping by!


Monday, January 30, 2012

Water Flower Tutorial

I played with the new C.S.I. Case File #4 over the weekend! I was really inspired and excited to use these colors!I  The evidence I used was frames, which I made for all my journaling strips. I stamped them and backed them with my words printed from Photoshop onto vellum. I also stamped the border around the whole page using Martha Stewart's stamp around the page stamps. I used gesso around the lighter teal paper for my wet medium. For something shiny or reflective, I made these cool flowers! For my testimony I journaled in frames and used the inspiration words, wonder, although I added ful for wonderful, and change, which I made into changing. Here's what I came up with.
Here's the Case File.
The flowers were inspired by this video I saw here.
http://www.youtube.com/watch?v=oLWfHLZZB_Q&feature=related
I'll show you how I made mine since I did them a little differently. Here's what you'll need.
Supplies:
1.Heat gun
2.Transparency paper or any kind of clear plastic.
3.Stream alcohol ink
4.Blending solution
5.Glossy Accents
6.Tweezers
7.Bead or rhinestone for the center

For the large flower I cut 3 sizes of  a flower in small, medium, and large onto the clear plastic. I made my own template for this based on Tim Holtz' Tattered floral die. Don't worry about it being perfect, since you'll be melting the edges anyway.
Then I used Stream alcohol ink with some blending solution to color the plastic.

This is the tricky part and you may have to try it a few times until you get your desired flower. Using the tweezers to hold part of the flower, I used my heat gun to melt the edges of the petals. Sometimes the petals don't all go in the same direction, so you have to be careful not to hold the heat gun too close. The smaller ones are especially hard to make, but definitely worth it in the end. It looks so much better in real life! It looks just like blown glass.
Then I glued the layers together using Glossy Accents and added a teal bead to the center.
Here's a close-up on my page.
Thanks for looking!

Friday, January 27, 2012

Raffia Flower Tutorial

     Hello! I created this page for a very good friend of mine. This is her oldest daughter dressed up for Halloween about 12 years ago. I've been wanting to scrap these adorable photos of her for awhile now. I also did this for the Denim Blues Challenge at Funtoolas,
http://funtoolas.ning.com/forum/topics/january-denim-blues-challenge and for the January Distressed in the New Year Challenge at Scrabook.com,
http://www.scrapbook.com/forums/showtopic.php?tid/1568397/tp/1/ with the twist to use denim. I cut up a pair of my son's shorts which he's outgrown, and used them to create this page. I also have another tutorial for you, with these fun raffia flowers.
Here's a close-up.
To start with, cut a piece of sturdy cardstock at 4" wide for the larger flower, and/or 3" wide for the smaller flower. Wrap your raffia around the cardstock.
Then slide it off the cardstock holding and pinching the raffia in the center with your fingers and thumb.
Use a smaller piece of raffia to tie it all together making a double knot to secure it.
Then start spreading apart the raffia as much as you can.
To fill in the gaps on the 2 sides, I just glued some pieces of raffia together to give the illusion of a full flower. 
After trimming up the stray pieces I just added this silk flower.

You can add whatever flower you'd like, or add a button like I did with the smaller one. 

Monday, January 23, 2012

Vellum Flower Tutorial

Sorry I haven't posted anything all week. I hurt my back last week doing pilates, and really had to struggle to get this page done. It wasn't just the pain that I was struggling with either. I had a hard time with the color palette for C.S.I. color, stories, and inspiration Case File #2.  I originally started with grey cardstock and painted my bricks on that. It wasn't doing anything for my photo until I changed the cardstock to purple. Then it finally all came together. This was also based off of last weeks Mojo Monday sketch at Flying Unicorn. Here's what I did.
The evidence I used was flowers, which I made myself except for the large cranberry ones. For an architectural element I used bricks which I painted using a Prima stencil and a stippling brush using 3 different colors. The swirls were cut using my Cricut, Serenade and Home Decor cartridges. For a sheer element I made vellum flowers which are so easy to make. I inked the blue paper on the bottom to look like water.  For my testimony I chose to document an adventure.
To make the flowers I used my Cricut Mother's Day Bouquet cartridge and cut 3 lavender flowers #35 at 3/4", 1", and 1 1/4". I cut a cranberry flower #35 at 2".

Take the lavender flowers and curl the petals upwards. 

Take the large cranberry flower and glue it to vellum. I used a lavender vellum.

Then I just cut around the petals.

After curling the petals up I just layered and glued my flowers together starting with the largest on the bottom.

Then I added a rhinestone brad, but you could use a button,bead, pearl, or whatever else you'd like.

Try using different colors to match your LO or project. They're super easy and fast to make! Thanks for stopping by!

Saturday, January 14, 2012

C.S.I. Case File #1

    I hope you're all enjoying your weekend! I was SO excited to find this new site called C.S.I: Color, Stories, Inspiration. http://csicolorstoriesinspiration.ning.com/
I'm even more excited that I was able to complete the very first case file. It goes beyond just a color palette. Besides the 5 color palette, you have an evidence list, which is just different elements you can pick to use on your page, and a testimony list, which gives you different journaling ideas. I LOVE mysteries, so this was right up my alley. Here's what I did.
This was the Case File.
From the evidence list I used the bow, in my lacing, distressing, of course, a teacup, which I found somewhere on-line, and my lacy element is my doily, which I inked. I also used stamping for the frame around my photo.I used clear embossing powder so, it's kinda hard to tell. I also stamped 2 of my tags with a Prima script stamp. The leaves around the frame were also stamped and cut out.
From the testimony list I decided to use journaling on one of my tags. I took a close-up of it, if you want to read it.The chipboard scroll on the top photo is from Imaginarium designs, which I painted. I made the flowers myself using this awesome tutorial.
http://tina-mypaperpantry.blogspot.com/2010/05/distressed-rose-tutorial.html
Here are some close-up pics.


Thanks for stopping by!