It's Thursday already. Time for the new sketch at Pages in Time. Here it is.
Here's my take. I scrapped these pics of my little sister from a hike we were on together in Lake Tahoe, a couple of years ago. I'm also entering this into the October Monochrome challenge for week 4 to use mostly lime green with touches of bright blue. I painted the whole cardboard background and made the flowers myself, which I'll share with you. If you haven't gotten it yet, I highly recommend buying the Mother's Day Bouquet cartridge for the Cricut. I already have quite a few tutorials using it, with more in the making.
Supplies:(For the large flower)
Cricut Mother's Day Bouquet (Flower #23)
Green cardstock
Faded Jeans Distress ink
Glue
Using flower #23 from the Cricut Mother's Day Bouquet cartridge,cut out 3 flowers at 3", 1 at 2 1/2", 1 at 2",
1 at 1 1/2", and 1 at 1" from lime green cardstock.
Then ink all the edges with Faded Jeans distress ink.
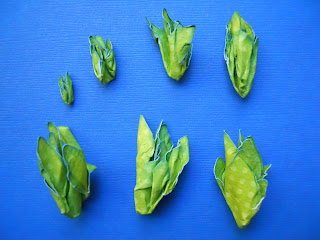
Now take each flower, wet it, and crumple it from the center out. Be careful not to get it too wet or it might rip.
Carefully open all your flowers and let them dry completely. If you're impatient like me, just use your heat gun to speed up the process.Now layer the 3 largest flowers together slightly overlapping the petals.
Add the rest of the flowers stacking from largest to smallest and gluing each layer together. I didn't add glimmer mist but if you wanted to you could. This looks great too using white cardstock skipping the inking all together. You could also try a white flower with just a hint of color by inking the edges in whatever color you want. I know I'm going to try that in a future page. Here's a close-up of the finished flower.
Here's my take. I scrapped these pics of my little sister from a hike we were on together in Lake Tahoe, a couple of years ago. I'm also entering this into the October Monochrome challenge for week 4 to use mostly lime green with touches of bright blue. I painted the whole cardboard background and made the flowers myself, which I'll share with you. If you haven't gotten it yet, I highly recommend buying the Mother's Day Bouquet cartridge for the Cricut. I already have quite a few tutorials using it, with more in the making.
Supplies:(For the large flower)
Cricut Mother's Day Bouquet (Flower #23)
Green cardstock
Faded Jeans Distress ink
Glue
Using flower #23 from the Cricut Mother's Day Bouquet cartridge,cut out 3 flowers at 3", 1 at 2 1/2", 1 at 2",
1 at 1 1/2", and 1 at 1" from lime green cardstock.
Then ink all the edges with Faded Jeans distress ink.
Carefully open all your flowers and let them dry completely. If you're impatient like me, just use your heat gun to speed up the process.Now layer the 3 largest flowers together slightly overlapping the petals.
Add the rest of the flowers stacking from largest to smallest and gluing each layer together. I didn't add glimmer mist but if you wanted to you could. This looks great too using white cardstock skipping the inking all together. You could also try a white flower with just a hint of color by inking the edges in whatever color you want. I know I'm going to try that in a future page. Here's a close-up of the finished flower.


Awesomely stellar page! Your flowers absolutely rock and look so wonderfully lifelike (thank you for sharing the step-by-step howto for them).
ReplyDeleteBig hugs!
Jessica