This is the first photo that I've scrapped of our cat Spaz since she died almost 2 years ago. She lived a long 15 years, and was my husbands cat before we met. It felt good to scrap this photo of her for C.S.I. #38 and Once Upon a Sketch. I even managed to do another flower tutorial.
Here's a look at the case file and sketch.
Evidence I used:
*trees/branches which I cut with my Cricut (Serenade cartridge)
*Birds (I stamped the bird on the branch)
*Flowers
*Newprint pattern (I used newsprint mixed with gesso, fibers, and mists behind the photo.)
*border ( I sewed around 3 layers of papers)
*Pet accent (Photo of my pet)
*Misting (The same paper with the newsprint and gesso was misted.)
Testimony I used:
*Document a pet
*Inspiration word daily
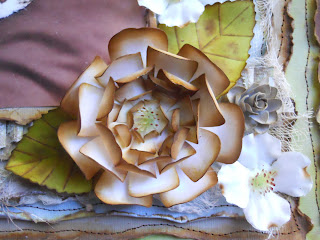
Here's a close-up of the flower and leaves I'll be showing you how to make.
I used the Mother's Day Bouquet cartridge for the Cricut to cut these out, but you can try this with almost any shape of flower or leaves.
I started with white cardstock cutting flower #8 at 3 1/2", 3", 2 1/2", 2", 1 1/2", and 1".
Then using Distress ink (gathered twigs) and my blending tool I inked the edges front and back of all the flowers. You can use any color you'd like.
Then quickly dip your flower in water and curl your petals up, using the heat gun to dry them.
Now just glue all your flowers together starting with the largest one on bottom.
You can use whatever you want for the middle, but I cut out the centers from the white flowers that I used on this page to give it a more natural look.
To make the leaves I cut out leaf #7 at 2 1/2" and 2 1/4".
Use your blending tool and whatever green Distress inks you'd like. I used bundled sage, peeled paint, and crushed olive.
Now turn your leaf over and use a stylus to create the vines.I started by making a straight line down the middle of the leaf using the ruler on my paper trimmer.
When you're done it should look like this.
Now use brown ink (I used gathered twigs) to ink the edges and lightly go over the vines.
Spray with water and heat with your heat gun to get the finished result. The heat gun will help curl your leaves a little.
Thanks for stopping by and enjoy your weekend!


What a great layout in memory of Spaz and the tutorial is an awesome idea, thanks for sharing.
ReplyDeleteA lovely layout with awesome layering. Thanks for the tut and thanks for playing with us at OUAS.
ReplyDeleteLove all the layers on your layout and the beautiful hanmade embellies!
ReplyDeleteThank you for sharing with us at OUAS!
Love your tuts Andrea, I especially like the leaves! Love the pretty layers and details but most uf all the photo of Spaz. Have 3 fur babies myself at home and they love to snuggle in my bed too. Thank you so much for sharing your tuts and for playing along with us at OUAS!
ReplyDelete