
Pages In Time Interactive Blog Hop
Welcome to the Pages In Time Interactive Blog Hop! We call it an “Interactive Blog Hop” because you do more than read a blog, you actually get to create a layout along the way! At each stop you will collect steps for completing a layout!
The Interactive Blog Stop starts at the Pages In Time blog http://fablady.blogspot.com/ with the Pages In Time Weekly Sketch. From there, you will hop from blog to blog to collect the steps to create your layout! You should have arrived here from Stacey's blog http://ohschwietscrap.blogspot.com/. If you stumbled upon the hop by accident, please play along (just make sure you hit all the blogs)!
The step you are collecting from me is stitching. First let me show you my take of the sketch.
 I chose to do machine stitching (the black stitching around the yellow pp) and hand stitching (around the title).
You can do any kind of stitching you want, machine or hand, but here's a really easy stitch I'd like to share with you that I call a twisted stitch. Here's what you'll need.
1. 2 different colors of embroidery floss
2. needle
3. scissors
4. Mat to poke holes (you can also you an old mouse pad)
5. Piercing tool (you can also use a needle or small nail)
 The first and most important step when sewing by hand on paper is to pierce your holes. Then just do a basic stitch in one of your colors. I did the darker green first. For a skinnier stitch you can divide your embroidery floss into 3 strands. I didn't do that on this page because I liked the bulkier stitch to bring out the title more.
 Then thread your needle with your other color making a knot at the end. Bring your needle up from the back of your page starting at one end of your previous stitching. Then pull your needle through the very first stitch along the front page.
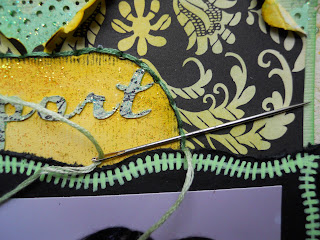 Continue doing this with all your stitches bringing your stitches through each previous stitch going in the same direction. See how my needle is facing out. After I pull the thread through, I put my needle through the next stitch the same exact way never going through the back of the page until your done. As you can see, your threads will start twisting making a great outline or rope effect.
 Because I used 2 different shades of the same color it's more subtle. But try it with black and white, or red and white, which gives you a candy cane look. Once you get to the end just pull your needle through the hole in your last stitch and knot it in the back. Here's what it looks like all done.

Be certain to write down the steps along the way, because you will need to incorporate them into your layout to be eligible for the overall prize! Speaking of prizes, take a peek at the grand prize:

To be eligible for the prize you must incorporate the sketch and five additional steps from the hop. The order of the hop is as follows:
Karen: http://fablady.blogspot.com (sketch)
Becky: http://manyminimemories.blogspot.com/ (distressing & inking)
Lisa: http://theshabbyhorse.blogspot.com/ (Pictures: Mat picture and doodle on the edges)
Anna C: http://picturesnpapers.blogspot.com/ (Border Punch)
Jessie: http://disasterouscrafting.blogspot.com/ (Flowers-plans tutorial)
Stacey: http://ohschwietscrap.blogspot.com/ (Faux Flourish)
Me: http://dreasscrapsofinspiration.blogspot.com/ (Stitching)
Traci: http://scrapsofwhimsy.blogspot.com/ (Title - Stamping or doodling on the letters)
Lili:http://pagesintimestoresite.ning.com/profiles/blogs/pages-in-time-interactive-blog (Journaling)
Finally, you will need to upload your completed layout at Pages In Time. If you are not already a member, you will need to become one. Once you are there, you will find a Forum entitled “June 30 – July 6 Thursday Sketch”. You will have until midnight on July 6th to upload your layout. All layouts that are based upon the sketch and have incorporated at least five of the steps from the blog hop will be eligible for the prize. A winner will be chosen by the Pages In Time Design Team.
You can earn two extra votes!!! If you follow all the blogs listed in the hop and leave a comment on each blog, you will be eligible for an extra vote. You can also earn an extra vote if you incorporate the step listed at each stop in your layout. That means, if you do your layout based on the sketch and include all of the steps, you get an extra vote!
One more surprise!!! I am offering a personal RAK of some of my homemade embellies to a random person that is a follower of my blog and leaves a comment!
Now hop on over to Traci’s blog http://scrapsofwhimsy.blogspot.com/ and have fun!!
Welcome to the Pages In Time Interactive Blog Hop! We call it an “Interactive Blog Hop” because you do more than read a blog, you actually get to create a layout along the way! At each stop you will collect steps for completing a layout!
The Interactive Blog Stop starts at the Pages In Time blog http://fablady.blogspot.com/ with the Pages In Time Weekly Sketch. From there, you will hop from blog to blog to collect the steps to create your layout! You should have arrived here from Stacey's blog http://ohschwietscrap.blogspot.com/. If you stumbled upon the hop by accident, please play along (just make sure you hit all the blogs)!
The step you are collecting from me is stitching. First let me show you my take of the sketch.

You can do any kind of stitching you want, machine or hand, but here's a really easy stitch I'd like to share with you that I call a twisted stitch. Here's what you'll need.
1. 2 different colors of embroidery floss
2. needle
3. scissors
4. Mat to poke holes (you can also you an old mouse pad)
5. Piercing tool (you can also use a needle or small nail)


Be certain to write down the steps along the way, because you will need to incorporate them into your layout to be eligible for the overall prize! Speaking of prizes, take a peek at the grand prize:

To be eligible for the prize you must incorporate the sketch and five additional steps from the hop. The order of the hop is as follows:
Karen: http://fablady.blogspot.com (sketch)
Becky: http://manyminimemories.blogspot.com/ (distressing & inking)
Lisa: http://theshabbyhorse.blogspot.com/ (Pictures: Mat picture and doodle on the edges)
Anna C: http://picturesnpapers.blogspot.com/ (Border Punch)
Jessie: http://disasterouscrafting.blogspot.com/ (Flowers-plans tutorial)
Stacey: http://ohschwietscrap.blogspot.com/ (Faux Flourish)
Me: http://dreasscrapsofinspiration.blogspot.com/ (Stitching)
Traci: http://scrapsofwhimsy.blogspot.com/ (Title - Stamping or doodling on the letters)
Lili:http://pagesintimestoresite.ning.com/profiles/blogs/pages-in-time-interactive-blog (Journaling)
Finally, you will need to upload your completed layout at Pages In Time. If you are not already a member, you will need to become one. Once you are there, you will find a Forum entitled “June 30 – July 6 Thursday Sketch”. You will have until midnight on July 6th to upload your layout. All layouts that are based upon the sketch and have incorporated at least five of the steps from the blog hop will be eligible for the prize. A winner will be chosen by the Pages In Time Design Team.
You can earn two extra votes!!! If you follow all the blogs listed in the hop and leave a comment on each blog, you will be eligible for an extra vote. You can also earn an extra vote if you incorporate the step listed at each stop in your layout. That means, if you do your layout based on the sketch and include all of the steps, you get an extra vote!
One more surprise!!! I am offering a personal RAK of some of my homemade embellies to a random person that is a follower of my blog and leaves a comment!
Now hop on over to Traci’s blog http://scrapsofwhimsy.blogspot.com/ and have fun!!


Andrea thank you thank you thank you for sharing this technique!!! My stitching with the weaving has to be my favorite part to my page. I can't wait to do this technique over and over again. You get a lot of bang for your buck... 'cause it looks super cool and it's SOOOO easy.
ReplyDeleteLove how your page looks with the looped ribbon
I have never done stitching on any of my scrapbooks. Maybe it's time I tried it!
ReplyDeleteI like your idea on making the twisted rope effect for your stitching, it looks great! TFS!
ReplyDeleteLovely Andrea! You really went all-out on your page!
ReplyDeleteYour page is great and thanks for your advice I never try two colors I guess I have to now.
ReplyDeleteI've never thought of using 2 thread colors like this...can't wait to try this out.
ReplyDeleteLove that paper collection! Your stitching looks great. Fantastic hop!
ReplyDeleteThis is something I never thought to try. It worked out so great! I love the way you used it on your page! Thank you for sharing this!
ReplyDeleteWonderful layout. I'm following your blog, hope you can visit mine at www.scrapdiva-tina.blogspot.com
ReplyDeleteabsolutely gorgeous! LOVE the color combo and all the stitching! Thanks for the tips on sewing on the layouts too! I'm a follower of your blog, of course! :)
ReplyDelete~Amarilys