
I had such a great 4th of July! I hope you did too! I did this 2 pager documenting last years celebration. It's my example for the July Sewing Challenge that I host at Scrapbook.com. The twist this month is to stitch some stars and stripes. I machine stitched around the blue cardstock, and hand-stitched the stripes (on the journaling) and stars. There's still plenty of time if you want to join us.


This started out as one page. Obviously with such a big title, it wasn't working for me. So when I saw this sketch for the July 2 page sketch challenge at Scrapbook.com, it was just the inspiration I needed.

I masked and misted the star paper on the left. I made the flowers to resemble stars and added a touch of bling in the centers for the Red, white, and blue challenge at Funtoolas, where the twist is to add bling.

Here's a close-up of the journaling.

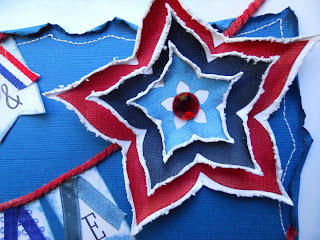
A close-up of some stitched stars.

FREEDOM FLOWER TUTORIAL
Supplies:
red, white, light blue, and dark blue cardstock
Cricut (Mother's Day Bouquet cartridge)
Glue
Distress inks
bling for the centers
Directions:
Cut flower #1 out of red cardstock at 3 3/4", dark blue at 2 1/2", and light blue at 1 1/2"

Ink the edges with Distress Ink.

Glue onto white cardstock and cut around the flower leaving some white on the edges. It doesn't have to be perfect since we're going to distress the edges anyway. I used my distressing tool, but if you don't have one, you could always use your scissors.

Now just shape your petals up, while giving it a little pinch with your fingers. After shaping all of your flowers, glue them together, and add some bling to the centers.

I thought this was a fun, patriotic flower! I hope you try it!


really pretty delicate edges. Thanks for showing us.
ReplyDeleteLove how you did your flowers! TFS! And thanks for playing in my challenge too!
ReplyDeletethese are so pretty! Thanks for the tut!
ReplyDelete