Thursday, June 28, 2012

The Color Room #116

I was so happy to play in the Color Room again, since it's been such a long time! I loved this weeks color  palette, and used a photo that I took at the Monterey Aquarium of some sand dollars. I've also been missing the beach and the smell of the ocean!
Here's the color palette.
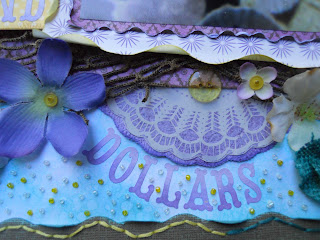
I was even inspired by the sketch, even though I took it in a different direction. I started by inking the background to look like water using distress inks.Then I cut the sand dollars using my Cricut, (Life's a beach cartridge using the border function) and applied gesso to create texture. I misted it and used distress inks with my blending tool, before adding rock candy distress stickles. It was a process, but well worth it in the end.
Here's a close-up of the beads I scattered along the bottom.I also used the Prima packaging that the white flowers came in, to make the doily peaking out under the photo.
Thanks again for stopping by!

Monday, June 25, 2012

Sunburst Flower Tutorial

After all these masculine pages I've been doing lately I wanted to do something really fun and colorful, and what better papers than Bo Bunny's Flower Child, which I still have so much of. So I made this page of my son for a couple of challenges.
1. Here comes the sun at Scrapbook.comWe had to use a sun and use stitching for a twist. I cut my sun out with my Cricut, (Life's a beach cartridge) and then misted it with blue Glimmer Mist (Jack Frost). I stitched a little on the striped paper in the back, and the 2 spirals, which I did in two colors.
2.June Walking on Sunshine at Flying Unicorn where we had to use blue, yellow, and green. 
I inked the edges of the background paper with some distress inks, and used a lot of water distressing everywhere, including the flowers, which I made myself. 
Here's a close-up of the journaling and stitching.
Here's a close-up of the flower we'll be making.

Supplies:
2 different contrasting colors of cardstock and yellow for the center. For this flower I used blue and red. 
Cricut (Mother's Day Bouquet cartridge)
brown ink
Glue
Brad for the center

Directions:
The first step is to cut out your flowers using the Cricut Mother's Day Bouquet cartridge. Cut 3 red and 3 blue using flower #34 at 2', 2 1/2", and 3". Cut your yellow flower (or sun) #17 at 1 1/2".
For all the red and blue flowers I used water distressing, by dipping the whole flower into water, and then shaping the petals up while pinching the ends. Make sure you're using good sturdy cardstock, otherwise the flowers might tear. Then give it a good blast with the heat gun to dry them.
Now just layer and glue together alternating your colors starting with the 3" flowers on the bottom.
For the centers just ink your flower with brown ink, and use the same water distressing technique by dipping it in water and shaping it up. I didn't pinch the edges though like I did with the other flowers. 
Now just glue the center to the flower, and insert a brad or button, and you have a sunburst flower! Thanks for stopping by! 

Saturday, June 23, 2012

4 Generations

I was finally able to give this belated Father's Day gift to my dad today.  He loved it, and even gave me the photo a month ago. I got the oh so subtle hint, and made him this page out of  Bo Bunny's Weekend Market. It's such a great line for masculine pages! This is a photo of my dad,with  his dad, his grandfather, and his son (my brother Bryan). I know it's always been a favorite photo of his, and I was even able to include my Great Grandmother's buttons on here, which I inherited a few years ago.I altered the chipboard frame and number 4 to look like leather, by gluing tissue paper onto them, and inking with various distress inks.
Here's some close-ups of the buttons! 

TFL! Enjoy the rest of the weekend!

Monday, June 18, 2012

I'm a chef @ PMB

Woohoo!!! I'm now part of the design team for the Paper Mixing Bowl! It's a fairly new site, but so much fun! I love cooking up recipes for them, and will have the July recipe up on my blog on the 1st. I look forward to getting to know the rest of the team. 

Sunday, June 17, 2012

Happy Father's Day

Hello! I just wanted to say Happy Father's Day to all the dads out there, especially my own! It was good seeing my dad yesterday! I made this card for my husband!We're going to enjoy the day out by the pool! Have a wonderful day!

Friday, June 15, 2012

The Paper Mixing Bowl June Recipe Challenge

Have you ever had a creative dream? I hadn't had one in a very long time, until a few days ago when I woke up with this image in my head. I knew the exact photos I wanted to scrap, of my darling husband, the title, colors, and all the smoke, which I created by using a make-up sponge and white ink.
I just LOVE scrap cooking at the The Paper Mixing Bowl, and made this using the June Recipe for Shish Kebabs! I started by flipping the sketch.
The main ingredient is charcoal briquettes, which was the whole inspiration for this page. 

I used all of the utensils except for the twine.
*Metal elements-My husband brought home all the washers from work. I recycled some soda can tabs to make the banner.
*brads/eyelets-I used 4 large eyelets on the corners of the matting behind my photos.
*paper with script-I stamped BBQ all over my journaling tag.
*tape-I used black electrical tape on the corners under the eyelets.
*brackets-I used some picture hangers for brackets in my title.

The directions I followed were to journal about a special man in my life,(my honey).I also used hidden journaling, tucking my tag behind the photos. I masked a hamburger onto the top right corner. 

I stitched silver lines on the bottom to mimic the grill. I made the flag/tag title for a challenge at Flying Unicorn.
Thanks for stopping by! Have a great weekend!

Sunday, June 10, 2012

The Sweetest Chill

I let my dark side out for this page I created  for the Chipboard Craze Challenge at Flying Unicorn. I started by misting and inking the background onto white cardstock. I embossed the fence. The Dusty Attic rose chipboard was painted before adding gesso to it. I also used gesso around the black cardstock matting the photo, which I found on-line. The roses were made using Gabrielle Pollaco's rose tutorial. I just added some diamond dust to them.
This was based off of this beautiful sketch that my friend Amy made for Scrap That.
Here's a close-up of the lyrics from Siouxsie and the Banshees before I started to roll them up. 
And after I rolled it.
A close-up of the chipboard. 
TFL! 

Friday, June 1, 2012

Hero

I let out a lot of pent up emotions while scrapping this photo of my Grandpa. His health isn't  so good, and I've been trying to ignore it for a long time now. His birthday is in a few days, and even though I can't be there with all my family, I want them ALL to know how much I love and miss them!
This is my example for the June Sewing challenge that I host at Scrapbook.com with the twist to use a cross stitch. It's also my entry for the circle challenge going on there. I used Bo Bunny's (Weekend Market) for the pp's. I did a lot of masking and misting on here, using distress ink pads and Glimmer Mists.It felt good to finally use one my Heidi Swapp Bingo cards. It was definitely made from the heart!
A close-up of the stitching.
Another close-up.
Thanks for looking! Have a good weekend!

Tuesday, May 29, 2012

London Calling

I had a blast making this LO for my sister-in-law of her recent trip to England! What better challenge to enter this in, than the British challenge at Scrapbook.com. It's also for the multi-pic challenge, and my example for the Sewing Challenge that I host. The twist that I gave was to stitch your title. I used some old chipboard letters to trace my title and hand-stitched it in blue. I did lots of masking and stamping on this page. My favorite part though is the phone booth that I made out of a shirt gift box. I used an exacto knife to cut it out, and then painted it red before adding a shiny top coat. The windows on the sides are backed with clear transparency paper. I cut the crown out with my Cricut (home decor cartridge), and actually used the back of an old envelope that was gold. I love when I can recycle things into my work! Besides the blue background paper all the other papers are from Tim Holtz Lost and found collection.
Here's some close-ups. The stamped Big Ben started out as a mistake. I stamped it in black ink, but it didn't take in the middle. At first I was just going to cover the whole image with the gold embossed framed and colored image, but I liked the way it looked angled off of the original stamp. Sometimes mistakes can turn into something even better than you had imagined. 

Thanks for stopping by!

Monday, May 28, 2012

Happy Memorial Day!

I hope everyone's enjoying the rest of the 3 day weekend! I have another page to share, but first I'd like to thank all the men and women who have served our country, fought,  and given their lives for our freedom! So thank you!!!
I made this page from my son's 10th birthday for the Chocolate challenge going on at Scrapbook.com. I started by editing the photos in Photoshop, so that just the cake is in color. I did some punching and machine stitching. It's pretty simple for me, but at least I finished it pretty quick. TFL!


Monday, May 21, 2012

Fashion Layout Challenge

    Hello! Don't you just LOVE these adorable photos of my cousin Janie's little girl? She's so cute!!! As soon as I saw these pics on facebook, I knew I had to scrap them. I played with them in Photoshop, making them black and white with a pop of pink, revealing the flower in her hair.
   This is my entry for the Spring Splurge Challenge going on @ Scrapbook.com. I missed the last few weeks, but had to jump in for the Fashion Layout week. This is also my entry for Funtoolas May color challenge to use black, white, and pink.
I created the mirror by cutting the frame using my Cricut (Storybook cartridge). I cut 2 strips of white cardstock to create the legs, topping them both off with Diamond stickles. I thought the circles on top looked like lights, so I backed them with black cardstock and applied Glossy Accents to make light bulbs. The mirror was cut using a smokey silver shiny paper. It looks much better in real life and actually reflects like a mirror. I created the background paper with stamps and markers. The rest of the papers are Bo Bunny's Enchanted line. I can't remember where I got the hangar, but have had it for a while now.
I made the flower using this tutorial from my friend Wendy. http://wendysscrappincorner.blogspot.com/2010/07/tutorial.html
I printed the quote in photoshop, which my cousin had originally used on one of the photos. I outlined it with Diamond stickles, and thought it was just PERFECT for these pics! "Give a girl the right shoes and she can conquer the world."- Marilyn Monroe

Saturday, May 19, 2012

A Mother's Love

I found this photo of my mother-in-law with her mom in a stack of old photos that my husband had. I've been meaning to scrap it for years, and thought Mother's Day would be the perfect time to do so. I assumed that my mother-in-law gave this photo to my husband, but she had never seen it. She did know that it was near the time that her mother had passed. Unfortunately, I never got the chance to meet my husbands Grandmother, but I know she was loved and very special. It was an honor to make this for my Mother-in-law, and I know she'll treasure it forever.
I made all the blue flowers, stamping some. I also stamped the floral border on the bottom. The background  started out as a light peach, before I added a mask, gesso, and some glimmer mists. I felt that these older BoBunny (Gypsy) pp's worked perfectly with this photo. I've been hoarding these papers forever, and only used them once before, so it felt good to play with this line. Here's a close-up of some of the flowers.
Here's a close-up of the stamped border.
Thanks for stopping by!

Wednesday, May 16, 2012

Pinkish Pleated Flower Tutorial

I'm back with another flower tutorial as promised. I made this LO for my mom for Mother's Day, of her mom back in the day. I'm entering it into quite a few challenges:heritage photo,distressed, and May Flowers at Scrapbook.com, embossing challenge at Funtoolas, scrap for help, pick your bouquet at Flying Unicorn, and the Paper Mixing Bowl.

Here was the recipe I used from the Paper Mixing Bowl.
Utensils:
*rub-ons/stamps-I stamped the chain link looking fence on the paper on the left. I also stamped and embossed the smaller flowers.
*Flowers-I made 3 different styles of flowers, and added 2 silk ones.So I guess I get brownie points.
*Paint or mist-I used paint and mist on the cardboard background, and an antique bronze glaze for the pearls and some of the flower centers.
*buttons-I used a couple of my Grandma's buttons on here.
*Weaving-I wove embroidery floss on the mini card that I made, which is tucked under the photo on the right.

Directions:
I used the inspirational word mother and made a mini folded card. Here's the inside of it.

For Funtoola's http://funtoolas.ning.com/forum/topics/may-embossing-challenge I embossed the small flowers and key.

The old envelope under the key was a requirement for Scrap for help, and I printed it from a list on their blog.http://scrapforhelp.blogspot.ca/ You also had to use something recycled, so  I used the cardboard and a brown shopping bag behind the photo, and for some of the small embossed flowers.

Now for the tutorial! Here's a close-up of the large flower I'll be making.

Supplies:
Cricut-Plantin Schoolbook cartridge
white cardstock
blending tool
Distressed ink pads (victorian velvet, aged mahogany, tea dye, and frayed burlap)
Scissors
glue
brad for the center

First cut your flowers with your cricut onto white cardstock at 4", 3", 2 1/2", 2", 1 1/2", and 1".
Then use your scissors to cut the ends of the petals so they're more natural and not so straight.

Using your blending tool, apply distress ink onto the flowers using tea dye, victorian velvet, and aged mahogany.
Using the largest flower, spray with water and fold in half. The water will react with the ink, blending the colors together.
Now just fold your petals like an accordian, back and forth. You might have to spray your petals again if they're not wet enough, but don't get them too wet cause they can tear or rip.
Carefully open up your flower. It should look something like this.
Then use your blending tool to apply frayed burlap distress ink onto the pleats that you just created.
Next shape your flower curling your petals out and down like this.
Now take the next 2 smaller sized flowers, and repeat the steps above, up until shaping the flower. This time you want to curl your petals up and  inwards like this.
Make the next 2 smaller sized flowers exactly like the large one, curling your petals out and down.
The smallest flower gets curled inwards. Glue all the layers together starting with the largest flower on the bottom. Add a brad through the center to finish it off.

You can make so many different variations of this just by changing the colors, and playing with your inks. I know I'll be trying it!