Saturday, September 29, 2012

Woodland Flower and Leaf Tutorial

This is the first photo that I've scrapped of our cat Spaz since she died almost 2 years ago. She lived a long 15 years, and was my husbands cat before we met. It felt good to scrap this photo of her for C.S.I. #38 and Once Upon a Sketch. I even managed to do another flower tutorial.

Here's a look at the case file and sketch.
Evidence I used:
*trees/branches which I cut with my Cricut (Serenade cartridge)
*Birds (I stamped the bird on the branch)
*Flowers 
*Newprint pattern (I used newsprint mixed with gesso, fibers, and mists behind the photo.)
*border ( I sewed around 3 layers of papers)
*Pet accent (Photo of my pet)
*Misting (The same paper with the newsprint and gesso was misted.)

Testimony I used:
*Document a pet
*Inspiration word daily


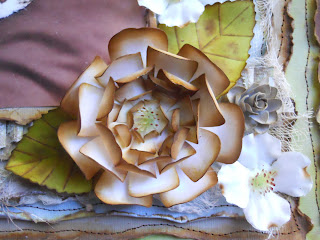
Here's a close-up of the flower and leaves I'll be showing you how to make.


I used the Mother's Day Bouquet cartridge for the Cricut to cut these out, but you can try this with almost any shape of flower or leaves. 
I started with white cardstock cutting flower #8 at 3 1/2", 3", 2 1/2", 2", 1 1/2", and 1".
Then using Distress ink (gathered twigs) and my blending tool I inked the edges front and back of all the flowers. You can use any color you'd like. 

Then quickly dip your flower in water and curl your petals up, using the heat gun to dry them.
Now just glue all your flowers together starting with the largest one on bottom.
You can use whatever you want for the middle, but I cut out the centers from the white flowers that I used on this page to give it a more natural look.
To make the leaves I cut out leaf #7 at 2 1/2" and 2 1/4".
Use your blending tool and whatever green Distress inks you'd like. I used bundled sage, peeled paint, and crushed olive.
Now turn your leaf over and use a stylus to create the vines.I started by making a straight line down the middle of the leaf using the ruler on my paper trimmer.
When you're done it should look like this.
Now use brown ink (I used gathered twigs) to ink the edges and lightly go over the vines.
Spray with water and heat with your heat gun to get the finished result. The heat gun will help curl your leaves a little.
Thanks for stopping by and enjoy your weekend!

Saturday, September 22, 2012

Mom's Birthday Card

I made this card for my Mom's birthday which was the 18th. Happy Birthday Mom!!!My inspiration for the colors came from sapphire, which is the birthstone for September.
I used this sketch from Cardabilities which is being sponsored by Flying Unicorn.
I cut out the perfume bottle using my Cricut (Summer in Paris cartridge). I embossed the top layer with gold. The bottom layer was cut with a clear transparency which I inked with alcohol ink. I made the blue roses using Gabrielle Pollaco's Rose Tutorial.I painted all the gold edges around the roses and pp's.The round chipboard image is an old vintage perfume label which I got from  Magic Moonlight.
Here's a close-up of the lacing and some of the misting and stamping I did on the lavender paper.
Thanks for visiting!

Sunday, September 9, 2012

Fall Train Ride

I'm already anticipating the start of the Fall season, which is my absolute FAVORITE time of year, as I've said many times before! So I created this Fall 2 Pager for a few challenges at Scrapbook.com.
 This was based off of this sketch for the September 2 Page Sketch Challenge.
I'm also entering this into the Feeling a Fall Trip Challenge, where I used the word Fall, some acorns, cranberries, and leaves. I used a ruler and ink to make the journaling lines, and stamped the leaf border for this Stamping Challenge.
Here's a close-up of some of the embellies and stamping.
Thanks for stopping by!

Tuesday, September 4, 2012

Tattered and Torn Flower Tutorial

I knew as soon as I saw these adorable photos of my cousin Regina's baby girl Callaia,  that they would be perfect for these new Kaisercraft papers (Charlotte's Dream Collection) that I won last month from Flying Unicorn! Besides being a new mommy, Regina's also a professional photographer, and her little model is just too cute!
I started with this beautiful sketch by my friend Amy (Amarilys) for Scrapthat.
I used 3 different border punches for a challenge at Funtoolas hosted by another scrappy friend Anna. I masked a doily with different mists, and hand stitched around it before adding Callaia's picture to it. I also hand stitched around the whole page using 4 different colors, as an example for the Sewing Challenge that I host at Scrapbook.com, with the twist to use lacing. I'm also entering this into the ABC Challenge at Scrapbook.com for the letters J (Jewels,my pearls) K (Keepsake, I used me and Regina's late Grandma's buttons), and L (lace, under the lacing.)

The flowers I made were inspired by the flowers on the paper. To make them you'll need white cardstock, distress inks (tattered rose and spun sugar), a blending tool, Glimmer Mist (Dazzling diamonds), and glue.

Directions:
Start by using your blending tool and covering your white cardstock with Distress inks in tattered rose and spun sugar. Then make a small dot with a pencil to mark the center of your flower. Now carefully tear petals around that dot. I tried to make 2 of the same size, but it's up to you how many layers you want and how big to make them.
Now spray each flower with Glimmer Mist ( I used Dazzling Diamonds), and lightly crumble them from the centers.
Open them up and shape however you want. I curled the petals of  my 2 largest flowers upwards, and the rest inwards.The smallest flower I left closed, but  curled one or two of the petals.
Now just layer and glue all of your flowers together. If you don't like the look, you can always reshape your petals until your satisfied. Here's a close-up of how I did mine. To make the cream flowers I used my blending tool and Distress inks in Antique linen and old paper.
They were a little time consuming, but I think they're worth it!  Thanks for visiting my blog!

Saturday, September 1, 2012

Spongebob Monopoly

I have to admit that when I first saw the recipe for September's recipe at the Paper Mixing Bowl, I was a little intimidated because of the main ingredient: popcorn (yellow). I'm such a color person, but yellow is definately at the bottom of my list. It's a good thing my son is such a Spongebob fan! I ended up having a lot of fun with this 2 pager I created!
Here's a look at the recipe.


Utensils:
Game related items or pieces- I think I got that covered. I scanned the board and cards from the game.
Splatters-It's hard to tell, but I made the yellow paper by inking 2 different yellow distress inks onto white cardstock and then splattering it with water. I wanted it to look like a sponge.
Repetitive shapes-I used squares and rectangles.
Doodling-I doodled the black wavy border.
Yellow+neutral- I used black as an accent color.
Mimic a game board-I scanned each corner of the game board and printed it out on photo paper at 4x6. Some of the edges didn't print out so I trimmed them just a bit and backed it with black cardstock. It left a small square in the center of my board, so I added my husbands picture there, since he was the winner.

Directions:
I journaled about a game. Here's what it says along the bottom, since it's probably hard to tell in the photo.

We have many different editions of Monopoly, including the Spongebob one, which was a Christmas gift for Logan. No matter what version we're playing, Trey always wins, like he did here.

Thanks for stopping by! Enjoy your weekend!

Thursday, August 23, 2012

The Golden Gate Bridge

I took this photo on a quick trip to San Francisco, CA with my dad to pick up his uncle at the airport when I was just 15. We were visiting my late Uncle Bob at the time who lived right outside of the city. This photo worked out perfectly for C.S.I.'s Case File #33!
Here's a look at it!
This is how I used the evidence:
*liquid medium-I used paint and glimmer mists.
*wood/woodgrain-The red and grey frames
*sand-like stuff-I embossed a sand like pattern onto the misted paper, and used actual sand inside the red frame.
*something shiny-I cut and embossed the silver anchor inside the frame.
*white background-My misted paper started out white.
*metal-The anchor
*create shadows-I used black soot distress ink and my blending tool around the frames, and to mask the compass.
*transparent-I used a clear plastic, which I stitched around the edges, to make a pouch for the sand and shells inside the red frame.
*triangles-I angled the red frame like a triangle.
*nautical elements-I cut the sailboat, ship wheel, and anchor with my Cricut (life's a beach cartridge).

This is how I used the testimony:
*document a landmark you've seen
*journaling strips
*I used the inspiration word light.
Thanks for looking!

Saturday, August 18, 2012

Wild Fire Flower Tutorial

I finally got a chance to play at Once Upon A Sketch for the first time! Even though I love their sketches, and even have some saved, I never actually played until now. We had to journal about a season, so of course, I picked fall, my absolute favorite!
I started by making my background paper with Glimmer Mists. I made the fence using my Cricut (Songbird cartridge). It came with a bird on top, which I cut off along with all the vertical pieces. I then cut 2 strips of brown paper for the horizontal  backing of the fence. I added a strand of beads, and masked the pumpkin along the left side. I also made the tree with my Cricut (October 31st cartridge), and the leaves and flowers were made using the (Mother's Day Bouquet cartridge). Here's the beautiful sketch I had to work with!
Here's a closer look at my tree.
I have hidden journaling on a tag behind the smaller flower.

I'm also entering this into the August Monochrome challenge at Scrapbook.com to use Wild Fire Orange, which was my inspiration for these flowers. They remind me of flames. Here's a close-up.
Supplies:
White cardstock, Cricut (Mother's Day Bouquet cartridge), distress inks, blending tool, glue, and water.

Directions:
Cut your flowers out of white cardstock using your Mother's Day Bouquet cartridge. I used flower #32 and cut 2 each at 2 1/2", 2", 1 1/2", and 1".
Now use your blending tool and distress inks starting with mustard seed, since its the lightest color. Then randomly add some spiced marmalade, ripe persimmon, and fired brick.
Spray with water and crumble them up from the center. Carefully open them and let dry or use a heat gun.
Now layer and glue your flower starting with the largest ones on bottom. Thanks so much for stopping by and all your sweet comments!

Saturday, August 11, 2012

A very merry unbirthday to me

Not only is it my unbirthday today, but it's also my 11th wedding anniversary to my husband! Before celebrating I wanted to share my latest page I created for C.S.I Case File # 31. Here's an old, old, photo of me at Disneyland riding the teacups.
I had so much fun with this case file, and just couldn't resist these bright colors!
This is how I used the evidence:
*liquid medium-I used glimmer mists on the doilies, distress ink and water on the teal paper, and paint, alcohol inks, and Glossy Accents on the teacups.
*repetition-I used repeating circles, flowers, lanterns, and teacups.
*Furniture accents-the lanterns and teapot.
*Circles-I based this whole design on circles which I stitched with my sewing machine. 
*Solid background-I used black and white
*parallel lines-I stitched lines on my lanterns to mimic pleats.

testimony:
*add something to the top of your journaling spot-I used the Cheshire cat on a branch. 
*Inspiration words-I used color and bright. Here's a closer look. 


And a closer look at the lantern.
Thanks for looking!Enjoy your weekend!

Monday, August 6, 2012

Clock Tower Flower Tutorial

I found these awesome photos of the Munich Glockenspiel that my late Uncle Bob took while serving in the army many years ago. They worked great for the August Monochrome Challenge at Scrapbook.com to use Cloudless Sky.
I started off with this beautiful sketch by Maggi at Flying Unicorn.
Then I took out my Gesso, brick stencil, masks, inks, stamps, embossing powders, paints. thread, and needle, to come up with this. I was inspired by seeing clock hands on someone else's flowers awhile ago, but can't credit them because I can't remember who or what blog I was visiting at the time. I tucked it away for later, and came up with these flowers.

Supplies:
White Cardstock
Cricut (Mother's Day Bouquet cartridge)
Glue
Clock hand stamps
Embossing Powder
Bling for the center
Distress Inks (Weathered wood, Stormy Sky, and Pumice Stone)

Directions:
Using your Cricut (Mother's Day Bouquet cartridge) cut flower #10 out of white cardstock at 1", 1 1/2", 2", and 2 1/2".
Use your blending tool to color your flowers using stormy sky, weathered wood, and pumice stone.

Using a spray bottle full of water, mist your flowers and scrunch them up from the center. 

Open them, respray, and scrunch. While your flower is still damp, lightly go over it with your pumice stone ink pad.
To make the clock hands I used this stamp that I bought at Michaels, but I know there's lots of different clock stamps out there. I just embossed it to give it more strength, before cutting it out. 
Now just layer and glue your flower starting with the largest flower on the bottom. Glue your clock hands on and then add a bling in the middle.
I made these in grey too, just using pumice stone and black soot. Here's a close-up of the masking, stamping, and bricks.