Sunday, November 18, 2012

Christmas Eve

I made this for the Little Yellow Bicycle Challenge at Scrapbook.com using these beautiful papers (25 Days of Christmas) that I've been hoarding for the last couple of years. It felt good to finally put a dent in them, and I still have a lot left.This is a photo I took of my little sister Irene and my Grandma Norton. I'm also using this as an example for the November Sewing Challenge that I host @ Scrapbook.com, with the twist of doing hand-stitching. I hand-stitched the red border and green blanket stitch.
I painted some of the edges of my papers gold and silver. All the papers are from Little Yellow Bicycle, except for the silver border outside of the green blanket stitching, and the black cardstock on the very bottom layer. I got the greenery at Michael's, and the red flowers from a RAK from Funtooolas. Thanks Cindy! I still have one more. 
Thanks for taking the time to stop by!
Drea

Wednesday, November 14, 2012

Where flowers bloom, so does hope

I made this as a gift for my Mother-in-law, who recently lost her sister. I took these photos of her garden during our last visit to her in 2010. I'm hoping she doesn't read my blog, since I still have to send it to her. I'm entering this into quite a few challenges.
Itty Bitty Challenge for Flying Unicorn
ABC Challenge at Scrapbook.com
P-Piecework-I made a quilt using up some scraps
Q-Quote "Where flowers bloom, so does hope." Author Lady Bird Johnson
R-Ribbon-I used ribbon that I tied in the corners.
S-Sewing-I machine stitched the quilt
November Multi Pic Challenge at Scrapbook.com
I used 13 photos.
Here's a close-up of the stitching.

I made all the roses using Gabrielle Pollaco's 3D Rose tutorial. Thanks for looking!

Saturday, November 3, 2012

Reno, Nevada

Happy Saturday!  I just wanted to share my latest LO with you done for a challenge at Flying Unicorn. The challenge is all about where you live, which gave me the perfect chance to finally use up my Reno paper that I bought years before even living here.
I made the tent from a scallop trimmer and cardstock, which I scored and folded down.
Here's some close-ups of the journaling.

Thanks for taking a peek! Enjoy the rest of your weekend!

Thursday, November 1, 2012

Snowy Woodland Flower and Leaf Tutorial for the Paper Mixing Bowl

I had so much fun working on the November recipe for the Paper Mixing Bowl! Here's my take on mashed potatoes and gravy.
Here's a look at the recipe.
From the utensils I used:
*Neutrals (white, brown, black, kraft)
*recycled elements- the cardboard which I covered with Gesso and Diamond dust.
*Elements from nature-The tree and flowers
*Use a stencil/mask/template-I used a Tattered Angels stencil to make the tree with Gesso and glitter.
*Use fibers-I LOVE using fibers on my pages and using them in different ways! After the Gesso and glitter dried on my tree, I glued down some white fibers to give it even more dimension. But I didn't stop there. I also added it to my flowers which I'll be showing you how to make.
From the directions I journaled about something I am thankful for, and about nature and the outdoors.
Now onto the tutorial. This is the snowy version of my Woodland Flower and Leaf Tutorial.

While first experimenting with this flower I made a glittery blingy one, but it didn't work for the LO I was working on. But I knew right away it would work for this snowy page. So gather your supplies. In addition to white cardstock and brown ink, you'll also need some Gesso, glitter or Diamond Dust, a popsicle stick, bling, and this white fiber I bought at Michael's. 
Follow all the steps of my Woodland Flower Tutorial, inking both sides of your flower, and curling the petals up after wetting.
Once dry, apply Gesso using your popsicle stick onto the white parts of your petals. Immediately cover with glitter or Diamond Dust while the Gesso is still wet. Then shake off the excess and add it back to your bottle.

To make the centers, I snipped off about 6 small strads of the white fiber and glued it into the middle of the smallest flower. Then I added my bling on top.

After gluing all the layers together your flower should look like this.
To make the leaves refer back to my Woodland Tutorial but ink your leaves with gathered twigs and brushed corduroy.

After creating the veins with a stylus, ink them and the edges of your leaf with walnut stain.
Wet them with water and dry with your heat gun. You don't have to use your heat gun but it gives a nice curl to your leaves if you do.
Now cover parts of your leaf with Gesso and immediately add glitter or Diamond Dust.
Assemble your leaves under your flower and your done. I hope you enjoyed this tutorial as much as I enjoyed making it!

Monday, October 29, 2012

Coffin Break

Wow! Halloween is just a few days away! I scrapped these photos of my son from LAST Halloween using the sketch for the 2 Page Sketch Challenge at Scrapbook.com. I'm also entering this into the October Fall Challenge at Funtoolas. At first I was fighting the colors and pp's out of my Halloween stash, but once I went  with the Fall colors and leaves, it started to come together.
Here's the sketch I used.
Here's a close-up of the title and journaling. I cut the tombstone and arm using my Cricut (October 31st cartridge).

I drew the spider web and then stitched over it, before adding some spider stickers to it.
Thanks for stopping by, and have a SPOOKTACULAR Halloween!!!

Friday, October 12, 2012

Salvador Dali

I couldn't pass up on the art challenge at Flying Unicorn this month. I've always been into art and studied it at home and school growing up. The hardest part of this challenge for me was picking a favorite artist, but I went with Salvador Dali, the Spanish surrealist, since he's also my husband's favorite, and we have some of  his prints on our walls.
I choose this work of art, The Disintegration of Persistence of Memory, because it's one I don't have, and I love all the clocks and bricks. While working on this I found out that this was Dali's recreation of his famous Persistence of Memory, which I also printed out to scrap in the future. In this version the landscape has been flooded with water. I love the way Dali's crazy mind worked, and the hidden images that can be found in his art! He was eccentric and highly imaginative! I found the melting clocks on-line and printed them out, and stamped and masked the other clocks.
I drew and cut out the tree.
I used my Prima brick stencil to make the outside border, which I drew and cut. Then I used it with gesso and paints to make the bricks coming up from the photo. I've also used brick stamps on here.

I made all the flowers using my Clock Tower Flower Tutorial. I had so much fun working on this piece, that I can't wait to do another!!Thanks for stopping by!!

Thursday, October 4, 2012

Something Wicked

I've always wanted to make an all black layout, so when I saw that one of the colors for the October Monochrome Challenge at Scrapbook.com was black, I got right on it. I even did the twist and used feathers. I took this photo last Halloween while trick or treating with my son. I used Bo Bunny's Enchanted line and dyed some cheesecloth black to cover it all.

This page was inspired by the Mojo Monday Sketch at Flying Unicorn.
I made all the flowers using Gabrielle Pollacco's 3D Rose Tutorial, and my Wild Fire Flower Tutorial using black cardstock and spraying with Dazzling Diamond Glimmer Mist.
It's probably hard to tell, but there's 4 bats on here which I fussy cut and covered with black stickles. The skull was stamped and embossed. Thanks for stopping by!

Monday, October 1, 2012

Jack Jack-O-Lantern for the Paper Mixing Bowl

I had SO much fun with the October recipe for the Paper Mixing Bowl!! Here's my interpretation of pumpkin pie, using pumpkin (orange) as the main ingredient.
I started by drawing the white lines on the black background paper. Most of the papers are older Basic Grey from different collections. I couldn't help but think of my good  friend Jon while working on this, since he's OBSESSED with this movie! Lol! I hope I did it justice.

Here's a look at the recipe.

This is how I used the utensils:
*Carve something (I fussy-cut the purple hill)
*Disguise something ( I inked the flowers which I made myself  using my Beachy Green Flower Tutorial. By experimenting with different colors of inks you can get such different results.)
*Catch something in a web ( I masked mine)
*Go batty (I stamped them, and used a pp with bats)

For the directions I used Halloween in my journaling. 


Here's a close-up of the masking and the little bottle of poison that I made using my Cricut (October 31st cartridge). I covered the bottle with Glossy Accents, and used some green ink to create smoke coming from it. 

Thanks for visiting me!!!

Saturday, September 29, 2012

Woodland Flower and Leaf Tutorial

This is the first photo that I've scrapped of our cat Spaz since she died almost 2 years ago. She lived a long 15 years, and was my husbands cat before we met. It felt good to scrap this photo of her for C.S.I. #38 and Once Upon a Sketch. I even managed to do another flower tutorial.

Here's a look at the case file and sketch.
Evidence I used:
*trees/branches which I cut with my Cricut (Serenade cartridge)
*Birds (I stamped the bird on the branch)
*Flowers 
*Newprint pattern (I used newsprint mixed with gesso, fibers, and mists behind the photo.)
*border ( I sewed around 3 layers of papers)
*Pet accent (Photo of my pet)
*Misting (The same paper with the newsprint and gesso was misted.)

Testimony I used:
*Document a pet
*Inspiration word daily


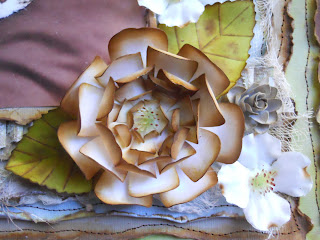
Here's a close-up of the flower and leaves I'll be showing you how to make.


I used the Mother's Day Bouquet cartridge for the Cricut to cut these out, but you can try this with almost any shape of flower or leaves. 
I started with white cardstock cutting flower #8 at 3 1/2", 3", 2 1/2", 2", 1 1/2", and 1".
Then using Distress ink (gathered twigs) and my blending tool I inked the edges front and back of all the flowers. You can use any color you'd like. 

Then quickly dip your flower in water and curl your petals up, using the heat gun to dry them.
Now just glue all your flowers together starting with the largest one on bottom.
You can use whatever you want for the middle, but I cut out the centers from the white flowers that I used on this page to give it a more natural look.
To make the leaves I cut out leaf #7 at 2 1/2" and 2 1/4".
Use your blending tool and whatever green Distress inks you'd like. I used bundled sage, peeled paint, and crushed olive.
Now turn your leaf over and use a stylus to create the vines.I started by making a straight line down the middle of the leaf using the ruler on my paper trimmer.
When you're done it should look like this.
Now use brown ink (I used gathered twigs) to ink the edges and lightly go over the vines.
Spray with water and heat with your heat gun to get the finished result. The heat gun will help curl your leaves a little.
Thanks for stopping by and enjoy your weekend!