Tuesday, March 26, 2013

BOAF March Sketch

   Even though I scrapped these photos before in a 2 pager, I decided to use them again for the March Sketch Challenge at Birds Of A Feather.  I  used Bo Bunny "Serenade" papers. I cut up an old burlap rice bag that my Mom picked up for me at either a thrift shop or garage sale, and used it behind the striped paper. Thanks Mom!

   Here's the beautiful sketch that I worked with.

    I made the small yellow flowers using my Mini Wildflowers Tutorial. The large yellow flower was made from leftover scrap flowers that I had, and the red one was an old  hand made leftover. I stamped the black swirls and ivy, the date, and the title. Here's a close up.


Thanks for your visit!
Drea

Saturday, March 23, 2013

More with the March Kit ~ BOAF

   I just want to share some more projects from me working with the March Kit from Birds of a Feather. The first one is this layout I made with photos of my sister and her boyfriend. I used more of the Little Yellow Bicycle "Just because" collection.
I love these chipboard frames!!

For my next project I made a thank you card for my Mother-in-law also using LYB.

   Then I wanted to do something more masculine, so I made a birthday card for my Dad using Teresa Collins "Stationary noted" collection. I stamped the candles, greeting and date. The paper clips came from my own stash. I also stitched a pocket which could be used for cash or a money card.
   This kit really is so versatile, and you could go really feminine or masculine with it, as I just showed with these 2 cards. I've also done LO's from Thanksgiving,The 4th of July, and a birthday celebration.Thanks for looking!

Thursday, March 21, 2013

Le Cirque

   I finally dove into these Graphic 45 "Le Cirque" papers that I've had for awhile now. Originally I was going to print all of my photos in black and white, but realized the colors in the photos matched the papers pretty well, so I left them alone, with one exception. The family photo on the right of me, my husband, and son, was altered in Photoshop to make the sign behind us sepia, instead of white, like it was originally.

   I doodled the black lines around the banner after distressing the edges. 


   This was based on the sketch for the 2 Page Sketch Challenge at Scrapbook.Com. Thanks for stopping by!


Saturday, March 16, 2013

March Kit Reveal ~ Birds Of A Feather

   It was SO exciting receiving my first kit from Birds of a Feather! What better way to express that, than with this layout I created using the Little Yellow Bicycle "Just Because" Collection.
   I used Distress Inks around the border with my blending tool, and added some splashes of water along the edges.Then I stamped the banner using a stamp of an upside down party hat. I LOVE the banner on top which comes in the canvas stickers with extra embellishment 1,along with the blue chipboard frame! I mimicked the stitching on the paper with real machine stitching in red along the left.
   I also stamped the cupcake.

   For this next page I used Teresa Collins "Stationary Noted" Collection using this photo of my parents from last 4th of July. The grey cardstock with the punching was part of my own stash, and I added silver embossing powder to the edges.
   These little birds from Maya Road are so cute! I used the dark grey cardstock that comes with the extra cardstock to make the branch which I cut with my Cricut "Home Decor" cartridge.
   All of the patterned papers on here came with the extra Patterned Papers.I applied Gesso and Silver Glimmer Mist to the "Poppies" paper from Teresa Collins. I loved the back so much, which is I why I did some heavy water distressing, so you could see it! The silver heart comes with the chipboard  with extra embellishment 1.
   I also added some lacing and beads. The red flowers were my own,  but I added some of the different brads that come with the kit to them.
   Thanks so much for taking a peek!
Drea

Friday, March 15, 2013

March Recipe for the Paper Mixing Bowl

For those of you who don't know we've moved our reveal day to the 15th of every month, instead of the 1st, at the Paper Mixing Bowl. The March recipe is now posted for some Corned Beef and Cabbage, just in time for St. Patrick's Day. Here's my untitled take using photos of my sister and her boyfriend in Ireland, which I've put in a shadow box for them.
Here's a look at the recipe and how I used it.
Utensils:
*Small photos
*Irish lace-I used a lace pp from Basic Grey.
*The Emerald Isle (Predominately green, which is my favorite color)
*Pot o' gold-I just used a few touches and painted the outside of the lace paper, and used a gold button.
*I stamped the brown flowers

Directions:
I chose to keep this untitled and didn't use any journaling. I just love that this is now optional!

I used Photoshop to edit my photos making everything except for the cliffs, black and white. I wanted to keep everything as green as possible, and didn't want the blue sky or sea showing. Then I recycled some cardboard which I painted in black, brown, and various greens.

I stamped the brown flowers and made the dark green ones using my Wild Fire Flower Tutorial. I hand-stitched the black flourish on the bottom. I also used some cheesecloth sprayed with Glimmer Mists to add to the whole background.

Thanks for looking!
Drea


Tuesday, March 12, 2013

Clear Jar/Vase Tutorial for BOAF using the March Kit

   I'm so happy to share my first page and tutorial for Technique Tuesday at  Birds of a Feather using the March kit. I was inspired by the jar in the Little Yellow Bicycle (Just Because Collection)  and wanted to make my own to use as a vase for the chipboard flowers, which came in the extra embellishment 1, along with  the bird on the tag, the silver heart, and so very special banner.
I edited this great photo of my Grandma in Photoshop to make the background black and white, instead of brown and beige,which worked much better with these colors. I wove some on the LYB papers and hand-stitched along the borders. The white scallop border is a canvas sticker, also part of the extra embellishment 1.
I just love this lace which comes in the kit!

To make the jar with water you'll need the following supplies:
*Clear transparency or any clear packaging.
*Black extra-fine Sharpie
*Scissors
*Glue Gun
*Glossy Accents
*Distress Ink (broken china) or alcohol ink in light blue.I'm sure you could also use paint or mists.
*Alcohol Blending Solution
*Make-up sponge

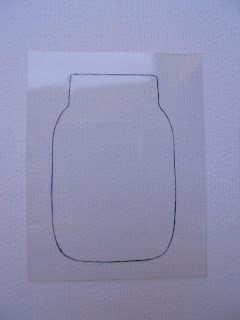
I started by drawing this basic photo of a jar using  my Sharpie onto the clear transparency . Feel free to copy mine if you want.

Cut out your jar trying to keep your scissors on the inside of the jar, so you don't see any black lines around the edges.

Now make 3 lines going across the top of the jar using the glue gun. I have a low-temp mini one which worked well with this. I had to do this a few times and actually cut up a few more jars just to get it looking straight.

Use Glossy Accents by Ranger and apply all over the jar and in between the glue gun lines.Wait a few hours or overnight for the glue to completely dry. I actually messed this one up by not waiting long enough and smudging it with my glue bottle. Once it's completely dry turn it over and apply the ink and blending solution using the make-up sponge to create water. You could also try a light blue paint, mist, or vellum.

I used this white doily from my own stash to put my jar on, gluing it down with some dabs of Glossy Accents. But first I drew the flower stems, and hand-stitched them using silver thread.Don't forget to add these cute chipboard flowers to your stems!
If you don't want a jar with water, you could keep it clear and fill it with marbles, ladybugs, or candy instead. Play with the size and make it really big. The possibilities are endless!
Drea

Friday, February 22, 2013

I'm a Scrap Chick!

I'm so excited to reveal to you that I was chosen to be a Scrap Chick at Birds of a Feather! I can't wait to get my hands on the first kit and start creating!!! I'm also hosting my first challenge there for the Lovebirds Crop happening this weekend.

For my challenge I chose this older Pagemaps sketch.
 
I scrapped these photos of my 2 loves and Valentines, my husband and son!

I just LOVE this cute mailbox! I stamped the lettering behind it on the "love" note.

Thanks for dropping by and sharing in my wonderful news!

Tuesday, February 19, 2013

Garden of Grandchildren

   Remember a couple of posts back I mentioned going through and scanning some of my Grandma's old photos? Well this is one of them. I scrapped this photo of my Great Grandma Dale with my Dad and his siblings when they were kids. I love the colors in this photo and thought they'd go well with these beautiful Prima papers (Firefly Collection)!
I made this for the Four Categories Challenge at Scrapbook.com for category 3 to use misting or painting with masking for the twist. I started by masking a Prima floral frame that I sprayed with Glimmer Mists (Blarney, Cranberry Zing, and Black Cherry). I made the leaves with my Cricut (Life is a beach) cartridge. The pink and gold button on the bottom flower I inherited from my Great Grandma, and had to put it on here. It's one of my favorites!
Thanks for looking!
Drea

Friday, February 15, 2013

I love a good mystery~The Paper Mixing Bowl

It's our new reveal day at the Paper Mixing Bowl, and we have a brand new challenge and recipe for February. Here's my take on red velvet cake.
Here's a look at the recipe and how I used it.
Utensils:
*I used layers
*Frosting ( I used gesso on the cream Bo bunny pp)
*2 is better than 1 (I used more than 2 flowers and puzzle pieces)
*Spill something ( I have a coffee stain on my background paper, but I think it's hidden now. )
*Hearts and flowers ( I have a chipboard heart in my title and used 4 different flowers)
*Multi-photo ( I used 11 photos of some of my favorite books)

Directions:
I used love (my heart)  in my title as a journaling prompt.I'm also using this for the Four Categories Challenge at Scrapbook.com  for category 4 with the theme I love ..... and the twist to use a heart. I made a bookmark for my journaling.
I started this page by making a book, which is stamped and painted.It's hard to tell from the photo, but I painted the sides of it gold, and made the cover to look like red leather.  I also stitched a line down the center. I made the magnifying glass out of gold paper, ribbon, and Glossy Accents. It was fun to make!
The white flowers were a RAK from Funtoolas which I covered with red paint. I made the cream and brown flowers using this tutorial for Sugarplum Flowers  by Vicky Alberto.
Thanks for stopping by and for all the sweet comments!
Drea

Thursday, February 14, 2013

Sew Crafty

   Happy Valentine's Day!!!I just came across this old photo of myself while going through my Grandma's old photos. I lucked out and found all kinds of neat pictures, which I already scanned and saved on my computer. Among other things I was most excited about getting my Grandma's button collection, to add to the other vintage buttons that I inherited from my other Grandma and my Great Grandma. I had to use them right away and thought this photo and new line from Basic Grey (Lucille) would work well together.
I'm entering this into the 4 Categories Challenge at Scrapbook.com for category 1 to use buttons and to stitch them down for the twist. Here's a close-up of some of the buttons and these cute little patterns that I've had for awhile now.
I used a Prima mask and gesso on the background. The flowers were all handmade and leftovers I had from other projects. The pink ones were made using my Tattered and Torn Flower Tutorial. The blue roses were made using Gabrielle Pollaco's 3D Rose tutorial. I also got the white lace trim from my Grandma. I machine stitched the blue background paper and hand-stitched the red zig zag on the photo.
Thanks so much for looking!
Drea

Tuesday, February 5, 2013

Once upon a time

Sorry I haven't posted in awhile. I've had a lot going on, and have been working on things that I can't post yet. But I just finished this wedding page I did of me and my husband from 11 1/2 years ago. Our love has only gotten stronger since then and I'm so happy to have him in my life!
This was based on this month's sketch at Once upon a sketch, with love for the theme.

For the journaling I used the front of a wedding card that we received from my parents, and cut it into strips.

I also saved the silk flowers which I used here from our wedding day. I made the bling flourishes using liquid pearls (baby blue).

This is my example for the sewing challenge that I host at Scrapbook.com with the XOXO twist to stitch a circle and X's.  I hand-stitched the circle with black embroidery thread, and a baby blue for my X's. I'm also entering this into the Four Categories Challenge at Scrapbook.com for category 2 to use black and white with one other color, and the twist to use flowers. Thanks for looking!!
Drea

Tuesday, January 15, 2013

The Perfect Snowball~The Paper Mixing Bowl

   We've made a few changes at the Paper Mixing Bowl, starting with the dates for the recipes to be due. Our new reveal day is now going to be on the 15th of every month. You still get a month to cook something up with us though. Here's my take on Sushi.

From the utensils I used:
*Splash (Wet medium)- I made the background using mists and paint.
*Metallic elements-I have some silver snowflakes
*Stitch it up-I hand stitched the circle with the title in it.
*Bling it on- I used bling in the centers of some of my snowflakes
*Rolled paper-I rolled the edges of my papers

From the directions I didn't do anything, since it's now OPTIONAL if you want to journal. Great new changes!!

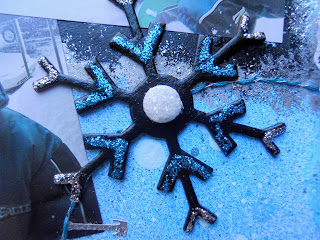
 Here's a close-up of some of my techniques. I used paint, stamps, stickles, and alcohol ink here.
I wasn't sure about the black snowflakes at first, but now I love them! It's my something unexpected for the Winter Wonderland Challenge at Flying Unicorn.
Thanks again for stopping by!
Drea