Saturday, September 28, 2013

4th Grade

Even though my baby is a big 6th grader now, I still have lots of his old school pics to scrap, which I did with this page of his first day of 4th grade.

I was inspired by this awesome sketch, used for the September Sketch Challenge @ Scrapbook.com. I love it so much, I'm sure I'll use it again!

I started by dripping some Distress re-inkers down my page, in black soot and shabby shutters. I used a lot of old stuff on here, recycling some black mesh that probably came from some fruit, the notebook paper, which also got inked, and a soda can tab, which was the challenge at Scrap for help. I attached the soda tab to my large tag, and then tied fibers through it. Even the stickers, fibers, pp's, and especially the apple brads are very old supplies, making it all the more fun to play around and get messy with. After my drips dried, I stamped the brick pattern randomly around the page.

Here's a closer look at the mesh and rulers.

Thanks so much for stopping by!! Have a GREAT weekend!!!


Monday, September 16, 2013

Happy Birthday Beth!

Happy birthday to my beautiful Sister-in-law Beth!! I made her this card and then sent it to her old address. Oops!! I feel soooo bad!  I'm hoping she still gets it, but if not, then I'm really glad that I snapped this  photo before mailing it.

I used  the Dear Lizzy "Lucky Charm" collection from my leftover June Kit from Birds Of a Feather. I stamped the cupcake and "happy birthday", and hand stitched the line along the chevrons. This is my take on sketch #2 for the September Card Sketch Challenge @ Scrapbook.com.

Thanks for looking!

Monday, September 9, 2013

My hair fairy

I'm so thankful for the personal hair fairy that I had on my wedding day! My younger cousin Ashley, spent hours doing my hair and soothing my nerves.  I was so happy with the results, and all of the ribbon and bling that she added!


I was immediately drawn to the black and white colors on September's mood board at Scrap Around The World, and the beautiful sketch!!!

The painted zebra face is what inspired this Dusty Attic chipboard garden fairy, that I painted in black and white. And what's a fairy without some star dust Stickles? I painted the scroll piece from Imaginarium Designs a shiny black.

I started this page with a sheet of white cardstock, which I stamped all over using 2 different stamps, using 2 different black inks. Then I finally played with my new Prima mask, and used my blending tool and Distress Ink (tumbled glass) to complete the background. The edges were cut with some decorative scissors, inked with the same tumbled glass along the back, and water distressed. I applied it to a shiny black specialty paper, but it's kinda hard to tell in these photos. Then I got to work on my doily, which was made by applying Gesso onto black cardstock using my doily stencil by Pink Paislee. While it was still wet I added some white glitter to it. After it completely dried, I cut it in half and used it in the corners. I stamped and embossed all of the flowers, except for the 2 all white Prima ones.Those also got a sprinkling of star dust Stickles. The beautiful butterflies were part of a fantastic RAK from Renea Bouquets! Thanks Renea!!
This is my entry for the September 5 Ingredients + Yours Challenge at Scrapbook.com to use
1.white
2.leaves, (which were actually from my wedding)
3.something smeared (which is my Gesso and Stickles)
4.one photo
5.chipboard
It's also my entry for the September 4 Categories Challenge for category 3, to use handmade embellies, which are my flowers, doilies, and the twist of using a past technique, which is painting, recycling (my leaves), embossing, and stamping.  I hand stitched the black flourishes and scallops for my example for this months Sewing Challenge that I host, with the twist to use beads.

Thanks for stopping by!

Wednesday, September 4, 2013

Live Life Beautifully

Happy hump day!! I'm here to share my latest LO with you of some old photos of me and my Uncle, who unfortunately passed away a couple years ago. I was very close to him ever since I was young and cherish every memory I have with him!!

I did this for quite a few challenges at Scrapbook.com, starting with the September PageMaps Challenge, using sketch #1.

This is also my entry for the Bo Bunny Flower and Brad Challenge, to use at least 50% Bo Bunny products, and at least 2 photos, 1 flower, and 6 brads. I used the Weekend Market line, which is most of the papers, except for the light blue cardstock in the background, and the woodgrain paper, which I've had forever. The brads were brown but I painted them gold. I used exactly 10 of them to get the twist in for the September 4 Categories Challenge for Category 1 to use brads. I used 4 large ones on the Be You tag, and the rest on the suitcases, which were fussy cut, and stacked.

This is also my example for the Stamping Challenge that I host, with the twist of stamping text and numbers. I stamped the post card, text under the title, the postage mark on the right, some numbers and more postage marks over the brown flower, and the date on the Remember tag. My Uncle and I used to write letters to each other when I was younger, so it was important to me to include the post card and postage marks.
Thanks for looking!

Friday, August 30, 2013

Fishville Flower Tutorial

Happy Labor Day Weekend!!! Before searching out some sales and spending time with family, I wanted to share my latest work with you, including another flower tutorial.

These gorgeous colors were inspired by the August Design Seeds Challenge at Scrapbook.com.I did the twist with my distressed sharp corners. It's also my entry for the August 5 Ingredients Challenge to use
1.teal
2.patterned paper background
3.buttons
4.2 photos
5.paper strips

I used foam Thicker's for the title and shaded the bottom alphas with Distress Ink (peacock feathers and spiced marmalade).

To make my paper strips I started with a sheet of white cardstock, which I misted with Glimmer Mists (Bahama blue, Valencia, It's black,  and dark purple), and Lindy's Stamp Gang Mist (Tibetan Poppy Teal). After it dried, I tore the strips and used water to curl the edges over. Then I applied Stickles (mermaid) over the strips to make them sparkle. After layering them together I glued down some fibers and yarns to give them even more texture.

While going through my stash of handmade flowers, I found the perfect one with the top smaller one next to the title. There's so many fun color choices you can make with these, that I decided to make some more to share with you!

I started by cutting some flowers out of white cardstock using my Cricut (Storybook cartridge). Make sure to use the shadow feature and the shift button before pressing S, which will say hibiscus. Cut one at 3", 2", 1 1/2", and 2 at 1".

Using some scissors, cut the stems off.

Pick 3 different inks and use your blending tool to apply them to your flowers. I used spiced marmalade, peacock feathers, and evergreen bough).

Then wet your flowers and scrunch them from the centers.

After opening them up I shaped the petals towards the middle. For the bud I scrunched my smallest 1" flower and opened up a petal or 2 to fold over. It's kinda hard to explain so I hope you can tell from the photo.

Starting with the largest flower on the bottom, layer and glue the rest of your flowers. Cut the middle bud a little at the end, before gluing in the center of your flower.

Your flower should now look like this. If you want to give it some shimmer like I did, then just add some Glimmer Mist (dazzling diamond).

The flower on top was made the same way, except I switched the orange marmalade out for dusty concord instead. I'm sure you can come up with a color combo that'll be just right for your page!

As always, thanks for stopping by!

Monday, August 26, 2013

Tiny the Turtle

Happy Monday! I hope everyone had a great weekend! I just want to share  this page that I made for my Aunt who is recouping from surgery. She's a little obsessed with turtles and has real and fake ones all over her house. So I decided to scrap this photo of one of her real turtles named Tiny.

I was inspired by the bonus sketch for the August Monthly Sketch Challenge at Scrapbook.com.

I started with this very old grass paper that I've had since I first started scrapping. I had to use it here though, and mixed it with some Tim Holtz "lost and found" papers. After inking and water distressing the edges, I also machine stitched around them, using different colored green threads. I created a shell texture with some gesso, inks, and mists near the flower and top right side by the grass. The title was made from some old green alpha stickers that I covered with embossing powder. The small flower was leftover from my handmade stash, and I paired it with a leaf to cover the twist for the 4 Categories Challenge at Scrapbook.com, for category 2, to use mostly green and at least one leaf.

I got the large flower from my dear scrapping friend Anna C.  It was an off white but I sprayed it with some Glimmer Mist (forest green) and Lindy's Stamp Gang Mist (mystic malachite) to match the greens. Thank you Anna!! Then I just added some grass behind it. Thanks for looking!

Thursday, August 22, 2013

Fishing on Father's Day

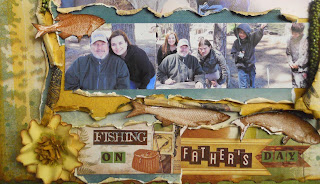
Now that this hectic month has finally settled down a little, I was able to play with my new Bo Bunny "Trail Mix" collection. This is my new favorite line from them at the moment, and love how it looks with these photos from Father's Day a couple of years ago. I just want to point out that I didn't do any fishing here nor do I ever! Lol!

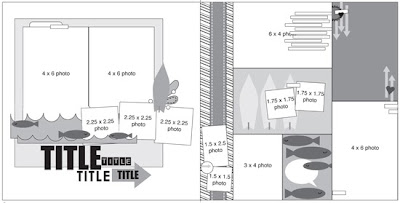
This is based off of this fun and creative sketch, done for the August Sketch Challenge at Scrapbook.com.It is also my entry for the August Color Challenge to use yellow, green, and brown with the twist of using nature photos. 

I started by masking the trees in the background using some mists. I inked and water distressed all of my edges. I used the cardstock stickers to make my title and for the journaling stips on the right. The fish were cut out from pp and then applied with Glossy Accents to make them shiny.
The flowers were left over's from my handmade stash that I altered a bit from the original. I thought I had made a tutorial for them, but I guess not, since I couldn't find them. The green Petaloo vines were a RAK from Flying Unicorn. Thanks Alda! 

And thank YOU for stopping by!

Friday, August 16, 2013

My final reveal for BOAF

It has been such an honor to design with the fabulous kits that Amy puts together for BOAF! Even though my 6 month term is almost up, I still have soooo much product left from all my previous kits, that is sure to keep me busy. I did this 2 pager using the Glitz design "color me happy" collection and the cardstock that comes in the main August kit and the extras.

I started by tracing and cutting out the yellow and green scallops from the cardstock. Then I used my Cricut Expression to cut out the white m's. I altered the black Thickers with some white paint and used an old m&m sticker for the center of the O. 

The stickers were just perfect for these photos and were the only thing that I added here from my own stash. 

I love this peekaboo which I used to cover part of the photo!  

For my next LO I used the Simple Stories "I heart Summer" collection. My son's favorite season is Summer, so I had to use this photo of him getting out of the pool from a couple of years ago. 

I cut out a frame from the I heart Summer paper and distressed the inside edges. I used the I heart Summer banner to cover the sentiment on the Pebbles Inc. library cards/pockets, and layered 2 of them before adding some stickers that you can buy with the extra embellishments. The yellow glittery buttons were leftover from the July Kit and made the perfect addition to my sun.

I used some Glitz washi tape, which unfortunately is sold out, and paired it with the fun strips of tape stickers from Simple Stories.I also used Smooch for the first time and used it to color the hearts a sparkly red, but it's kinda hard to see here. 

I finished it off with some black stitching all around the photo. Thanks so much for looking!