Showing posts with label Misting. Show all posts

Thursday, January 14, 2016

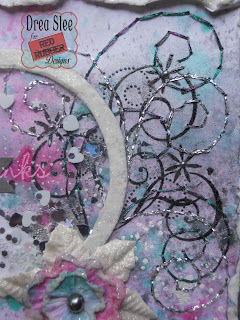
Many Thanks Shaker Card ~ Red Rubber Designs DT

     I'm ringing in the new year with some new products, and a new technique, with my very first shaker card! I had so much fun with this, I'm actually working on another one now!


      I've combined lots of misting, stamping, and hand-stitching on this card that I made for my in-laws! For details, and to see the whole card, please visit the Red Rubber Designs Blog!


   **************************************


Sunday, December 22, 2013

Winter White & Gold Flower Tutorial

Season's Greetings!! Somehow, in between wrapping presents, shopping, and everything else,  I managed to create this page that's very dear to my heart.

I was instantly inspired by this GORGEOUS sketch from Alda for Mojo Monday @ Flying Unicorn!

I started by using some old vintage sheet music, which I tore and then painted the edges gold. I masked the tree onto it using Glimmer Mists (Forest Green and Snowy Pine). Then I used gesso to make the dots, applying Diamond Dust to them while they were still wet. I finally used my new Martha Stewart snowflake and flourish border punch set, which I  made sparkle by spraying some Glimmer Mist (Dazzling Diamond) on it. I also punched the green pp and around the big doily for the Punch Fun Challenge @ Scrapbook.com, where we also had to use 2 or more photos and 2 or more lines of journaling. I made a scroll for my journaling and tied it with some gold ribbon.

Here's what it looks like when unrolled.

This is also my entry for the December 4 Categories Challenge @ Scrapbook.com for category 1, to use doilies. The small gold one was stamped and embossed. 
I got the gold flower awhile ago from Michael's, as well as the greenery and red berries. I made the white flowers and will be showing you how I made the larger one. 

Supplies:
Cricut (Mother's Day Bouquet cartridge), white cardstock, glue, gold paint, pearls or bling for the center, and Glimmer Mists (Iridescent Gold and Dazzling Diamonds).

Directions:
1. Using flower #7 on the Mother's Day Bouquet cartridge for the Cricut, cut out 2 from white cardstock at 2 1/2".  Then cut one out at 2".

2.Use a dropper to splatter on some Glimmer Mist (Iridescent Gold).

3. Paint the edges gold. I did this very sloppy for a more distressed look. 


4.Now curl all of your petals up and over like shown in this photo.

5. Layer and glue your flowers together with your smallest one on top.

6.Now spray your whole flower with Dazzling Diamond Glimmer Mist for some extra shimmer. Then I used these Prima pearls for the center.


Here's the other one that I did using a white half pearl in the center, and surrounding it with smaller gold ones. But I really love the large antique pearl button on the left that I inherited from my Great Grandma Dale.

Thanks so much for stopping by, and have a wonderful Christmas!!

Saturday, October 26, 2013

Devil's night

With Halloween less than a week away now, I decided to scrap my photos from last year. I struggled a bit with choosing what papers to pick, since my son's red devil costume kept throwing me off. But I finally settled on some old Basic Grey (Indian Summer) and some red papers from even older lines, and this is what I came up with.

My starting point was this AWESOME sketch for the October 2 page Sketch Challenge @ Scrapbook.com. Isn't it cool? I'm sure I'll use it again!

I also wanted some flames on here, so I drew and cut out my own flame stencils, and used them with some Glimmer Mists on white cardstock. The tree on the left was cut out with my Cricut Expression (October 31st) and masked with some black Glimmer Mist. I inked the title with  Distress Inks (festive berries, spiced marmalade, and mustard seed) after cutting it out with my Cricut (Storybook) cartridge.


I used the same Martha Stewart border punch (Garden rail) on both pages, and finished it off with some hand stitching along the right.

Thanks for looking!

Thursday, August 22, 2013

Fishing on Father's Day

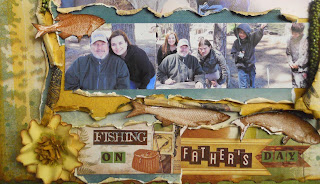
Now that this hectic month has finally settled down a little, I was able to play with my new Bo Bunny "Trail Mix" collection. This is my new favorite line from them at the moment, and love how it looks with these photos from Father's Day a couple of years ago. I just want to point out that I didn't do any fishing here nor do I ever! Lol!

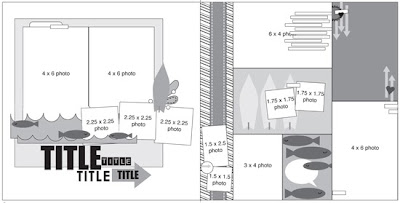
This is based off of this fun and creative sketch, done for the August Sketch Challenge at Scrapbook.com.It is also my entry for the August Color Challenge to use yellow, green, and brown with the twist of using nature photos. 

I started by masking the trees in the background using some mists. I inked and water distressed all of my edges. I used the cardstock stickers to make my title and for the journaling stips on the right. The fish were cut out from pp and then applied with Glossy Accents to make them shiny.
The flowers were left over's from my handmade stash that I altered a bit from the original. I thought I had made a tutorial for them, but I guess not, since I couldn't find them. The green Petaloo vines were a RAK from Flying Unicorn. Thanks Alda! 

And thank YOU for stopping by!

Thursday, August 1, 2013

Everlasting Love

I just LOVE this old photo of my grandparents, and decided to use it as my example for the monthly Stamping Challenge that I host at Scrapbook.com. My Grandma recently passed away, but I'm comforted with the thought of her being with my Grandpa again. I love and miss them both SO much!!

I started with some Kaisercraft papers and misted a doily stencil on the top left
.
I fussy cut some of the flowers, wetting them and letting them air dry to give them a little dimension. I stamped the diamond grid under the flowers and the frame along the top right of the photo. I did the twist for the month of stamping around my photo. I stamped a border with brown ink and then filled in the dots with a light pink marker.

The large flower was also stamped, and for the center I used a vintage button that once belonged to my Great Grandma, which was my Grandma's mom. I love how well it goes with her outfit! I finished it off with a few more flowers and my title, part of which is a rub-on (LOVE). Thanks for looking!

Wednesday, July 24, 2013

Berry Blossom Tutorial

"Grow" is the theme this month at Once Upon A Sketch,  and what better way to show growth than with the beauty of new blossoms on the trees, like the ones I captured here, while on a walk around my neighborhood a few Springs ago.

I was instantly inspired by this sketch and will probably use it again.

This also my entry for the Photo Inspiration Challenge at BOAF. I have so many paint swatches and used strips of them behind the photo. The red rose below the journaling and the circles in the centers of the larger pink flowers are rub-ons that I've had for years, making this my entry for the Four Categories Challenge. I started this page by masking the doily on the upper left, and using the actual mask as a stamp for the doily on the bottom right.

I used a real doily which I inked, cut a circle from the center with scallop scissors, and then cut it in half. The largest flower was stamped, embossed, inked, and fussy cut from white cardstock.

I used a light pink vellum to print my journaling on, and glued it behind this scallop wood veneer, which like the rest, were sprayed with Lindy Stamp Gang mist. The doily behind that was stamped just like the one in the upper right corner, but with different colored inks.

Now to make the Berry Blossoms! I used my Cricut (Serenade cartridge) to cut my flowers from white cardstock. Cut 2 flower 5's at 2" and 2 plant 3's at 1 1/2".

I used Distress Ink (picked raspberry) and my blending tool to color the flowers pink.

Then I dipped my flower into water and starting in the center I folded and crumbled it. I opened it up and while it was still wet I used my Distress Ink (aged mahogany) to go over the edges and the lines that I just made by crumbling it.

Once it's dry, layer your 2 flowers together with some glue. I use Aleene's Fast Grab Tacky Glue.

To make the centers, use Distress Ink (seedless preserves) and your blending tool to color the tips leaving the middle white.

Now curl your tips up and over using the end of a paintbrush or some tool to help curl your petals.I used a rub-on tool.

Then glue your centers together like this.

For the center I used this circle rub-on that I've had forever, but you could use bling, buttons, brads, or whatever you'd like.

For my smaller blossoms I used pink puffy paint for the centers. Here's a close-up of them both finished on my page.

Thanks for looking!

Thursday, June 20, 2013

More of the BOAF June Kit

The June Kit at BOAF is still available and filled with lots of happy colors and papers. I knew when I saw the "Gabbie" collection by Anna Griffin that I wanted to create a fun and funky page with it. So here's what I came up with.

I scrapped this photo of my younger cousins, and started by masking the background. I used the extra patterned paper to cut out all of the letters, covering up some to change the title on the bottom from "memories" to "cousins". Here's a close up of the masking.

I also did a lot of stamping on here, and used the plain cardstock that came in the kit to stamp on 3 of the squares. I used a stitching stamp to go around all of the squares that I layered behind the photo. I just LOVE the large blue flower that came in the kit! I also added the rest of my 3D sticker flowers that you can get in the extra embellishment 1.

For this next page I scrapped this photo of me, my brother, and our cousins. We have LOTS of cousins in our familly!! I just wish I didn't live so far from all of them.

This was based on the June Sketch Challenge at BOAF. I just LOVE this sketch!

I started by misting some white cardstock for my circle and used Dear Lizzy paper around it. I used the diecut cards for part of my title and the stickers for the rest, and for the banner pieces, and journaling.

Here's the journaling sticker. I added the blue Prima flowers from my May kit.

The dark blue flower comes in the main kit, and the pink ones can bought with the extras. The buttons are from my own stash.
Thanks so much for looking!!