Showing posts with label 2 page layout. Show all posts

Friday, March 8, 2019

Graphic 45 (Flutter) 2 Page Layout ~ FotoBella DT

     Flowers, bugs, butterflies, and bright colors mix beautifully, in the new Graphic 45 (Flutter) I REALLY Want It All Bundle from FotoBella.com! So I made a two page layout, showcasing this gorgeous collection that will leave you yearning for Spring. 


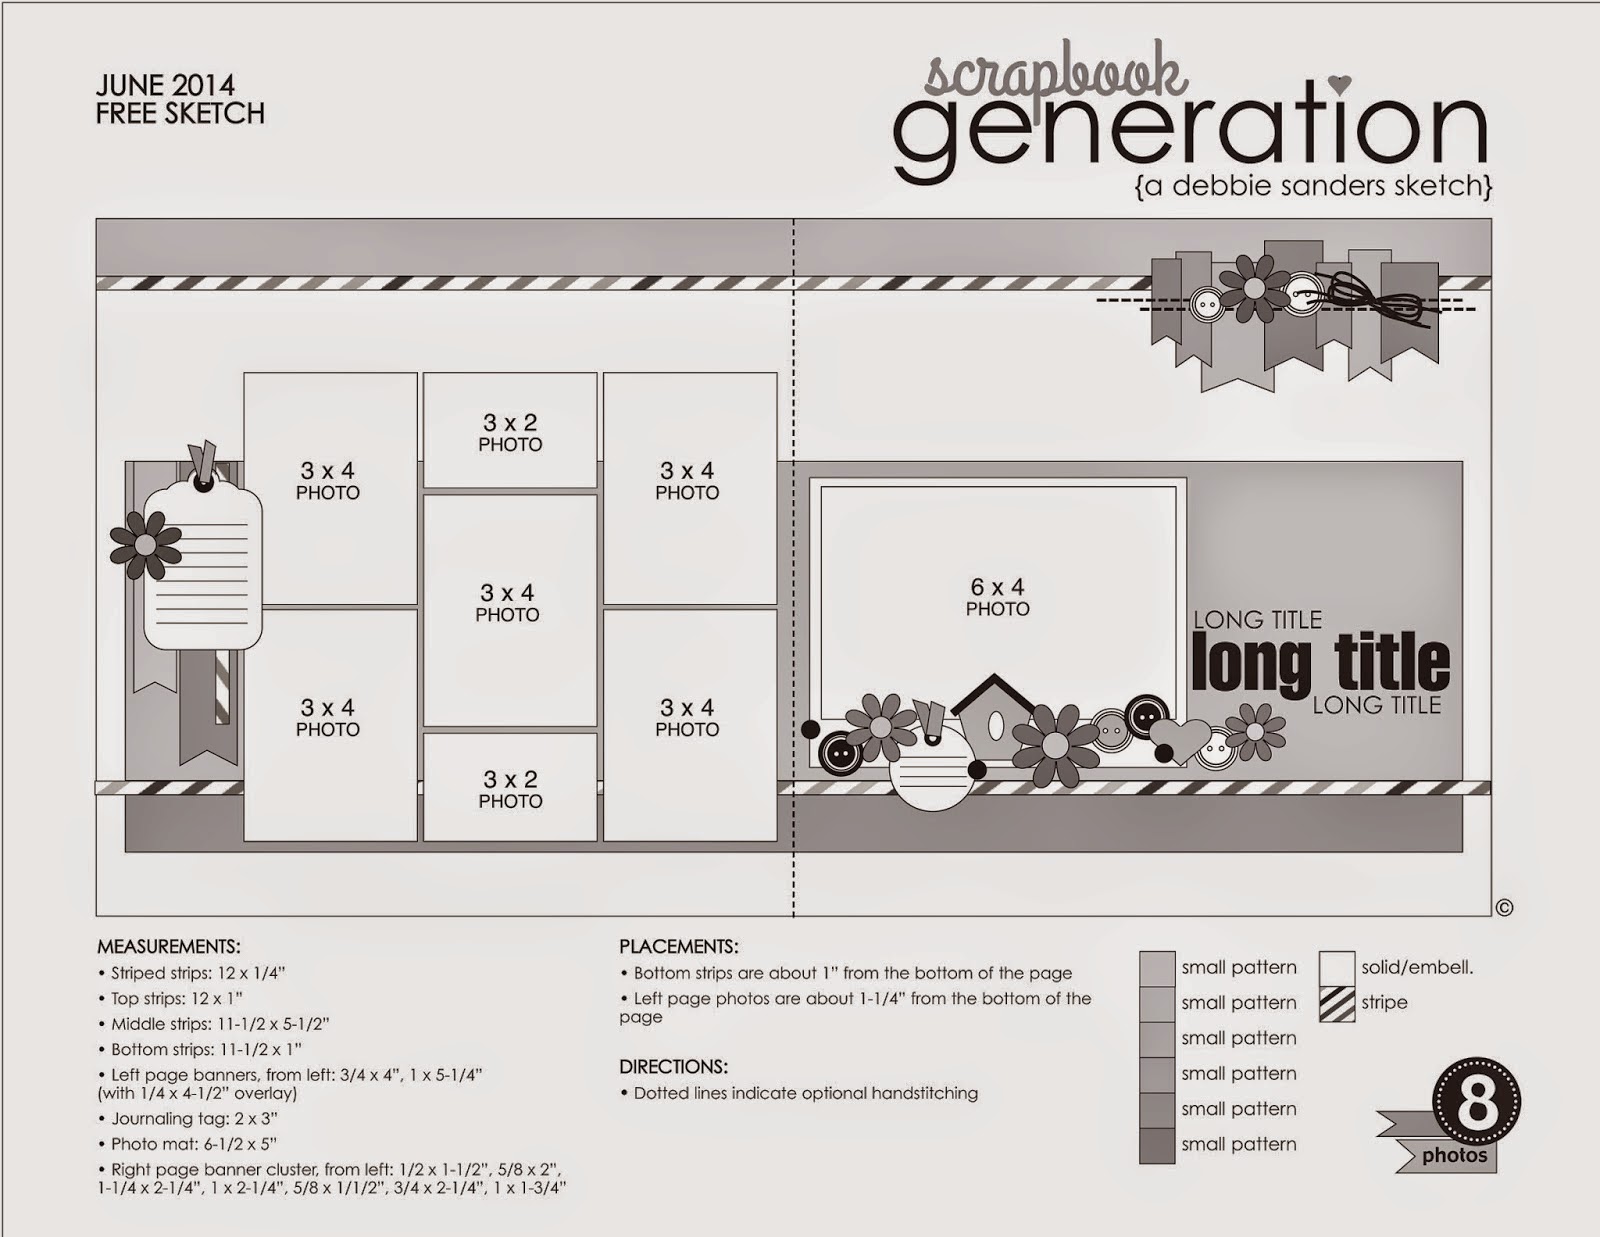
     I was instantly inspired by this fabulous sketch by Noreen Smith, and knew the butterflies would make great replacements for the hearts. 


     To replicate the fence in the photos, I applied Prima Marketing Gesso (White) to a wood grain stencil, onto both sheets of Bazzill Cardstock (Quicksand) from the Flutter Coordinating Cardstock. Then I spritzed it with Distress Spray Stain (Hickory Smoke) and Kaisermist Spray (Coffee), followed by Dylusions Paint (Slate Grey) that I just rubbed on with my fingers. 


     The neutral colors make a great backdrop to the colorful butterflies that I fussy-cut from the Flutter 12 X 12 Paper Pack


     I used a larger Ephemera card for my title, and inked the edges along with the patterned banner pieces, with Distress Ink (Black Soot).


     All of the banner pieces were machine-stitched with a crisp, white thread.


     To make the Sticker borders fit onto both pages, I cut and pieced them to look like one continuous line behind the photos, using a ruler as a guide.


     Thanks for stopping by, and get the Graphic 45 (Flutter) I REALLY Want It All Bundle at FotoBella.com!

********************************
Challenges Entered:


Monday, April 23, 2018

KaiserCraft Misty Mountains 2 Pager ~ FotoBella DT

     Hello and welcome back! I was so excited to open my new KaiserCraft  Misty Mountains Bundle from FotoBella.com, with all of the purples and blues, not to mention the GORGEOUS papers! So I made a 2 pager as my first project, featuring the papers and diecuts.


     My design inspiration was based on the sketch for the April 2 Page Sketch Challenge @ Scrapbook.com.


     The stickers that spell morning were so old from my own stash, that they lost their stickiness completely, and the glue stick I used to apply them, also wasn't working. Then I remembered getting the Prima Marketing My Prima Planner Glue Pen along with my bundle, and it adhered perfectly!


     I did my journaling onto masked notebook paper, blending Picked Raspberry, Dusty Concord, and Chipped Sapphire Distress Inks, to mimic the sunrise.


     Have you spotted the major mistake I made on the second page? It wasn't until I was looking at my uploaded photos, when I realized that I adhered the bottom photo upside down. Of course, it also has sheer ribbon, from my own stash, glued to it, along with all of the other diecuts, and was the only copy I had previously printed. I'm sure there's negatives around somewhere, but for now, it is what it is. Lol!


     Thanks for looking, and get your KaiserCraft Misty Mountains Bundle @ FotoBella.com!


Thursday, October 26, 2017

Bo Bunny Serendipity 2 Pager ~ FotoBella DT

     Happy Thursday! Today I have a 2 pager to share with you using Bo Bunny's Serendipity Collection from FotoBella.com.


     These beautiful photos of my sister and nephew were taken by my talented cousin, photographybyreginamarie.com. I was inspired by the quote and colors, based on the October 2 Page Sketch Challenge @ Scrapbook.com.


     I fussy-cut one of the photos, so I could place them in front of the door, (inked with Gathered Twigs Distress Ink) cut from a sheet a paper found in the Ephemera.


      For some sparkle, I applied Bo Bunny's Wasabi Glitter Paste to the green flower, (found in the Ephemera), and along the punched border. Then I added the circle Chipboard piece to the center.


     Before attaching the punched border, I used it as a stencil over the dark blue paper with Glitter Paste, to shine with the Bo Bunny Double Dot Blue Hues Flourish Jewels.


     The wooden shutters were cut from the same sheet of paper that I cut the door from, and inked along the edges with Walnut Stain Distress Ink. Then I creased the centers, using them to frame the large 8 X 10 photo.


     Always getting so much in the Ephemera, were these green laces. I love how they look with the distressed edges, (made easy with the Tim Holtz Paper Distresser) and the machine stitching!


     Thanks for looking, and shop for everything Bo Bunny at FotoBella.com!


Wednesday, May 10, 2017

Bo Bunny Aryia's Garden 2 Pager ~ FotoBella DT

    The beautiful florals and colors in Bo Bunny's Aryia's Garden I Want It All! 12 X 12 Collection Bundle from FotoBella.com was worth waiting to scrap these photos of my mom for! I love how the papers in the 12 X 12 Collection Pack compliment her "flower bed", especially the "Iron" paper, fussy-cut along the floral border!


     At the end of the border, I placed this adorable Chipboard wheelbarrow full of roses. 


     The edges of the fence "Poetry" paper were inked with Brushed Corduroy and Gathered Twigs Distress Inks, where I added the date onto the Noteworthy banner.


     To the front of the HAPPY tag, made previously with a tutorial from my Aryia's Garden Tag Set, I placed the glittery Bo Bunny Harvest Orange Zinnia, which inspired the drops of Sprinkled Sugar Stickles that I added to the Noteworthy roses, peeking out behind the tag.   


     From the "Notes" paper, I cut my journaling card, rounding the top corners with a punch. Then I used a bigger punch to round the top corners of the "Iron" paper, finishing the edges with Bo Bunny's White Gesso and machine-stitching.


     To the ends of the Sticker banner, I placed White Gesso covered buttons from the Ephemera, in between hand-stitched twine. I also used paper from the Ephemera to cut the title with my Cricut Expression, finishing the edges with Aged Mahogany Distress Ink. 


     Thanks for looking, and grab the gorgeous Bo Bunny Aryia's Garden I Want It All! 12 X 12 Collection Bundle at Fotobella.com!


Thursday, March 31, 2016

Bo Bunny Secret Garden 2 Pager ~ FotoBella DT

     The gorgeous new Bo Bunny Secret Garden I Want It All Bundle from FotoBella was everything and more than I needed, to make this 2 pager from some landscape photos of one of my favorite spots, right down the road from where I lived in Truckee, CA!


     I was instantly inspired by this sketch for the March 2 Page Sketch Challenge @ Scrapbook, as it's been awhile since I've done a 2 pager!


     Since the 12 X 12 Collection Pack comes with 2 sheets of each design, making it easy to create a 2 pager, I started with 2 of the "Vineyard" papers for my background. To mimic the field of flowers, I started by spraying the top border with green sprays. Then I added some sprays to some Prima Clear Gesso, and applied it with the Tim Holtz Dot Fade Stencil. From the "Corsage" paper I fussy-cut the flower clusters, and added 3 of them to my pages. To tie the 2 pagers together I cut the floral garland Chipboard, and placed it over 3 of my photos. I also brought the pages together with a strip of the purple ribbon that comes in the Ephemera


      All of the titlework and banner with the date, was done with the stickers that come in the 12 X 12 Collection Pack. I added another piece of chipboard to the left of "Still", and under "Spring" I added the green and purple bracket from the Layered Chipboard, using the rose banner piece on the right side of the page. 


     The papers matting the photo, banner date, and "Spring" all come from the Ephemera, and along with all of the other papers were distressed along the edges and machine-stitched. To the banner with the date, I added a couple of Brads.


Thanks for looking, and stopping by! 


Monday, June 1, 2015

Mammoth Cave Heritage 2 Pager

    I did some more work on my sister-in-law's album with this 2 pager I made with these fabulous, old photos!


     I kept it neutral, starting with the stone and wood papers from KaiserCraft. To make the trees in the background, I used my Cricut Expression (Serenade cartridge) to cut them out in different sizes. I masked them with some mists onto cream cardstock, and went over them with some Distress Inks. Then I used the negative part to stencil them again with brown inks.


     I tore and water distressed the paper edges, machine stitching them down. Along the bottom I added some cheesecloth that I had already aged with some mists and reinkers. I stamped the title and date, and added the handmade flowers which I had leftover from a previous project. To give it a personal touch, I added buttons to the flower centers, which  I inherited from my husband's late grandmother. She's the beautiful one posing by the car!


I'm entering this into the Monochromatic Challenge at Frilly and Funkie. Thanks for stopping by!


Tuesday, May 5, 2015

Forever Young "Flamingos" 2 Pager ~ FotoBella DT

     Bo Bunny's Forever Young I Want It All Bundle from FotoBella, is exactly what I've had in mind for these flamingo photos that I've been waiting to scrap! I just LOVE the bright, tropical colors! I used both of the flamingo papers from the 12 X 12 Collection Pack, cutting off the flamingo on the second page, to create this 2 pager.


     To add some texture and sparkle to the water, I applied some new Bo Bunny Glitter Paste (Sugar) using the Tim Holtz Stripes Stencil, which gave it a really neat ripple effect. Here's a closer look with one of the buttons that I added from the Ephemera pack.


     The green and orange flowers also come in the Ephemera, along with the paisely stamp that I used to make the petals behind them. I used the clear plastic that the papers come in, to stamp the paisley with Ranger Archival Black ink. After fussy cutting them, I colored them with Alcohol Inks (Stream and Lettuce) and Blending Solution, adding some glitter Brads to the centers.


     From the Noteworthy pack, I used the banner, tickets, and tag that I wrote on, peeking out from under the Film Sticker. I used Picked Raspberry Distress Ink on the tag and under the title, which I did by adding some Glitter Paste (Pink Punch) to the bottom half of the Alpha Stickers. All of the paper strips and edges were inked with  Black Soot Distress Ink, including the banner, which I curled up a little.


                   Thanks so much for your visit!


Tuesday, January 6, 2015

Victory ~ Inspirational # 201

     Happy 2015!! Our first Inspirational this year at Red Rubber Inspirationals is all about using a new stamp, so I decided to use my new Chicken Wire stamp for my husband's baseball album, which I only work on occasionally, and here's the result.


     Since I'm not really into sports I always struggle with these kinds of photos, and can never find the right papers for them, so I played around with some inking, stamping, misting, and embossing on plain cardstock to come up with this 2 pager. The strip across the middle was stamped with Running Stitches. and for the background I used Background Dots, Speckle Background, and Build-A-Background, which I used to emboss the little white stars. Then I took my new chicken wire stamp across the top half of both pages using silver embossing powder. I just LOVE this stamp!!


Thanks for looking, and be sure to visit Red Rubber Designs to get your new stamps!


Saturday, October 11, 2014

Bo Bunny Christmas Collage 2 Pager ~ FotoBella DT

    Happy weekend! Here's a 2 pager I made using the beautiful and festive Bo Bunny Christmas Collage I want it all bundle  from FotoBella. These photos are from my aunt, uncle, and cousin's visit at my parents house. It's always great to see them!


     I took my inspiration from this sketch used for the October 2 Page Sketch Challenge @ Scrapbook.com. 


     I thought this design would be perfect for all of the fun embellishments that come in the bundle, like the Chipboard, Ephemera, Layered Chipboard, and Brads, which I used to make the banner and clustered under the large photo.


     I fussy cut the scallops and punched holes in the centers using my Big Bite II, inking the edges with Distress Ink (Fired Brick). I also added some machine stitching using red and green thread.


Thanks for looking!