Showing posts with label masking. Show all posts

Saturday, August 27, 2016

Bay Bliss Layout

     Happy weekend! Sharing a layout I did with a photo I took of Monterey Bay, California last summer.


     I changed the hue a little, cooling the colors with more purples and pinks to go with this month's Mood Board Challenge at Scrap Africa. I was inspired by the whole board, from the gorgeous colors, to the flowers, butterfly, ocean, and glass, which I replicated with my flower centers.


     My design inspiration came from the beautiful August 15th Sketch at Stuck Sketches.


     The background was colored with Lindy's Stamp Gang Magicals (Prima Donna Purple and Sassy Sapphire) and Sprays (Afternoon Delight Denim and Witch's Potion Purple). The rest was done with stencils masked with inks, and embossed with Ranger's Rainbow Sparkle Embossing Powder, which I also used to stamp and emboss the stitching, flowers, and butterflies. I used the Well-Rounded Stencil from TCW to mask the black along the left of the photo, and to create the waves on the tag. 


     Around the hole of the tag, I rubbed some Platinum Inka-Gold before adding my fibers. Then I used the Butterfly Collage Stencil, also from TCW, to ink the circles with Distress Inks (Seedless Preserves, Wilted Violet, and Blueprint Sketch) before adding the embossing powder. The butterflies were layered and embossed with black ink using Bo Bunny's Flutter Stamp and also colored with Distress Inks.


     The netting I got from my mom was perfect for this page, and has flecks of silver in it.


     The banners were cut from purple and blue vellum, and the edges embossed with Lindy's Stamp Gang Queen Sheba's Silver Embossing Powder. I used Ranger Jet Black Archival Ink and Wilted Violet Distress Ink to ink and emboss the edges of the matting, which I popped up with Pop Dots. 


     The title was masked with Tim Holtz' Cargo Stencil using Peacock Feathers, Blueprint Sketch, Wilted Violet, and Shaded Lilac Distress Inks. Then I embossed the stitching underneath with Bo Bunny's Stitches Stamp. 


Thanks so much for stopping by!

**********************
Challenges:


A Vintage Journey ~ Stencil It (I used 3 different stencils)


Sunday, December 22, 2013

Winter White & Gold Flower Tutorial

Season's Greetings!! Somehow, in between wrapping presents, shopping, and everything else,  I managed to create this page that's very dear to my heart.

I was instantly inspired by this GORGEOUS sketch from Alda for Mojo Monday @ Flying Unicorn!

I started by using some old vintage sheet music, which I tore and then painted the edges gold. I masked the tree onto it using Glimmer Mists (Forest Green and Snowy Pine). Then I used gesso to make the dots, applying Diamond Dust to them while they were still wet. I finally used my new Martha Stewart snowflake and flourish border punch set, which I  made sparkle by spraying some Glimmer Mist (Dazzling Diamond) on it. I also punched the green pp and around the big doily for the Punch Fun Challenge @ Scrapbook.com, where we also had to use 2 or more photos and 2 or more lines of journaling. I made a scroll for my journaling and tied it with some gold ribbon.

Here's what it looks like when unrolled.

This is also my entry for the December 4 Categories Challenge @ Scrapbook.com for category 1, to use doilies. The small gold one was stamped and embossed. 
I got the gold flower awhile ago from Michael's, as well as the greenery and red berries. I made the white flowers and will be showing you how I made the larger one. 

Supplies:
Cricut (Mother's Day Bouquet cartridge), white cardstock, glue, gold paint, pearls or bling for the center, and Glimmer Mists (Iridescent Gold and Dazzling Diamonds).

Directions:
1. Using flower #7 on the Mother's Day Bouquet cartridge for the Cricut, cut out 2 from white cardstock at 2 1/2".  Then cut one out at 2".

2.Use a dropper to splatter on some Glimmer Mist (Iridescent Gold).

3. Paint the edges gold. I did this very sloppy for a more distressed look. 


4.Now curl all of your petals up and over like shown in this photo.

5. Layer and glue your flowers together with your smallest one on top.

6.Now spray your whole flower with Dazzling Diamond Glimmer Mist for some extra shimmer. Then I used these Prima pearls for the center.


Here's the other one that I did using a white half pearl in the center, and surrounding it with smaller gold ones. But I really love the large antique pearl button on the left that I inherited from my Great Grandma Dale.

Thanks so much for stopping by, and have a wonderful Christmas!!

Saturday, December 7, 2013

Joy ~ Little Yellow Bicycle (Once Upon A Christmas Collection)

Joy is the theme this month at Berry71bleu, so I decided to scrap this old photo of me and my husband on Christmas Eve. I finally broke into my Little Yellow Bicycle (Once Upon a Christmas Collection) that I won from them last year. Lucky me! It really is a beautiful Christmas line!

I got my inspiration from this awesome sketch #104 from Sketchabilities.

I used some Glimmer Mists (Scarlet and Forest Green) to splatter and drip down my page. Then I used my Crafter's Workshop Template (Mini Houndstoooth) with my Distress Inks (Festive Berries, Pine Needles, and Black Soot).I hung the sticker ornaments with some handstitching that I did with silver thread.

I love all of the silver accents that are in this collection, which is the twist  for category 2,  to add silver or gold with red and green for the December Four Categories Challenge @ Scrapbook.com. I made the flowers and leaves from LYB Papercrafting kit. I used silver paint around the edges and then some Smooch and Stickles on top. I also used silver paint around the papers. This is my example for the monthly stamping challenge that I host @ Scrapbook.com, with the twist to use any type of holiday stamp. Here I stamped the North Pole postage in red, but in real life it's straight across the page and not skewed like it is in the photo. I also stamped the reindeer and "magical" in black, and the pine branches were embossed using Ranger Embossing Antiquities in Topiary.

I used vellum tape strips in the background, and vellum for the journaling. Here's a closer look.

Thanks so much for stopping by!

Saturday, November 2, 2013

@ THE PARK ~ Bo Bunny (Trail Mix Collection)

   After receiving a stack of fabulous photos that my Sister-in-law took of my nephews, I knew that this was the one that I HAD to scrap, especially when I saw how perfect it looks with Bo Bunny's Trail Mix Collection.

   I was inspired by this sketch from last month's sketch challenge at Scrapbook.com. I just replaced the hearts with circles, but will probably use this again with the hearts, because I think it would make a beautiful wedding or Valentines page.

   The background gears were masked with Distress Inks (peeled paint and gathered twigs). The helm was cut with my Cricut Expression (Life is a beach cartridge), and inked with gathered twigs. I painted the "@" in the title with a cream acrylic paint to match the paper it's on. The dragonflies were stamped, cut out, and inked.

  After cutting out all of the circles, I machine stitched over them, and created a net like the one on the bridge in the photo. The curvy, uneven stitch lines make this my example with the twist, for the Sewing Challenge that I host @ Scrapbook.com. After all the sewing was done, I glued rope around the the circles.I finished up the page with a leaf and some buttons. Here's a closer look at the stitching on the bottom.

   I hope you're all having a great weekend! I'm getting ready to start on my next page.Thanks for stopping by!


Saturday, October 26, 2013

Devil's night

With Halloween less than a week away now, I decided to scrap my photos from last year. I struggled a bit with choosing what papers to pick, since my son's red devil costume kept throwing me off. But I finally settled on some old Basic Grey (Indian Summer) and some red papers from even older lines, and this is what I came up with.

My starting point was this AWESOME sketch for the October 2 page Sketch Challenge @ Scrapbook.com. Isn't it cool? I'm sure I'll use it again!

I also wanted some flames on here, so I drew and cut out my own flame stencils, and used them with some Glimmer Mists on white cardstock. The tree on the left was cut out with my Cricut Expression (October 31st) and masked with some black Glimmer Mist. I inked the title with  Distress Inks (festive berries, spiced marmalade, and mustard seed) after cutting it out with my Cricut (Storybook) cartridge.


I used the same Martha Stewart border punch (Garden rail) on both pages, and finished it off with some hand stitching along the right.

Thanks for looking!

Saturday, October 19, 2013

Journey for a jacket

Happy Saturday! I hope everyone is enjoying the weekend. I just finished this page yesterday of me and my husband, and our journey to retrieve back our son's brand new jacket.

Journey was the topic for this month's challenge at Once Upon A Sketch. Here's the sketch that I was inspired by.

I started this page with the wrinkled background, which was white cardstock that I inked, wet and crumpled. Then I used a Tim Holtz clock mask with some Glimmer Mists (copper, harvest orange, and it's brown). I used a compass mask to create the scallops, which were embossed with Distress Embossing Powder in vintage photo. I used this throughout the page to give the illusion of rust, which is one of the colors for the October Monochrome Challenge @ Scrapbook.com. I included the twist of a cog with some of my masking, like on the clock that I cut out. The flower was made from some leftover parts that I had in my stash. I just misted it with the same colors that I used on the background, and added a brown crystal.

I cut the keys from some Tim Holtz paper and strung them through a chain, which I also covered with Distress Embossing Powder in vintage photo. I love how it really looks like rust, and used it on both brads, the journaling pages, the black alpha thickers, and over the black, grungy dotted, stamping.

I finished this page off with black stitching over the scallops, and the old wooden buttons that I recently inherited from my Grandma Norton. Here's a look at the journaling.

The first word on this page is "and" which is hiding under the brad.

And the last page.

Thanks for looking!!


Thursday, August 22, 2013

Fishing on Father's Day

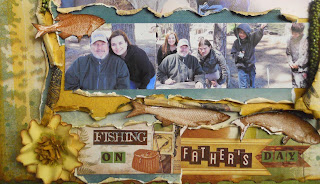
Now that this hectic month has finally settled down a little, I was able to play with my new Bo Bunny "Trail Mix" collection. This is my new favorite line from them at the moment, and love how it looks with these photos from Father's Day a couple of years ago. I just want to point out that I didn't do any fishing here nor do I ever! Lol!

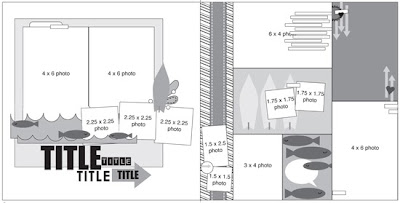
This is based off of this fun and creative sketch, done for the August Sketch Challenge at Scrapbook.com.It is also my entry for the August Color Challenge to use yellow, green, and brown with the twist of using nature photos. 

I started by masking the trees in the background using some mists. I inked and water distressed all of my edges. I used the cardstock stickers to make my title and for the journaling stips on the right. The fish were cut out from pp and then applied with Glossy Accents to make them shiny.
The flowers were left over's from my handmade stash that I altered a bit from the original. I thought I had made a tutorial for them, but I guess not, since I couldn't find them. The green Petaloo vines were a RAK from Flying Unicorn. Thanks Alda! 

And thank YOU for stopping by!