Sunday, January 31, 2021

Orange Blossom Fairy Art Journal

      Growing up in Southern California, we always had different types of fruit trees, and I remember January being the month when the oranges would ripen up and taste the best. For some reason, they always tasted SO much better than the oranges sold at the grocery stores! But perhaps it was just fairy magic, as depicted on my latest art journal page? 


    The rest of my inspiration came from the Finnabair January 2021 Art Recipe. Any excuse to play with my stencils and effect pastes, and I LOVE the color combo! 


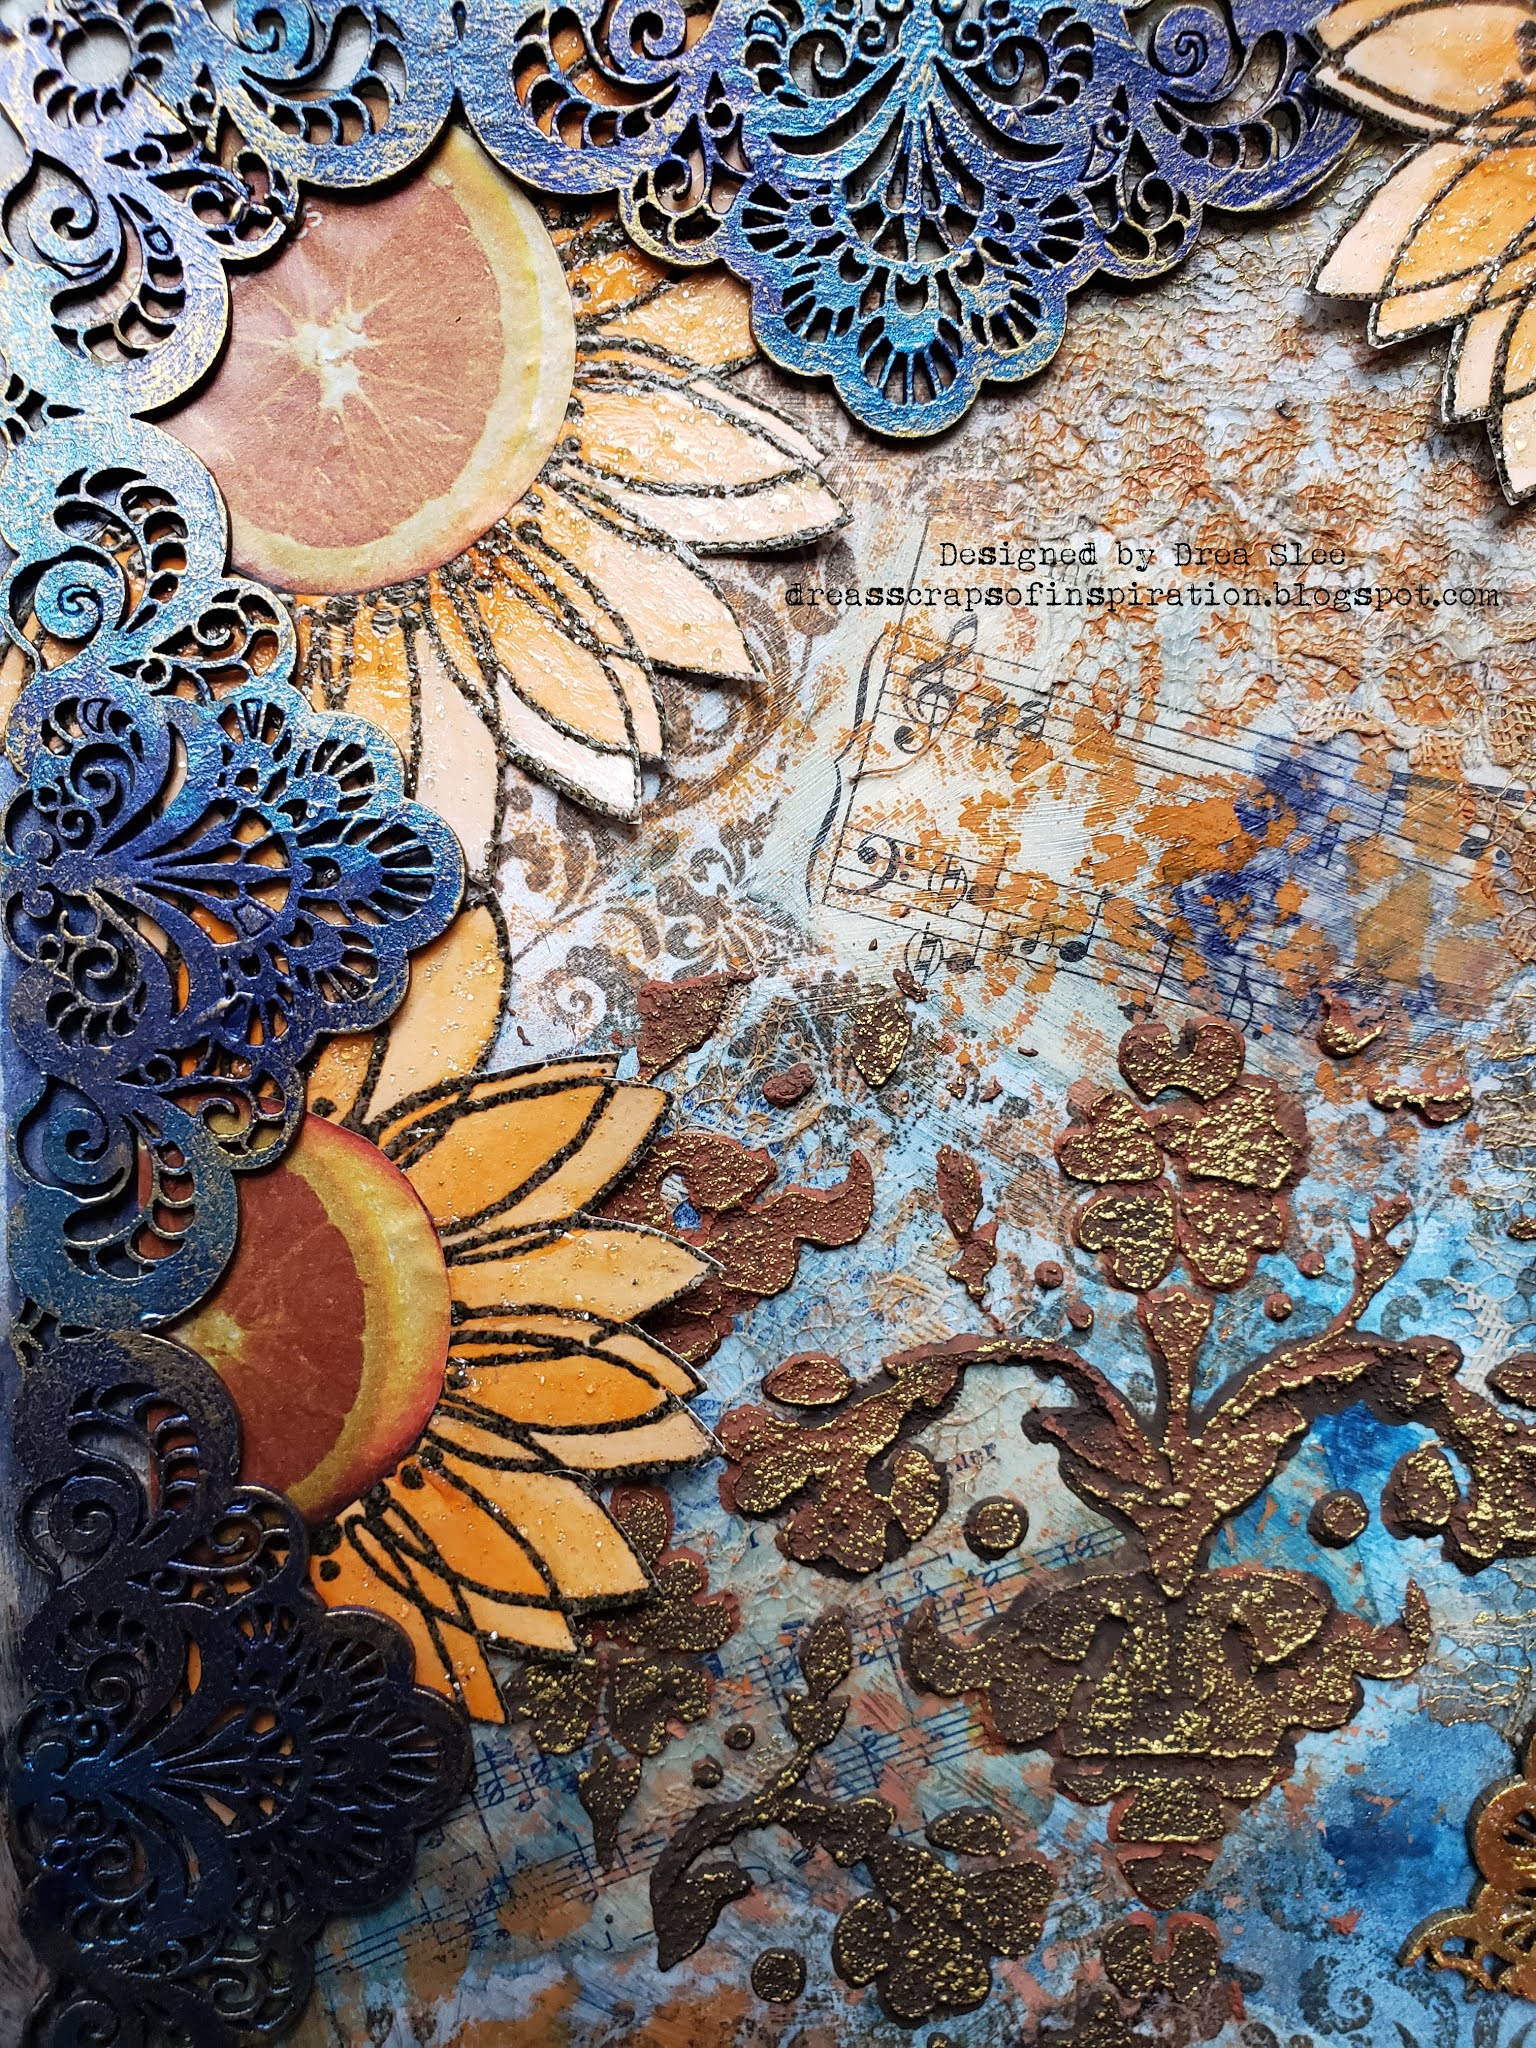
     It started as a collage of vintage sheet music, dictionary pages, lace, and stamping, adhered with Prima Soft Matte Gel. Then I painted it with Art Alchemy Metallique Paints (Rustic Brown, Fresh Orange, Deep Waters, and Midnight Sky), along with Sparks (Ginger Magic), adding lots of water to create some transparency.


     The orange color in the background was done with (Rusty Hinge) Distress Oxide Spray sprayed through the Finnabair (Floral Net) Stencil. Then I applied Finnabair (Red and Brown) Rust Effect Pastes to the Finnabair (Vintage Wallpaper) Stencil. Once dry, I added touches of (Vintage Gold) Metallique Wax, also added to the lace.


     All of the oranges were cut from magazines. The sliced ones were added to the flower centers that were embossed with Emerald Creek (Burnt Copper Leaves) Embossing Powder. I created a border with them using the Chipboard Lacy Border from Creative Embellishments, cut at an angle to make the corner piece. Then it was painted with Art Alchemy Paints (Deep Water and Midnight Sky), and more touches of Metallique (Vintage Gold) Wax.


     I played with my new Prima watercolors for the first time on this page, and absolutely LOVE them! They were used on the flowers and blush for the fairy. Then I finished the flowers with the new Finnabair (Crushed Ice) Effect Paste.


     The fairy was fussy cut from some older Prima paper. Her wings, which are the leftover pieces cut from the chipboard, were painted with Art Alchemy (Fresh Orange and Ginger Magic) Paints, and sealed with (Crushed Ice) Effect Paste.


      I'm so glad I was able to "squeeze" this in before the end of the month! Lol! Thanks for looking! 

***********************

Challenges Entered:

Finnabair ~ January 2021 Art Recipe


Sunday, January 24, 2021

A Whole New Perspective Tag

      Hello again! I'm back with this colorful tag, made with stencils and Dylusions Paints. 


      It started with strips of notebook paper, washi tape, and drywall tape, that was used a mask with a coat of white gesso. Then I used a brayer and my fingers to apply some of the latest and brightest Dylusions Paints. I hope you can see the grid texture in the background, made with the drywall tape.


     To create an abstract cityscape, I applied (Black Marble) Dylusions Paint to the Distressed Patterns Stencil from Creative Embellishments to make the small squares. Then I applied black Impasto Paint to the Dragonfly Screen Print Stencil from TCW. 


     I also applied black Impasto Paint to the Tim Holtz (Plaid) Stencil, and cut 3 squares from them to resemble buildings. Then I finished it up by stamping the quote onto painted strips of white cardstock.


     Thanks for looking, and hope you're all staying safe and well!

******************

Challenges Entered:

More Than Words ~ January Mini Challenge


The Crafter's Cafe ~ #258 New (New black Impasto Paint, and New in the quote)

Friday, January 22, 2021

Hope Grows Everywhere Art Journal

      Hi everyone! Even though this art journal page was such a struggle that I almost gave up half way through, I'm happy with the results, and glad I stuck with it. 


      I was completely inspired by the January Challenge at Mixed Media Academy, from the colors, to the rocks, quote, and elephant!


     The background was made from torn pieces of papers, and stamping. Then I used some of my new stencils from Creative Embellishments, and played with Distress Oxide Sprays (Peacock Feathers, Rustic Wilderness, Pumice Stone, Speckled Egg, and Black Soot) for the first time, combined with Distress Spray Stains (Picket Fence, Speckled Egg, and Hickory Smoke). I painted the flowers and greenery straight from the bottles, which were stamped and embossed with Emerald Creek (Onyx Frost) Embossing Powder, and added (Pewter) Liquid Pearls to the flower centers. 


     The rocks were done with the Cobblestone Stencil from Creative Embellishments using a coat of Prima Heavy White Gesso. Then they got painted with a mix of sprays, and a few layers, before splattering with (Picket Fence) Distress Spray Stain. 


     My favorite animal is the elephant, so I had to include one, stamped with the Take Pride Stamp from Red Rubber Designs onto kraft paper that was wrinkled and colored with sprays first! The globe is a sticker with Finnabair Metallique Wax (Old Silver) rubbed along the edges. Behind it, I applied white gesso to the Medallion Stencil and colored it with Finnabair (Old Siver and Patina Green) Waxes.


     It's hard to see in the photos, but (Old Silver) wax was also used along the top half of the dark grey alpha stickers, and outlined with a black Sharpie.


      Thanks for your visit, and take care!

********************

Challenges Entered:

Mixed Media Academy ~ January Challenge


Art Journal Journey ~ Favorite Things (Elephant is my favorite animal and green and teal my favorite colors!)


Simon Says Monday Stamp Challenge ~ We're On A Roll! (Medallion Stencil, Globe Sticker, and rocks)


Saturday, January 16, 2021

Lindy's Gang January Color Challenge Card

      With the new year, comes new resolutions, and one of mine last year was to enter all of Lindy's Gang Color Challenges. I came close, but missed last November and December, so thought I'd start again with this card for January, and my first post for 2021. 


     The snowflakes were stamped with the Bo Bunny Snowflakes Stamp, and embossed with Lindy's Gang (Silver Moon Turquoise) Embossing Powder. Then I applied Finnabair (Platinum Crackle) Texture Paste to the edges, and let it air dry, before spritzing with Lindy's Gang Sprays (Pop Rock Purple and Afternoon Delight Denim), and adding snow splatters with (Sidewalk Chalk). 


     The chipboard Snowflakes from Creative Embellishments are new, and were covered with Prima Heavy White Gesso. Then they got embossed with LG (Silver Moon Turquoise and Hollyhock Scarlet Plum) Embossing Powders. For some extra sparkle and texture, I applied Finnabair (Crushed Ice) Effect Paste (also new) to the snowflakes and card edges. 


     Finally, the sentiment was embossed with LG (Hollyhock Scarlet Plum) Embossing Powder. 


     Thanks for looking, and hope your year has gotten off to a great start! 

*************************************

Challenges Entered:

Lindy's Gang ~ January Color Challenge


More Mixed Media Challenge ~ Anything Goes with Optional Blue

Allsorts ~ Week 607 Something New (Chipboard Snowflakes and Finnabair (Crushed Ice) Effect Paste)

Crafty Creations ~ January #417 Anything Goes

Stamping Sensations ~ January Favorite Stamps (Used my favorite winter stamp Bo Bunny Snowflakes)

613 Avenue Create ~ #1 January Anything Goes

Monday, December 28, 2020

2020 Christmas Tree Card

      Hello! I hope you had a wonderful holiday! Unfortunately I wasn't able to get as many Christmas cards done this year as I would've liked, but did manage to duplicate this one a few times. 


     The background started with some Lindy's Gang Sprays and Magicals to create a light golden shimmer, which is hard to see in the photos. Then I used a stamp with Distress Inks (Aged Mahogany and Barn Door), and spritzed it with water before stamping for a more vintage look. 

     To make the tree, I applied a heavy layer of white gesso to the Tree's Stencil from Creative Embellishments, using a palette knife to create texture. Once dry, I reapplied the stencil and used a stencil brush with Art Alchemy Metallique Paints (Green Olive and Dark Forest). Then I highlighted all of that texture with Finnabair Wax (Vintage Gold), along with the card edges. 


     Red and gold sequins made the perfect ornaments, and the star was embossed onto black cardstock with Ranger (Gold Tinsel) Embossing Powder. 


     The same embossing powder was also used for the sentiment, stamped onto red cardstock, and backed with a strip of ribbon. 


     Thanks for looking, and have a Happy New Year!

*********************************
Challenges Entered:


Wednesday, December 9, 2020

Childhood Memories Art Journal

      Hello and, hope you're all doing well and staying healthy/safe! I rarely add photos to my art journal pages, but this one brings me right back to my childhood, reminding me of vacations from Southern California to Lake Tahoe and my late Great Grandma's cabin in Verdi, NV. I was always collecting pine cones and rocks whenever I was there, so I had to include them on this page, adding micro beads to represent the rocks. And I never left home without my Pooh Bear! Lol!


     The bottom layer was made with crumpled up pieces of kraft paper, and painted with Dylusions Paints (Melted Chocolate and Ground Coffee) to create a faux leather. Then I used my finger to apply Finnabair (Vintage Gold) Metallique Wax to the cracks and wrinkles, along with the torn edges of the beautiful Mintay Papers, including the fussy cut suitcases, feathers, camera, and birds, from the Harmony Collection, which I was lucky enough to win from a previous challenge at More Than Words. I also used the wax on the chipboard Pinecone Cluster from Creative Embellishments after embossing it with Distress Embossing Powder (Vintage Photo).


     The circles were handstitched with embroidery threads and a gold rayon, which doesn't really show in these photos because it's so thin, and the torn circle was colored with Lindy's Gang Metallic Magical Shakers (Glittering Gold, Antique Gold and Antique Bronze), and inked around the edges with Ranger Archival Ink (Potting Soil). A very old sticker sheet was finally used for the pine cones in between the feathers, and also happened to have the perfect quote.


     My favorite part of this page is the craft feathers that started out the color of the shirt that I'm wearing in this photo! I wet them with water first and used a paintbrush to apply LG (Blue Banff) Squirt along the feather lines. After a few coats, and letting them dry in between, I adhered them onto my page with Ranger Multi Medium (Gloss). Then I painted the feather lines with Art Alchemy Sparks Paint (Dragon's Eye), splattered some on the background, and finished the rest of the page with more Ranger Multi Medium (Gloss). 


     Strips of lace were used to create belts, and were also adhered with Ranger Multi Medium (Gloss). The buckles started out silver, and were painted with Dylusions (Ground Coffee) Paint, and finished with Art Alchemy Metallique (Vintage Gold) Wax. 


     The strip of lace in the middle was the same light blue as the top one, but got dyed with a few coats of Lindy's (Banff Blue) Squirt.


     Thanks for looking, and take care! 

**************************

Challenges Entered:

More Than Words ~ December Main Challenge

Art Sandbox ~ KoloroTon #30


Art Journal Journey ~ The Meaning Of (Childhood Memories)


Monday, November 9, 2020

Mini Milk Carton Houses

      Don't throw out your milk cartons! Just give them a good wash, and they'll be ready to recycle into houses. I used the small cartons on this trio, taking my inspiration from the colorful Victorian houses found in San Francisco, California. 


     I started by cutting 1/2" strips of white cardstock, and used a stiffer brush to apply a coat of clear gesso. Once dry, I colored them with Distress Crayons (Peacock Feathers, Chipped Sapphire, Picked Raspberry, Seedless Preserves, Shaded Lilac, and Wilted Violet), smudged them with my fingers, and added (Black Soot) around the edges. After cutting out the doors, I layered and glued them around the carton like siding on a house. The windows were stamped and embossed with Emerald Creek Boho Blends (Wrought Iron) Embossing Powder. Then I colored them with the same Distress Crayons using a brush and water for a softer effect.


     I used my leftover scraps from the siding, to make the bottom halves of the doors, by cutting the width of the 1/2" strips in half, and piecing them back together. Small brads were used for the knobs, and the doors framed with pieces from a cereal box. The framing, window sills, (cut with the Cricut Expression using the George and Basic Shapes cartridge), and scallop stamping along the eaves, were embossed with Ranger Mixed Media Powder (Bone). 


     The roof shingles are actually the centers of a flower stamp, that reminded me of a peacock feather, and were embossed with Emerald Creek (Black Cherry) Aroma Embossing Powder. 


     Thanks so much for stopping by!

*********************
Challenges Entered:

Mixed Media Academy ~ November Challenge (I've been in the mood to create little houses lately, and wanted to make haunted ones for Halloween, but instead went Victorian, which was perfect for this color combo)