Showing posts with label Fotobella Design Team Member. Show all posts

Friday, May 16, 2014

Basic Grey's Herbs & Honey ~ FotoBella DT

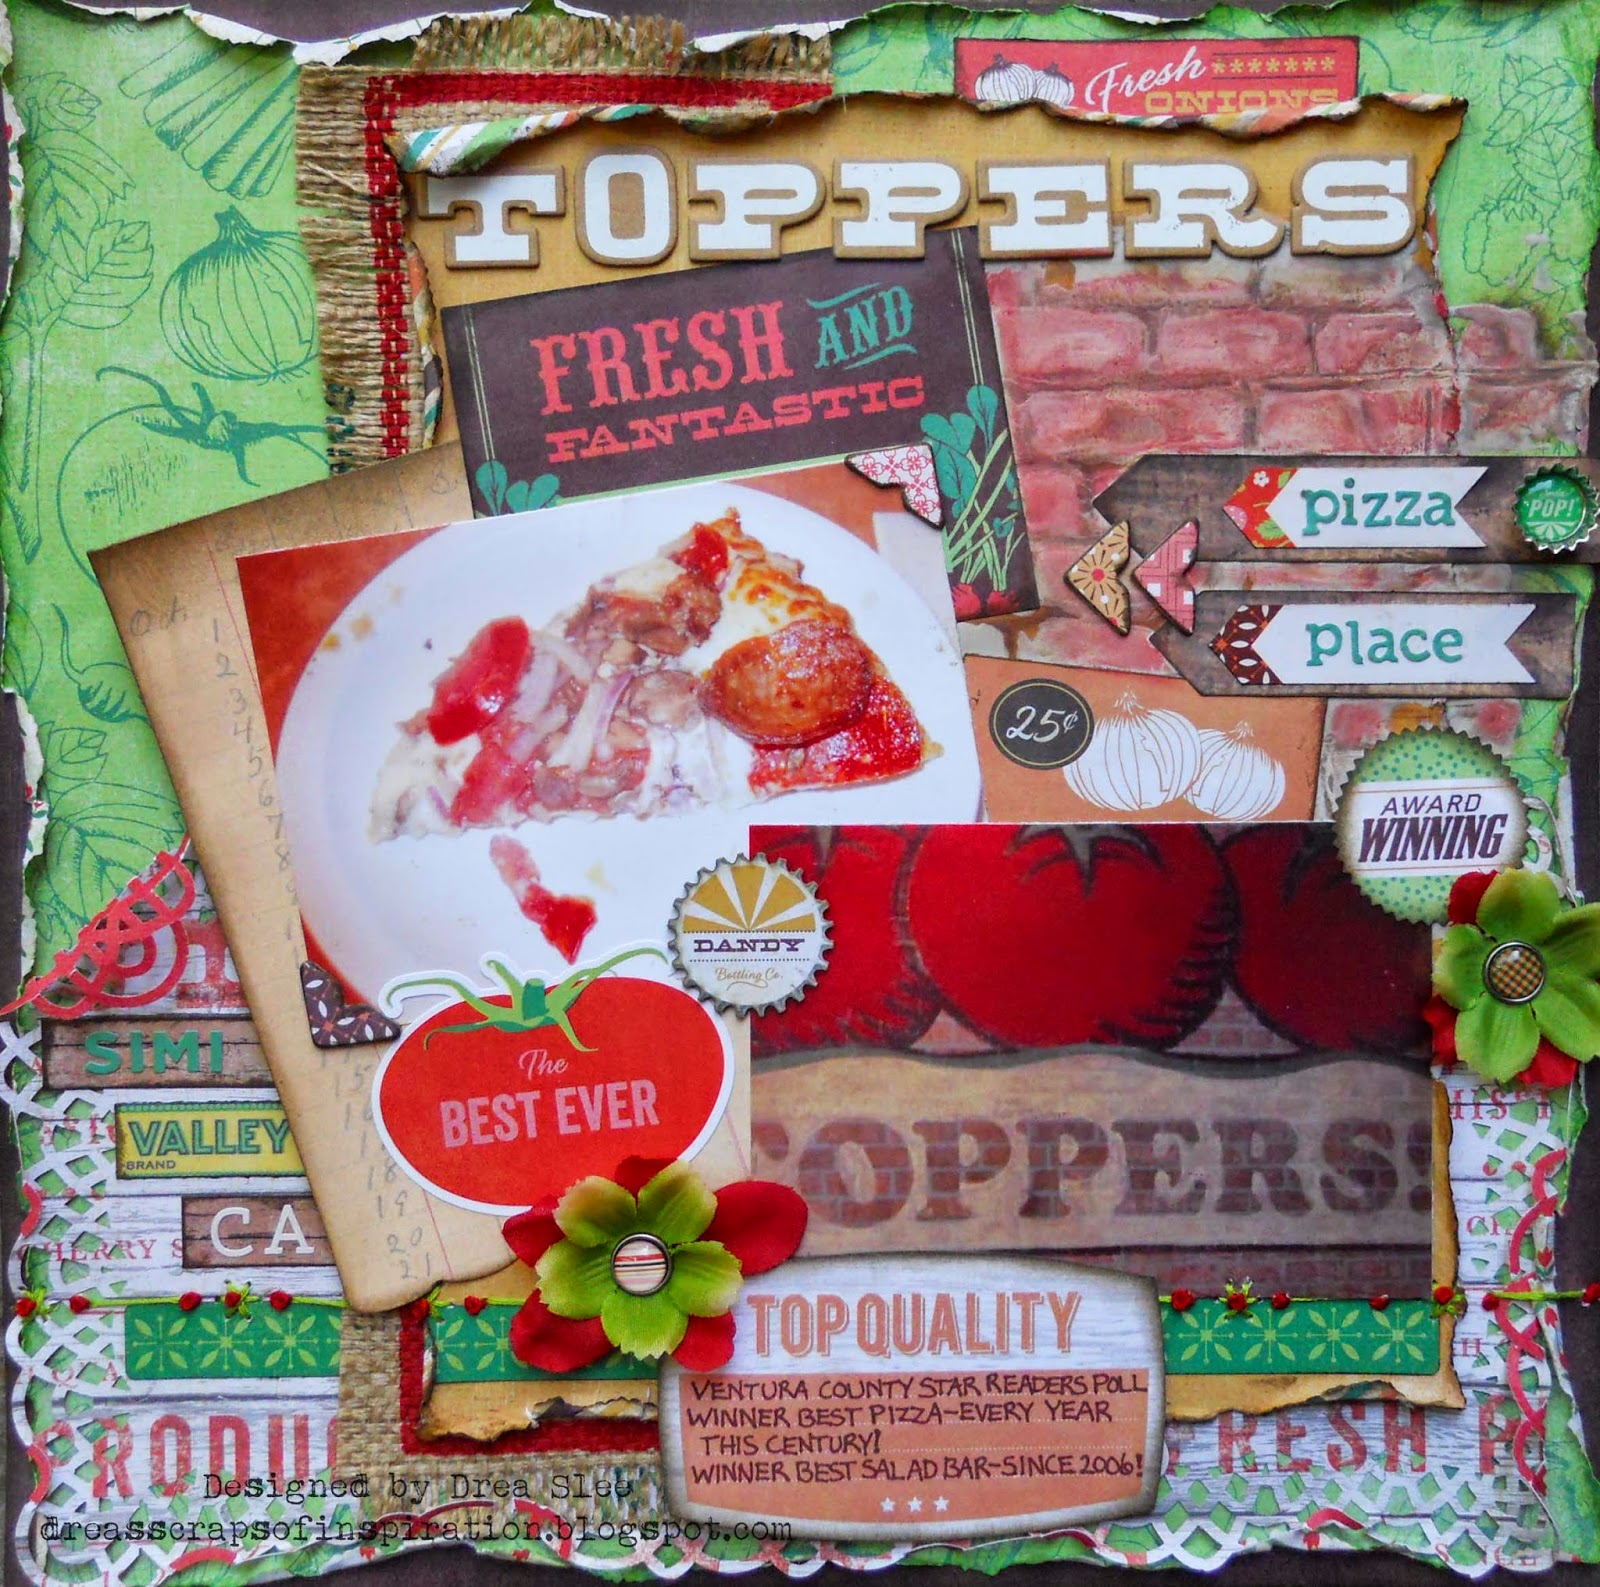
    Basic Grey's Herbs & Honey I want it all bundle from FotoBella is a fun collection of times past! To showcase some of the great vintage food advertisements and embellishments that come in the bundle, I scrapped these photos that my Mom took on a trip back to our hometown of my husbands favorite pizza place. In fact, he wanted me to put this away because it was torturing him just to look at it! Lol!


     The bricks were made with a stencil, gesso, and inks. I used a lot of stickers on here for the May Sticker Challenge @ Scrapbook.com, with the twist of using Alpha Stickers, which there's a whole sheet of in the bundle in six different colors, as well as the waterfall theme pack, which has two different colors. I used chipboard photo corners on the photo of the pizza, and as arrows next to pizza place, for category one of the May Four Categories Challenge, also @ Scrapbook.com. My favorite piece on here is the little green soda pop,  Bottlecap Sticker!


     The flowers are from my own stash, and I just added some brads to them. I also had to add the burlap, that came from an old feed bag that I got from my Mom a few years ago. I hand-stitched the border on the bottom using red french knots, which is the twist this month for the Sewing Challenge that I host, to represent tomatoes.


Thanks for looking!


Thursday, February 27, 2014

Crazy for Crazy for you ~ FotoBella DT

I'm just crazy for all of the colors and patterns in the Crazy for you I want it all bundle by We R Memory Keepers! I especially love all of the purples and pinks, which I used a lot of on this page that I scrapped from my 11th wedding anniversary.


I was inspired by this Page Drafts sketch!


I used my new Tim Holtz stencils (Stripes) and (Splatters) with some Distress ink and mists on the top.

I did a lot of machine stitching on here, including the stamped doily hearts, which were stitched right down the middle.

TFL!

Saturday, February 15, 2014

Stitch N' Strip Tutorial ~ FotoBella DT

Have you ever wondered what to do with all those strips that you end up cutting off from the bottom of your papers? Well I came up with this design to show you using the Crazy for you I want it all bundle by We R Memory Keepers.

Originally I printed this photo of me and my husband in black and white, but I got glue on it and completely ruined it. Then I remembered that I had printed it in color as well, and once I saw it with the pp's and colors I ended up liking it even better. Don't you love when that happens?

I started this page using my Crop-a-dile II Big Bite to punch out all of the holes around the edges using a Q-tip to ink them with Distress Ink (picked raspberry). I masked the Lace Doily Prima Stencil with my Glimmer Mists (dark purple and festival) and added the metal flower in the center. I used my new Tim Holtz Stencil (fade dot)  along the right side using Distress Inks (seedless preserves and picked raspberry). I stamped and embossed the doily heart using Ranger Seafoam white embossing powder and popped it with some pop dots also from Ranger.

After adding the title, photos, and punching the purple strip, I distressed all of those end strips with the Tim Holtz paper distresser and glued them onto my page.

Then using a ruler as a guide, poke holes every 1/4" along your strips making sure to align your holes vertically with the other strips. Decide what direction you want your slashed lines to be, and then poke a hole 1/4" away from the last one on the bottom to create your slash.

Now for the fun part! Sew all of your strips together using whatever color or colors of embroidery floss that you want. I used 5 different purples and pinks to go with the sunset photo taken in San Luis Obispo, CA.

I made the flower that came in the bundle a little more dimensional by wetting and scrunching up the petals.

This is my entry for Kristi B.'s Title Challenge to use one or more of these words on your title.I used love.

Thanks for looking and enjoy the weekend!

Friday, February 14, 2014

Happy Valentine's Day!!! ~ FotoBella DT

Happy Valentine's Day!!! Here's a card that I made for my sweet husband using the Crazy for you I want it all bundle by We R Memory Keepers. It's the perfect collection for all of your love or Valentine's projects!


I was inspired by sketch #1 used for the February Card Sketch Challenge @ Scrapbook.com.


I just love all the stamps that came in this bundle and used them here with Ranger black embossing powder! I machine stitched around the edges and along the black doily heart and chevron paper. To give some dimension to the black heart I folded it in half. Then I just added the bottle cap and kiss me button.


 Thanks for looking!

Sunday, February 2, 2014

February FotoBella Sketch Challenge

It's time for another sketch challenge at FotoBella for a chance to win a I want it all bundle. The deadline to submit your layout is February 15th. There is now some additional ways to enter.

Submit your layout on our Facebook Challenge Page.

Or submit a photo of your layout on Twitter or Instagram by using the hashtag #FotoBellaChallengeFeb2014.

For bonus entries have your friends vote for your layout on Facebook, retweet your submit and sharing on all 3 of these sites.

Finally make sure to comment on the FotoBella blog to let us know that you entered.

Here is the sketch inspired by Julie Nutting paper doll playtime at Prima's Artventure at CHA. Each of us design team members were given a different stamp to play with.


Here's my take on the sketch using a copy free image that I found online somewhere.

I used the Crazy for you bundle by We R Memory Keepers. I LOVE the stamps that came in this bundle and had to try them out right away! The roses were stamped and layered using the cardstock from the bundle.  I used Ranger's black embossing powder to stamp the round doilies and colored the hearts using a pink Prisma marker. The pink doilies were stamped with Distress ink (Picked Raspberry).

The doll stamp that I got was Lorena by Prima Marketing. I stamped her onto clear vellum and chalked her with Pebbles Inc. pearlescent chalks. Then I stamped her again onto clear vellum with little white hearts on them to make her dress. I used more chalks on the dress and then added the little pink hearts, which were stamped, and also came in my bundle. Once I finished her dress I cut it out and glued it on top of the first stamped layer. I finished her off with a small bow out of some ribbon for her hair.

Thanks for looking and make sure to visit the FotoBella Blog to see some more inspiration from the rest of the team. Sarinda also has an awesome video tutorial on using Copic Markers, which she used for her doll stamp.


Thursday, January 16, 2014

Christmas Chalk Flower Tutorial for Fotobella DT

As much as I tried using Echo Park's Tis the Season Collection  all on it's own, I couldn't help but add their Reflections Christmas Collection. They're both so festive, and work beautifully together! Just perfect for all those holiday photos, like this one that I used of me and my son from 2012!


I did a lot of distressing on this page, and hand stitched the white blanket stitch. I stamped the black scallopy border, as well as the flower, which I'll be showing  you how to do.


Supplies:
~25 Days double sided paper by Echo Park (Tis the Season Collection)
~Be Jolly double sided paper by Echo Park (Tis the Season Collection)
~Echo Park (Tis the Season Collection) Brads
~Black cardstock
~White Ink
~Inkadinkado Stamping Gear Collection Intro Kit
~Glue
~Cricut Expression (Serenade Cartridge) or decorative scissors

Directions:
1.Using Echo Park's Be Jolly paper (the black side) stamp your image 6 times using white ink. I used Inkadinkado's Stamping Gear, but any type of flower stamp would work too. I really think that it's the white ink that makes this look like chalk, as well as the paper which looks like a chalkboard. 

2.Cut out your images and curl your petals up and out.

3.I cut out this scalloped circle from Echo Park's 25 Days double sided paper using my Cricut Expression (Serenade Cartridge flower #3) at 2 1/2",  and then inked the edges with white ink. You could also use decorative scissors to cut around a circle, or simply just use a circle. 


4.Now cut another circle out of black cardstock that's slightly larger than the first one, and glue it underneath. Then you can take your petals and glue them in the center.

5.Now use a brad to finish it off. I inked the scalloped circle that came with this brad to go with the bottom layers. 

Thanks for stopping by!

Monday, January 6, 2014

Fotobella Sketch Challenge

There's a new sketch challenge at Fotobella. Get started on your Holiday Scrapbooking with this sketch to win a fabulous I want it all bundle. Post your take to our facebook page and then come back and comment here that you posted it. The deadline is January 15th.


This is my take using Tis the Season 12 x 12 Collection Kit by Echo Park. It came together super fast and easy once I picked out my photos.

I used some gesso on the top left before adding the flourish sticker with the red brad in the snowflake. The candy cane frame along the right is also a sticker. Everything here came in the kit except for the ribbons. 

Thanks for looking!


Thursday, January 2, 2014

Echo Park Reflections Christmas Santa Tag ~ Fotobella DT

Happy New Year!! I just wanted to share this tag that I made using Echo Park Reflections Christmas Collection Kit for the Fotobella design team.

I cut the tag from black cardstock using my Cricut Expression (Plantin SchoolBook Cartridge) at 6". Then I inked the edges with white ink and added a silver grommet to it for the tassle made from cream embroidery thread and previously dyed muslin that I tore up. I added the brads just how they came in the package with the doily and snowflake behind them.  I stamped Dec 25 along the bottom. My FAVORITE part of this tag is the layered Chipboard Santa, which I inked around the edges! This collection is SO perfect for all of your holiday projects! I love it all, and can't wait to show you what else I've been doing with it!

Tuesday, December 17, 2013

Woodland Snowflake Tutorial ~ Fotobella DT

I'm so excited to share my first tutorial for Fotobella using Bo bunny's Woodland Winter I want it all bundle! I'm just in LOVE with this collection of GORGEOUS papers and embellies, not to mention the colors!! Perfect with these snow pics of mine.

I started by using some Glimmer Mist (slate) and reninker (antique linen) on the background. Then I used a snowflake stamp. The distressed edges were covered with Gesso. Here's a closer look at the typed journaling, which was one of the ingredients for this month's 5 Ingredients + yours challenge @ Scrapbook.com. The other ingredients were to use the color navy, ribbon, something stamped, and 3 pictures.

To make the snowflakes start by gathering some twigs outside. Using the Woodland Blizzard paper fussy cut out some snowflakes. I decided on this one that I used on the top left of my LO. Then pick another paper and cut out a circle slightly larger than your snowflake. I used Woodland Winter Journal.  Now cover the edges with gesso and glue your snowflake onto it. 

Break your twigs into 6 equal pieces, and cover with Gesso.


Glue the twigs onto your snowflake, using the center design as your guide.

Now find some bling for the center. I used this pearl to mimic a snowball.

Then cut pieces from another snowflake and glue under the circle, in between the twigs. Here's the finished result.

You can get so many different looks just by combining different snowflakes, papers, and gems. Here's the other one that I made.

If you don't have Gesso you could always use white paint. Stickles or Smooch could also work to make your snowflakes sparkle. Just have fun with it!


Thursday, November 21, 2013

Bo Bunny ~ Woodland Winter Brrrthday Card

I'm so excited to show you what I've been up to with my very first post as a design team member for Fotobella.com. I made this card from the fabulous new Woodland Winter I want it all bundle by Bo bunny. I absolutely LOVE this line, and honestly I'm still drooling over it!!

I was inspired by this sketch from Cardabilities. I started by cutting a rectangle 9" x 5" using the reverse side of Woodland Winter Mittens paper. From the reverse side of Woodland Winter Journal paper I cut a piece at 5' X 4 1/2", and distressed all of the edges using my Tim Holtz distresser.

Then I  used some gesso over the edges and immediately added some white glitter to it. I glued the pieces onto this same kraft cardstock that are in these photos, and folded it in half to make a card.

My next idea didn't come out the way I intended it to, but ended up being a happy mistake. I used a doily template on the bottom with a little too much gesso, that you couldn't even see the doily design except for on top, which I knew I would be covering. But because it looks like snow, I think it worked it out OK. As it was still wet I added the snowflake sticker that came in my bundle, and then added more of my white glitter.

Then I cut the diamond shapes out from the Woodland Winter Scarf paper. I inked the edges with some Distress ink (faded denim) and then outlined them with some Stickles (waterfall). I also used the Stickles to make the dots in the centers of the stars.

I wrote on the sticker  frame using a white pen,  and finished it off with the mittens button that I threaded with some white fiber.

Thanks for looking!