Thursday, October 30, 2014

Inspirational #144: Fall Foliage

     I just LOVE fall, and since my parents 43rd anniversary was a couple of weeks ago, I decided to make them a fall themed card for Inspirational #144, to use fall foliage.


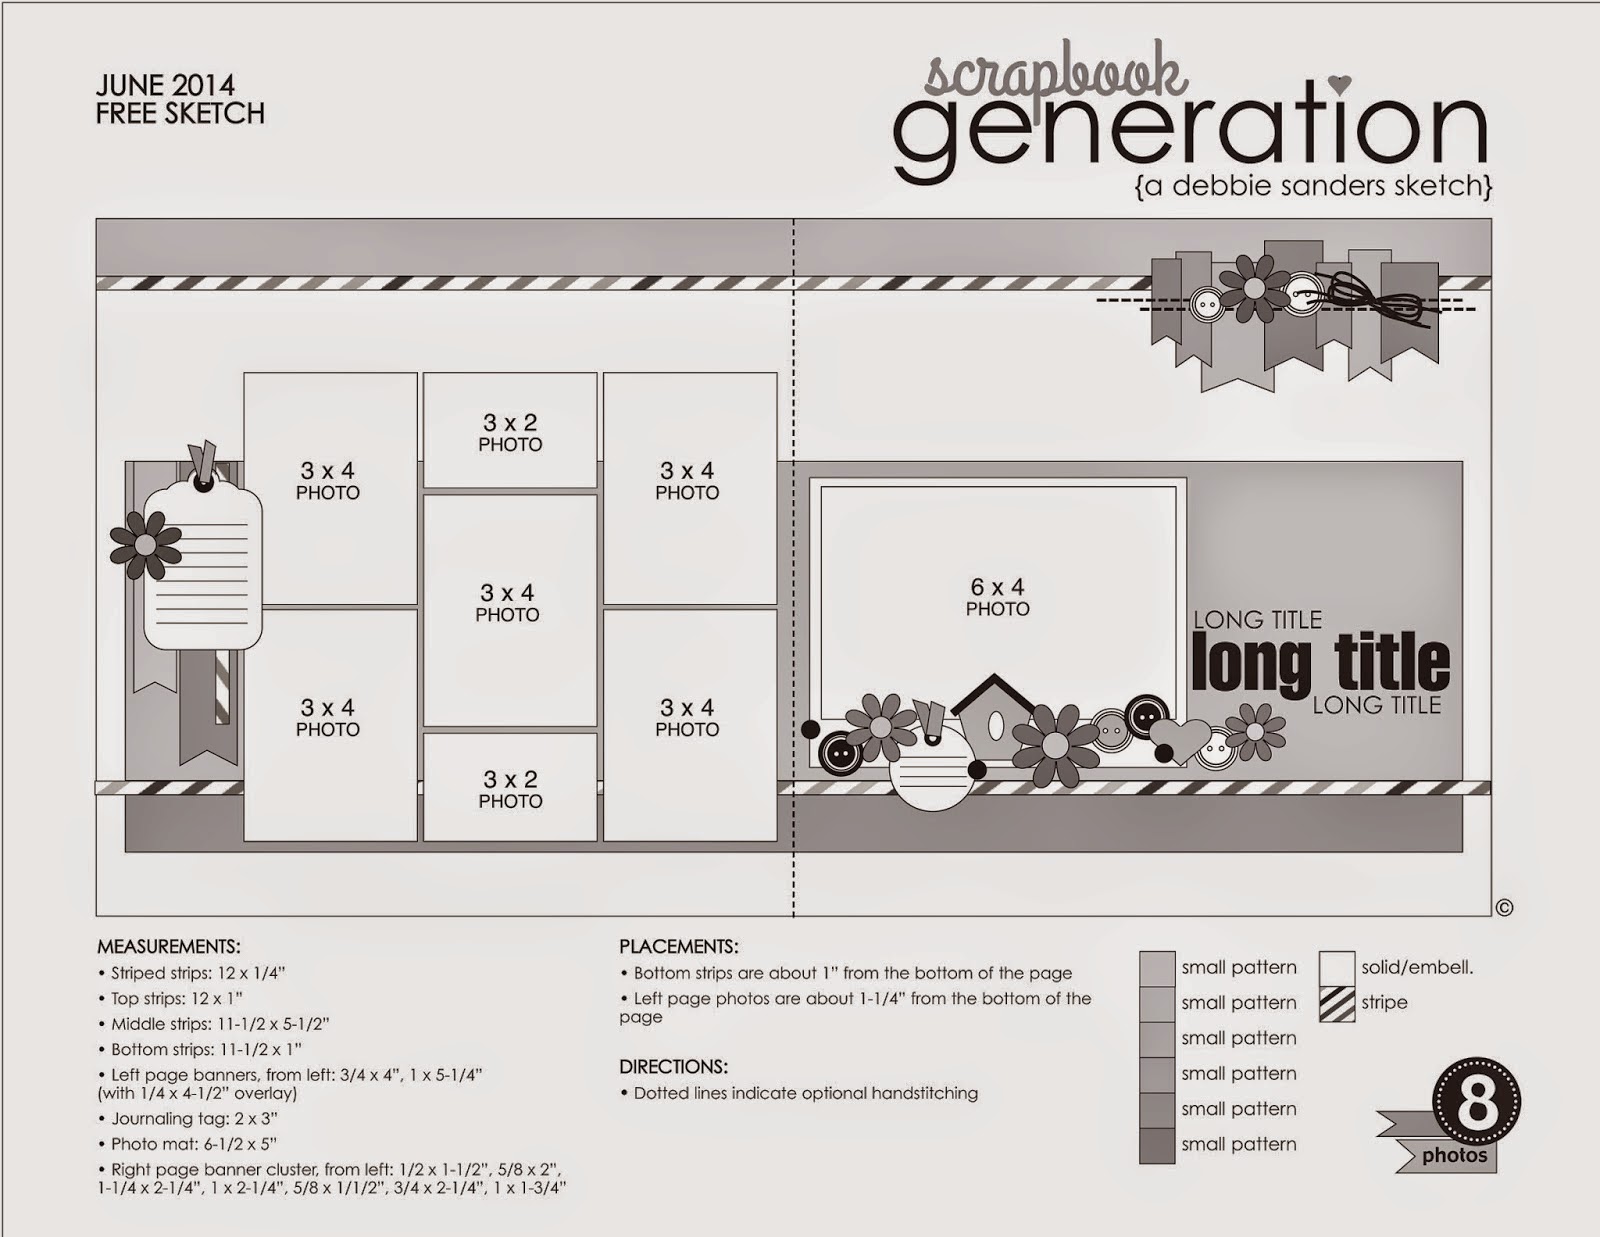
     I took my inspiration from bonus sketch #6 used for the October Card Sketch Challenge @ Scrapbook.com. 


       All of the papers are an older line, Beautiful Life, from Bo Bunny and is still one of my favorites! I started out by making the wreath from a ring of paper, which I wrapped and glued with rafia, adding orange fiber around the outside.  Then I stamped and embossed the leaves using the Filled With Blessings stamp set from Red Rubber Designs.  Inside of the wreath and the swirly background were stamped with Autumn Swirls. The anniversary sentiment was done using Contemporary Greetings, and I added the label plate over Anniversary, which I got as a RAK from my scrappy friend Lisa. So thank you Lisa! 


    And THANK YOU for visiting my blog!


Saturday, October 18, 2014

Christmas Collage Santa Layout ~ FotoBella DT

     I just LOVE this Santa image that's part of the Bo Bunny Christmas Collage paper collection, from FotoBella, so  I used it here on this layout that I scrapped of my son at 6 years old!


     I also wanted to use the film sticker that comes in the I want it all bundle, since I hadn't yet in my previous projects with this line. It worked great with this sketch from Bo Bunny's October Sketch Challenge.


     I used some Lindy's Stamp Gang sprays (Rudolph's Nose Red and Cathedral Pines Green) to mist the top of the Santa paper, and I think the colors match the collection perfectly. I also did some distressing, machine-stitching, and inking on here, including the title stickers, which I inked along the bottom in red, to make it stand out more. The tag was cut from paper and I added fibers from my own stash to it. I also added the candy cane and holly leaves from my stash. The small, yellow button comes in the Buttons pack, and the rest from the Ephemera pack. 


Thanks for looking!


Thursday, October 16, 2014

Inspirational #142: Pumpkin Patch ~ Red Rubber Designs DT

     It's time for a new stamping challenge at Red Rubber Inspirationals! I'm hosting this week's Inspirational #142, to stamp a pumpkin, in honor of Fall, my favorite season. I created this card using the Filled With Blessings stamp set from Red Rubber Designs. I just love the scarecrow with the pumpkin and colored him in with markers, as well as the polka dots and fence! The leaves were misted with different Autumn colors.


     The design inspiration came from sketch #5 used for the October Card Sketch Challenge @ Scrapbook.com.


     I misted the tag and stamped the sentiment using Autumn Swirls.


Thanks for taking a peek!


Monday, October 13, 2014

Christmas Collage Card Tutorial

     I just love the new Bo Bunny Christmas Collage I want it all bundle from FotoBella!! It's so beautiful and festive!! Get an early start on your Christmas cards, like the one I made here.


    For a step-by-step tutorial on how I made this card, please click on the FotoBella blog!
Thank you for looking!


Saturday, October 11, 2014

Bo Bunny Christmas Collage 2 Pager ~ FotoBella DT

    Happy weekend! Here's a 2 pager I made using the beautiful and festive Bo Bunny Christmas Collage I want it all bundle  from FotoBella. These photos are from my aunt, uncle, and cousin's visit at my parents house. It's always great to see them!


     I took my inspiration from this sketch used for the October 2 Page Sketch Challenge @ Scrapbook.com. 


     I thought this design would be perfect for all of the fun embellishments that come in the bundle, like the Chipboard, Ephemera, Layered Chipboard, and Brads, which I used to make the banner and clustered under the large photo.


     I fussy cut the scallops and punched holes in the centers using my Big Bite II, inking the edges with Distress Ink (Fired Brick). I also added some machine stitching using red and green thread.


Thanks for looking!

Tuesday, October 7, 2014

Bo Bunny (Christmas Collage) Layout ~ FotoBella DT

     The new Bo Bunny Christmas Collage I want it all bundle was so perfect for this old photo of me and my cousins! I'm the one on the right.


     I started by masking the doily with Distress Ink (Festive Berries). Then I used Tim Holtz' stencil (Dot Fade) with some gesso put randomly on the page. I fussy-cut all of the circles and medallions from paper from the 12 x 12 Collection Pack, and added the buttons on top. The star also comes in the pack of buttons, which I added to the top of the chipboard tree, after adding green ink to the edges.


      I added the date with some stickers from the 12 X 12 Collection Pack over the chipboard banner. I stamped 25 with the stamps that come in the Ephemera package, using Ranger Seafoam White embossing powder. I finished it off with some hand-stitched circles around the photo, date, and image of the girl and tree, that comes in the Noteworthy package.


    You'll love this collection for all of your holiday photos, old and new, from FotoBella!!


Thursday, September 25, 2014

Inspirational #139 ~ Anything goes

     For Inspirational #139, at Red Rubber Inspirationals, I made this birthday card for my little sister, since the theme this week is anything goes. She's a big shoe lover, so the Darling stamp was perfect for her!


     I took my inspiration from this sketch used for the September Card Challenge @ Scrapbook.com. As soon as I saw the boxes on the left, I thought of a closet full of shoes. I stamped the shoes, colored them with Prismacolor markers, and for shine and dimension, added Glossy Accents.


       The sentiment also comes in the Darling stamp set, and the stitches were done using Running Stitches, which can all be found at Red Rubber Designs.


Thanks for your visit!


Tuesday, September 23, 2014

Mom's Birthday Card ~ Red Rubber Designs

     Happy Tuesday! Just wanted to share this card that I made for my Mom's birthday last week.


     The lace was sprayed with a couple of mists, and then stitched down with a zigzag stitch on my sewing machine. I masked the chicken wire with some Distress Inks and more mists, but unfortunately I haven't seen my mask since. I remember washing it, but where I put it after that I have no idea. I got my inspiration to use it from sketch #107 @ Cardabilities.


     The colors were inspired by this color combo, used for this month's Card Challenge @ Scrapbook.com. 


     The sentiment was stamped using Sophisticated Sentiments from Red Rubber Designs, which is a must have if you're a card maker. I want to thank my friend Lisa (dancingirish) for the die cuts on here. So thanks Lisa!!


And thank you for stopping by!


Thursday, September 18, 2014

Inspirational #138 ~ Stamped Metal

     Happy Thursday! Time for another new stamping challenge @ Red Rubber Inspirationals! I'm hosting this week with Inspirational #138, and looking to see some stamped metals, whether it's silver, pewter, gold, bronze, iron, or copper.

     I used some gold, bronze, and iron on this card that I made using my new sewing stamps, which I just LOVE, from Red Rubber Designs!!!


     To make the background, I used an old sewing pattern of mine, which I glued onto kraft cardstock. Then I cut up my tape measure, but the colors were just right, so I really had to. Lol! All of the stamping was embossed, and I made the flowers myself. The dressform, sentiment, needle with thread, and the smaller buttons were stamped with the Sew Thoughtful set. The scissors, other buttons, and sewing machine were stamped using the Sew Thankful set.  The black stitching along the bottom was done using Running Stitches. I used Reinforcers on the muslin tag, which I got from my Dancing Irish friend. Thanks SEW much Lisa!! Here's a closer look at it!


I hope to see your stamped metals!! Thanks for looking!


Saturday, September 13, 2014

Stamped Alpha/Text Background Tutorial ~ Red Rubber Designs

     I had so much fun creating this layout for Lynda's Inspirational #137 - Just Text Me, for Red Rubber Inspirationals! I sure miss my son at this age, as he's almost a teen now, and certainly acting like one. Lol!


    Here's a closer look at all the stamping that I did.


For a step-by-step tutorial on how I made the background, please visit the Red Rubber Inspirationals blog. 


Friday, August 29, 2014

MME Sleigh Bells Ring 2 Pager

     These older photos of my son were a perfect match for the new My Mind's Eye Sleigh Bells Ring I want it all bundle from FotoBella! The plaid papers do match up across both pages, but look a little off in this photo.


     I was inspired by this sketch used for the August 2 Page Sketch Challenge @ Scrapbook.com.


     From the Mixed Bag, I used Christmas, Santa, the snowflakes, the sleigh, bingo card, and small circles. 
I attached the Wood Dots to the red snowflake on the right photo, and for the banner. All of the stitching was stamped, as well as the flourish coming from the sleigh. I used the Word/Alpha Stickers for "Gifts" and the year.


     To create a border going across both pages, I masked a notebook stencil with Distress Inks (Mowed Lawn and Peeled Paint). I also used all but one of the Decorative Tapes. For the center of the black snowflake and the sleigh, I used the Enamel Shapes.


Thanks for looking!

Tuesday, August 26, 2014

MME + Sleigh Bells Ring = Joy ~ FotoBella DT

     Like a child at Christmas, I was so joyful to open up my new My Mind's Eye Sleigh Bells Ring I want it all bundle from FotoBella! I used the JOY paper to add this fussy cut photo of my son right in the middle of the O.


     I tore and distressed around the wreath, and hand-stitched the red and white circle, adding some green fiber around it. The Be Merry tag, small circle of berries, and bell ornament, which I hung with more hand-stitching, comes in the Mixed Bag. I added the bow, inking the edges with Mowed Lawn Distress Ink. I used Decorative Tape along the bottom, placing a Decorative Brad on top. I used the Word/Alpha Stickers for the year, which comes in different colors and all kinds of holiday sentiments.


Thanks so much for stopping by! 

Friday, August 22, 2014

ARTastic Guest Designer

     I'm so excited to be guest designing this month for ARTastic, a monthly challenge blog inspired by works of art!! This month's inspiration comes from this beautiful piece of fabric art by Kristen Doran. The criteria is to use fabric on your project. 


     I came up with this layout, inspired by the colors and flowers, using Bo Bunny's older Serenity collection. 


     I fussy cut the branch and hung some fussy cut and stamped lanterns from it, adding beads and machine stitching.


 The flowers were made with my Serenity Blooms Tutorial, adding muslin fabric to the centers. I stamped them and gave them some dimension by adding some glue and water, and finishing it with a bead.


     Thanks for looking, and be sure to stop by ARTastic for some more inspiration from the design team!