Friday, October 23, 2015

Sunflower Thank You Card ~ Red Rubber Designs DT

     A few weeks ago my husband surprised me with boxes of stamps and craft supplies from a co-worker! This is the thank you card that I made for her, using my stamps from Red Rubber Designs.


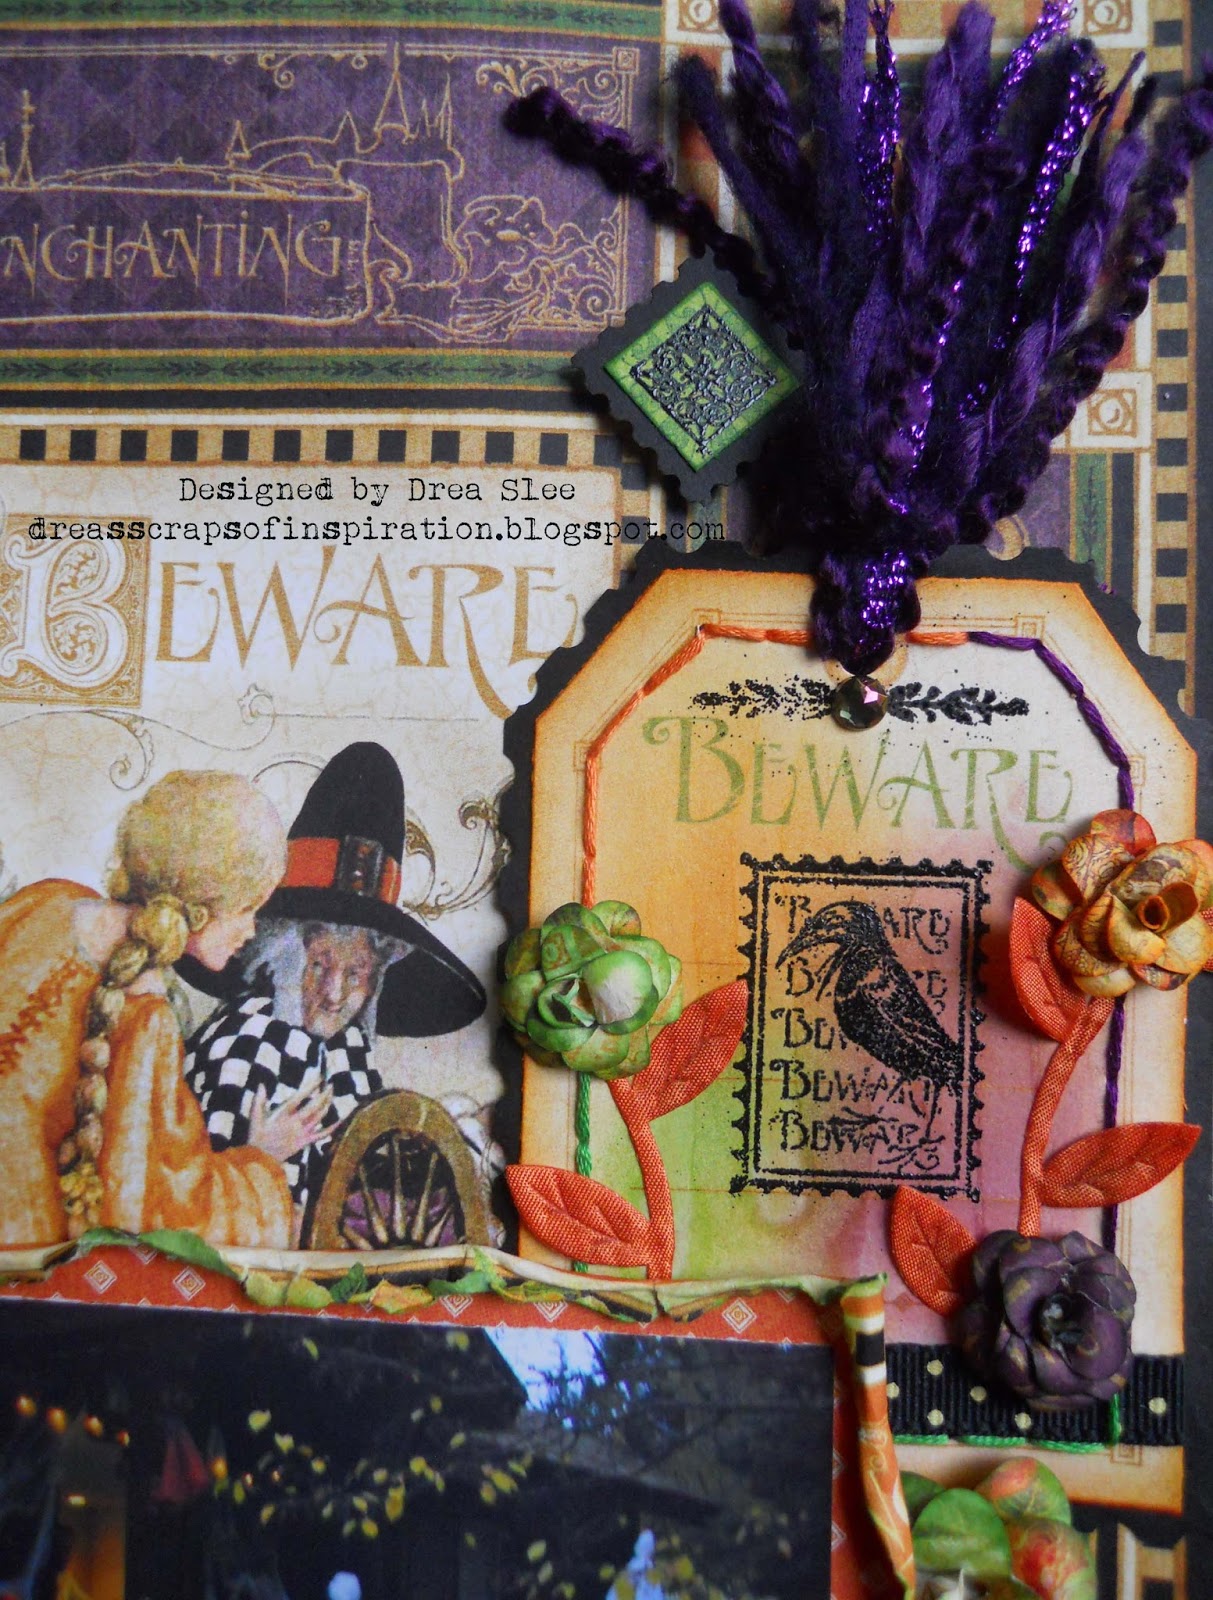
     Except for the sentiment, which was stamped onto wood using Savvy Sayings, the rest of the stamping was embossed with Distress Embossing Powder (Walnut Stain). On the yellow background I used Speckle Background to mimic dirt. Then I used the Sunflowers stamp to emboss the sunflowers in the watering can, coloring them with Distress Inks, and painting the watering can with silver paint. The larger sunflowers were embossed with the My Sunshine stamp set, and also colored with Distress Ink. For some more texture, I decided to add some brown beads to the centers.


     I took my design inspiration from this sketch used for the October Card Challenge @ Scrapbook.com. from Viva La Verve Sketches.


     I'm also entering this into the following challenges:

House of Cards using texture and the colors shown here, except for the brown which I used instead of black. 


Crafty Cardmakers and more for challenge #150 Autumn Colors. 

Beyond Grey Challenges #72 Anything Goes

**********************************

Don't miss out on the FABULOUS sale going on right now at Red Rubber Designs


Thanks for stopping by!


Thursday, October 15, 2015

Fantastic Fall Tag ~ Red Rubber Designs DT

      Fall is in the air with this fantastic tag that I made featuring stamps from Red Rubber Designs! To see the full tag and directions on how to make it, please visit the Red Rubber Designs Blog.


*********************************


Have a great day!!!


Tuesday, October 13, 2015

Bo Bunny Birthday Card ~ FotoBella DT

     You're invited to visit the FotoBella blog to see how I created this fun birthday card, using Bo Bunny's new You're Invited I Want It All Bundle! I'll show you some easy chalking techniques too!


     And if you don't have this collection, you can pick yours up at FotoBella! Thanks for stopping by!


Thursday, October 1, 2015

Beware Halloween Layout

     I was so honored to be one of ten winners for the Graphic 45 Challenge at Scrapbook.com last month! My prize was the beautiful and spooktacular An Eerie Tale Collection paper and stamps from Graphic 45, which worked perfectly with this older photo of my son dressed as a ghost on Halloween.


     To make the tag, I used Distress Inks to add some color, and then black embossing powder for the stamping. I backed it with black cardstock, did some hand stitching, and added the purple fibers, ribbons, and home made paper roses, which I scattered throughout the page. 


     I also used black embossing powder to stamp the diamonds, backed them with more black cardstock, and popped them up, along with the photo. 


     This is my example with the twist for the October Sewing and Stamping Challenges that I host @ Scrapbook.com. Come join us for all of the Fall fun! 


Wednesday, September 23, 2015

Happy Birthday Fall Card ~ Red Rubber Designs DT

     Happy first day of Fall, my favorite time of the year!! And a special Happy Birthday to my little sister, who unfortunately, won't be getting this card today, as I sent it out late. So hopefully she isn't seeing this right now. Lol!


     I made her this card inspired by this beautiful Sketch #131 @ Cardabilities!


     After misting some kraft cardstock, I used a doily stencil to apply some yellow texture paste. Then I painted the round chipboard, and stamped the lines with the Punctuation stamp from Red Rubber Designs. For the birthday sentiment I used the Savvy Sayings stamp, then wrapped it with some fibers, adding a couple of buttons inherited from my late grandma and great grandma. 


     I inked and sprayed the green scallops and added some brown beads to them. To make the leaves, I inked some white cardstock with Distress Inks, stamped them with the Filled With Blessings stamp, fussy cut them, and curled them up for dimension, adding them to the hand stitched branches. Since Autumn leaves is the theme for the Fantasy Stampers Challenge, I'll also be entering it there. 


****************************************************


Thanks for your visit!


Friday, September 18, 2015

MME Christmas On Market Street Mixed Media Technique ~ FotoBella DT

     I'm back with another layout and technique to share with you using the new My Mind's Eye Christmas On Market Street Collection from FotoBella!


     I started by using a dotted stencil with gesso onto the white dotted paper that comes in the 12 X 12 Paper And Accessories Kit.


     Then I sprayed over it with Lindy's Stamp Gang Sprays (Rudolph's Nose Red and Cathedral Pines Green).


     Once dry, add gold embossing powder over the dots and set with a heat gun.


For the September 5 Ingredients + Yours Challenge @ Scrapbook.com I used:
1. 2 Pictures
2. Something Messy (My background)
3. Frame (Made from vellum)
4. Star (On top of the tree cut from the Die Cut Alphas)
5. Stripes (The white and gold striped vellum and Paper Tape going across the page.)

For my own twist for the September Stamping Challenge, I embossed the gold dots on the Chipboard tree, adding some bling from my own stash.


And finally for my other twist for the September Sewing Challenge, I did some straight stitching by hand around the vellum frame. I also hand stitched around the vellum circle and circle photo.


Thanks for your visit!


Thursday, September 17, 2015

Victorian Collage Canvas ~ Red Rubber Designs DT

     I had so much fun making a canvas for the first time as a birthday gift for my mom, who loves everything vinatge! What a great way to feature the new Victorian Collage stamp from Red Rubber Designs!


     I also had fun with this month's Vintage Stamping Challenges #36 Tic Tac Toe, where I went with the last row down.


     To see close-ups and learn how I made the canvas background and flowers, please visit the Red Rubber Designs Blog!

*******************************************************

Monday, September 14, 2015

MME Christmas On Market Street Card Set ~ FotoBella DT

     It's never too early to get started on those holiday cards, and with the new My Mind's Eye Christmas On Market Street Collection from FotoBella, I'll show you just how easy it is to create these four cards.


     Just click on the FotoBella blog for a complete list of supplies and directions! While you're there make sure to become a follower so you don't miss out on any of the fabulous projects from my fellow design team members.


Thursday, September 3, 2015

Christmas On Market Street Stripes And Vellum Layout ~ FotoBella DT

     The new My Mind's Eye collection, Christmas On Market Street, is exactly what I've been saving this special photo of me and my grandpa for! This was from 1990, even though I didn't mark it on the page.


     I combined stripes with some of the beautiful vellum papers to come up with this design, using the 12 X 12 Paper And Accessories Kit. To the photo and dotted vellum, I added the gold photo corners that come in the Sticker Labels. From my own stash, I added lots of ribbons and fibers, which I've been collecting for over twenty five years. In fact, I think I bought the green, sheer ribbon when I was the age I was in the photo. I made a banner using some pieces from the Mixed Bag and Chipboard Elements, and attached Brads to the ends of my fiber. I also hand stitched some green fiber and gold specialty thread onto the the punched papers.


      But I didn't stop there, as I used the same gold thread to stitch around the flower die, which also comes in the Mixed Bag, along with the Christmas Eve banner that I added for my title.


       So head on over to FotoBella to pick up this gorgeous, festive collection, and get an early start on all of your holiday projects!


Saturday, August 22, 2015

Teal Birthday Card ~ Red Rubber Designs DT

     With all of the birthdays coming up next month, I thought I'd get an early start, with this teal card that I made from cardstock and vellum.


     I took my design inspiration from sketch #129 at Cardabilities!


      I started by stamping the birthday definition from the Well Defined Backgrounds stamp, onto white cardstock. Then I used a few mists to achieve the color, dripping some of it down the front. Once that dried, I applied some gesso onto a stencil, immediately adding some glitter to it, for some sparkle and shine. The banner was made from silver vellum with an embossed sentiment from the Sophisticated Sentiments stamp. I used silver stitching around the edges, and a silver netting on the base of the card. The Kaisercraft flowers were also sprayed, then scrunched and layered, before adding the grey pearls to the centers.The fibers and buttons finish it up! Thanks so much for stopping by and taking a peek! 


Thursday, August 20, 2015

Travel Tags Tutorial for Red Rubber Designs DT

     There's some awesome new travel stamps at Red Rubber Designs, which are the perfect size for these tags, made from kraft cardstock and some mixed media!


     There's four tags total, featuring the Paris Collage, (seen here)Triomphe Collage, Tower of Pisa, and Pyramid Collage stamps, bound together with some beautiful fibers and charms. To see all of these tags, and to learn exactly how to make them, please visit the Red Rubber Designs Blog  for a full tutorial. Don't forget to stop by the Red Rubber Designs store first to pick up your own stamps!


Wednesday, August 12, 2015

Floral Collage Thank You Card ~ Red Rubber Designs DT

     Watercolors are a great way to color your stamping, like I did on this card that I made for the Red Rubber Design Team! I also used them to paint the background onto white cardstock, stamping the sentiment with the For Everything stamp.


     The white cardstock really makes these flowers pop by stamping them with black ink using the  Floral Collage stamp from Red Rubber Designs, and coloring them with watercolors. I stamped and colored each image twice so that I could fussy cut some petals and curl them up.


     Homegrown summer is the theme this week at Simonsaysstampblog, and what's better than some beautiful flowers in bloom on a nice, sunny day! I only wish I could keep the real ones alive, but this card is how I grow flowers. Lol! 

Stamps from Red Rubber Designs:


Monday, August 10, 2015

Graphic 45 Gilded Lily Layout ~ FotoBella DT

     I'm back with another layout using the gorgeous Graphic 45 Gilded Lily I Want It All Bundle from FotoBella! I really wanted to showcase the chandelier stamp, so I went with this old photo of my husbands grandparents out to dinner.


     I created a wall of "wallpapers" and "moldings" with my papers, and embossed the "chair rail" using the Gilded Lily 1 Cling Stamp.  For the lower part of the wall, I used the 6 X 6 Patterns and Solids. I sprayed the upper part with mists, stamped and embossed the chandelier using the Gilded Lily 2 Cling Stamp, and added Scattered Straw Distress Ink to make it glow. I also added little light bulbs to it with Stickles (Cotton Candy Pink).


     Since this is for an album for my sister-in-law, I made a pocket for extra photos by backing the photo with kraft cardstock, and hand-stitching around it with a cream and gold thread, for the twist for this month's Sewing Challenge that I host at Scrapbook.com. I made the flap from a piece from the Tags and Pockets, using Distress Ink (Tattered Rose) around the edges. 


     I started my titlework by layering some of the Ephemera Cards along the left. I spelled "OUT TO"  with the Stickers, and stamped "EAT" onto a piece of Journaling Chipboard, adding the sheer gold ribbon from my own stash. Then I added the little spoon, which is my favorite piece, from the Vintage Charms that have been hand selected exclusively by FotoBella


Thanks for looking!


Tuesday, August 4, 2015

G45 Tres Chic Layout ~ FotoBella DT

     Hello and welcome to my blog! I used the gorgeous Graphic 45 Gilded Lily I Want It All Bundle on this layout that I scrapped of my husband's late grandmother!


     I took inspiration from the Vintage Charms, that have been hand selected exclusively by FotoBella. I decided to turn my charm into a vase, by adding some fussy cut flowers to it, and the pink lily that I had in my stash. I layered a couple of Ephemera Cards behind it, along with the paper strip that I backed with some lace, also from my own stash, dyed with some mists.


       I used Lindy's Stamp Gang Embossing Powder (Twilight Bronze Slate) on some of the paper edges, Journaling Chipboard pieces, and stamping that I did with the Gilded Lily 1 and Gilded Lily 2 Cling Stamps. I used some more lace above the photo, creating a valance with the striped paper by stamping the floral border, cutting scallops around it, and inking the edges with Distress Ink (Tattered Rose).  Gold thread in my sewing machine added that final touch of elegance! 


Thanks for stopping by!!