Sunday, October 30, 2011

Pink Survivor Flower Tutorial

To honor and support breast cancer awareness, I created this page of my Aunt Rachel who was diagnosed with breast cancer years ago, but is now cancer-free. I've lost too many people I love to cancer in general, so to have someone I know and love overcome it, is very inspirational. Besides a breast cancer awareness challenge on Scrapbook.com, I'm also entering this into the October Chippie challenge. The chippie was supplied by 3tailscraft and I used it to put my title on. I painted the bottom larger chippie with white paint and added rock candy distress stickles to it. For the smaller chippie, I painted it with pink and black paint using my brush in one direction. Then I added clear rock candy distress crackle paint. After cutting out my letters I used clear rock candy distress stickles to the white letters, and cotton candy stickles to the pink letters. The rest of the black lettering on the page was covered with black soot distress stickles. I made all the flowers myself and used Gabrielle Pollacco's rose tutorial found here.
http://www.mycreativescrapbook.com/gallery/index.php?showtopic=1743
This was also made for a challenge at this blog offering a fabulous chippie prize.
http://mlogandesigns.blogspot.com/2011/10/1000.html You have until November 4th to enter, so there's still plenty of time to play.
Here's a close-up of the chippie I used.
I thought I'd share this quick and easy flower I came up with to add to the roses.
Supplies:
Cricut Machine
Mother's Day Bouquet cartridge
White paint or dabber
Brad

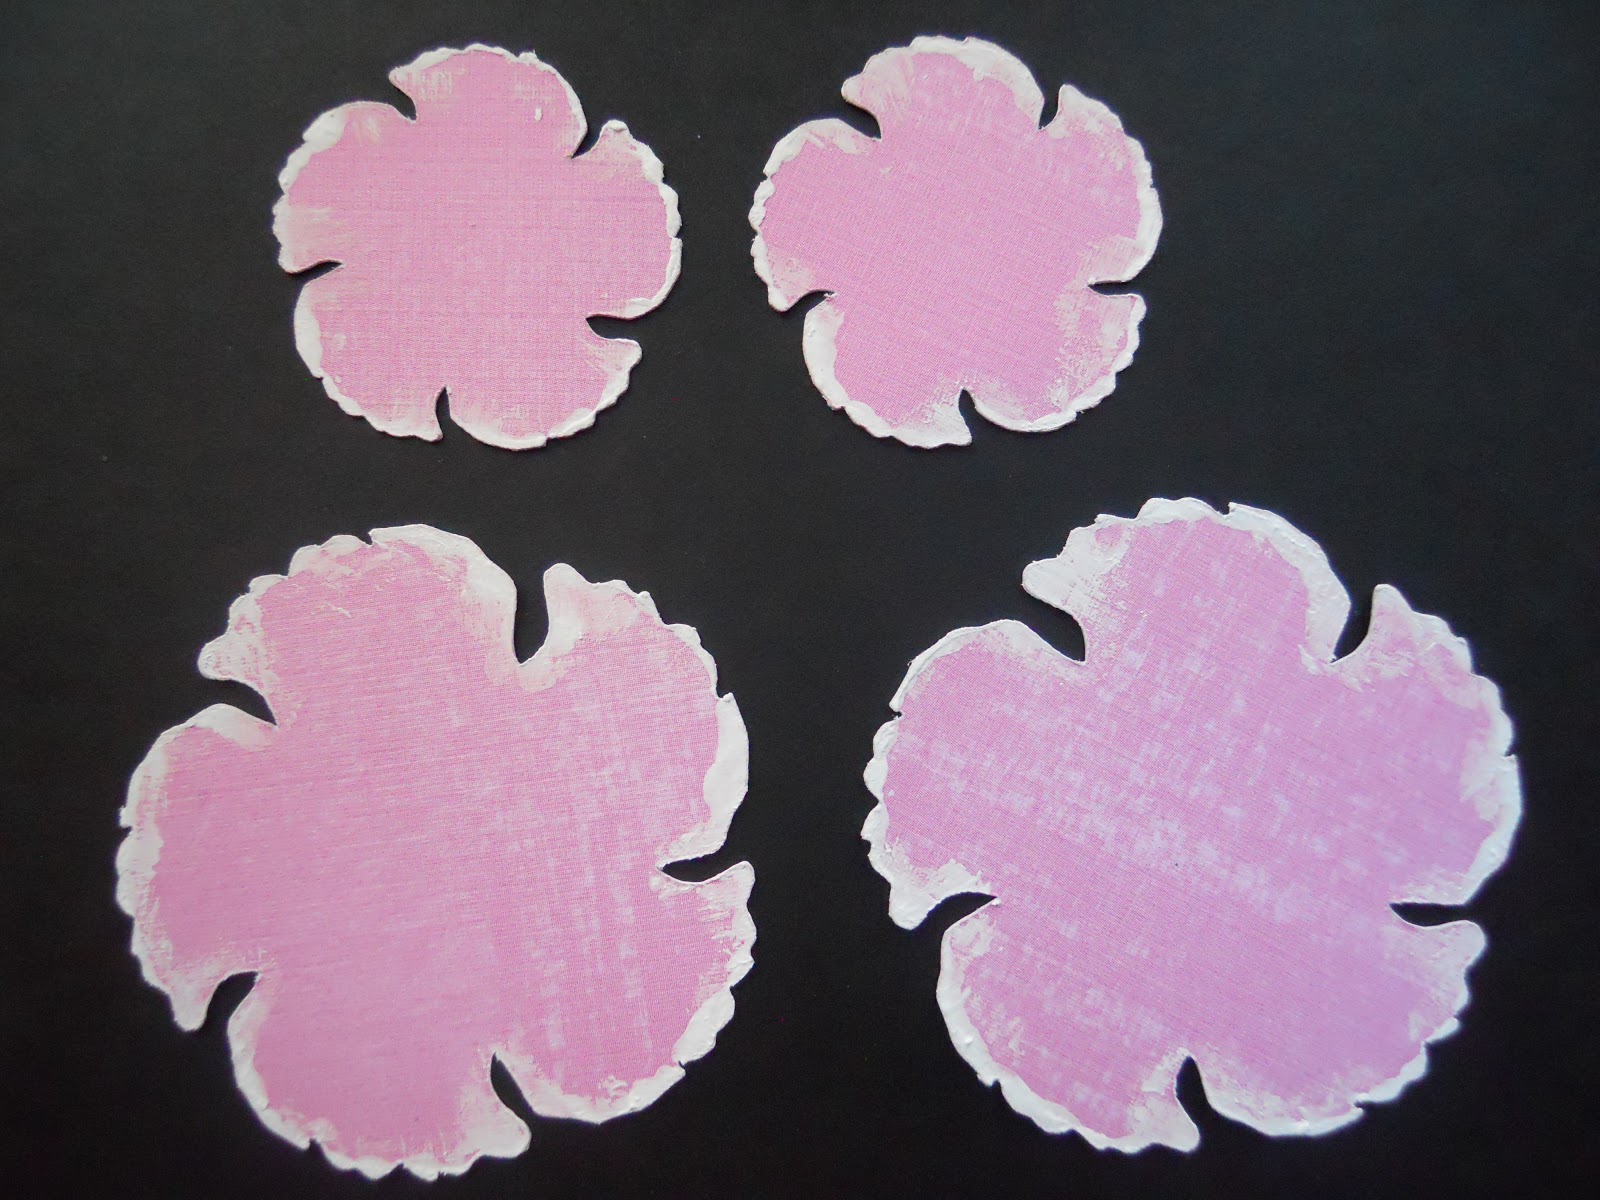
First I cut flower #9 with my Cricut machine (Mother's Day Bouquet) cartridge. I cut 2 at 2" and 2 at 1 1/4".
Then I used white paint to all the edges. It doesn't have to be perfect. I just used my finger to apply it.
Then spray your flowers with water and scrunch them up from the centers. After they're dry and opened they should look like this.
Now just poke a hole in all the centers and add your brad layering with your largest flower on the bottom.
I also made my large flower this way, but used white cardstock and pink ink for the edges. I also added 2 more flowers cut out at 3". When I was done making all my flowers I sprayed them with Dazzling Diamonds Glimmer mist. TFL!

Wednesday, October 26, 2011

Halloween Blog Hop

I just found out about this fun Halloween Blog Hop with lots of great prizes. Get details here.
http://wescrapkits.blogspot.com/

Tuesday, October 25, 2011

Pumpkin head

Hello!! Here's my entry for the October Monochrome challenge at Scrapbook.com for week 3 to use mostly orange with hints of red. I made this all out of cardstock. The orange papers started out white. I crinkled and inked them using distress inks, and masked the pumpkin which I cut out with my Cricut. I hand stitched around some of the photos in red. I hand cut the red wavy border to mimic the design of the pumpkin. I'm also using this as another example for the Halloween challenge I'm hosting here. Thanks for stopping by!
http://www.scrapbook.com/forums/showtopic.php?tid/1565185/
Here's a close up of the masking.

Thursday, October 20, 2011

Starburst Flower tutorial

It's Thursday already. Time for the new sketch at Pages in Time. Here it is.
Here's my take. I scrapped these pics of my little sister from a hike we were on together in Lake Tahoe, a couple of years ago. I'm also entering this into the October Monochrome challenge for week 4 to use mostly lime green with touches of bright blue. I painted the whole cardboard background and made the flowers myself, which I'll share with you. If you haven't gotten it yet, I highly recommend buying the Mother's Day Bouquet cartridge for the Cricut. I already have quite a few tutorials using it, with more in the making.
Supplies:(For the large flower)
Cricut Mother's Day Bouquet (Flower #23)
Green cardstock
Faded Jeans Distress ink
Glue

Using flower #23 from the Cricut Mother's Day Bouquet cartridge,cut out 3 flowers at 3", 1 at 2 1/2", 1 at 2",
1 at 1 1/2", and 1 at 1" from lime green cardstock.
Then ink all the edges with Faded Jeans distress ink.
Now take each flower, wet it, and crumple it from the center out. Be careful not to get it too wet or it might rip.
Carefully open all your flowers and let them dry completely. If you're impatient like me, just use your heat gun to speed up the process.Now layer the 3 largest flowers together slightly overlapping the petals.
Add the rest of the flowers stacking from largest to smallest and gluing each layer together. I didn't add glimmer mist but if you wanted to you could. This looks great too using white cardstock skipping the inking all together. You could also try a white flower with just a hint of color by inking the edges in whatever color you want. I know I'm going to try that in a future page. Here's a close-up of the finished flower.

Tuesday, October 18, 2011

Undying Love (Flower tutorial)

I was so happy to scrap this painting that my brother did! It was inspired by Gustav Klimt's, "the Kiss." I did this for the October darker side challenge with the topic of the macabre. For the background paper I used gesso and inks over white cardstock.To mimic the stars in the painting I scattered small beads on the black background. I made all the flowers myself and thought I'd share a tutorial on how I made the red and gold ones.
Supplies:
Red cardstock
Gold paint dabber
Glue
Glimmer mist (iridescent gold)
stylus
foam pad or old mouse pad
beads
Cricut (Mother's Day Bouquet)

First I started by cutting out my flowers using flower#6 on the Cricut (Mother's day Bouquet) cartridge. For the larger flower I cut one at 1", 1 1/4", 1 1/2" and 1 3/4".
Then I used my gold dabber to paint all the edges of the flowers.
Next I use my stylus and foam pad to go over all the petals loosening up the paper and making it easier to curl.
Then you want curl all your petals up and out, except for the smallest one, which should be curled inwards.
Now you glue all your layers together starting with the largest flower on bottom.
Now take a larger bead or bling and glue smaller beads around it.
Just give it a spirtz of some glimmer mist and you're done. These flowers were made from the same red cardstock that the title is cut out of. By painting the edges black it makes the red appear brighter and gives you a different look.

Thursday, October 13, 2011

PIT October 13-19 Thursday Sketch

The new Thursday sketch came out today at Pages in Time. Here's the sketch.
Here's my take. I found this pattern of cogs and gears, which I printed onto white, burgandy, and teal cardstock. http://www.patternhead.com/freebies/free-vector-repeat-patterns-gears-and-cogs
I misted and masked the entire background and used my sewing machine to stitch the zigzags.I'm also entering this into the October color challenge at Scrapbook. com to use burgandy, teal, black, and white.TFL!
Here's a close-up!

Wednesday, October 12, 2011

"Have yourself a cozy little Christmas"

This is my adorable nephew Neo from last Christmas Eve. I made this for the Snowy Owl challenge at Scrapbook.com. We had to make it 75% white and 25% black and another color. I choose aqua. We had to have at least 5 layers and use a quote. I'm not sure if I used enough white but love the way it came out anyway. I used clear embossing powder on white cardstock to make the snowflake border using my Martha Stewart Stamp around the page stamps. I then went over it using my blending tool and black soot distress ink.I stamped the calendar and made the white bling. For the large snowflake I painted the chipboard white and glued diamond dust on top. The bottom snowflake was cut with my Cricut (baby it's cold outside) and the top little snowflake was punched. I then applied frosted lace stickles to them and layered them between the chipboard. Finally I added a small aqua pearl on top.TFL!
Here's a close-up of the snowflake.

Sunday, October 9, 2011

Out for a bite

Halloween is my favorite holiday, so I decided to host a Halloween challenge at Scrapbook.com. This is my example and entry for the 2 page sketch challenge as well. I started by misting white cardstock with Scarlet Glimmer mist and inked around the edges using black soot distress ink. The cool flourish on the left was cut with my Cricut (October 31st. cartridge). I did some fussy cutting with the font, which I found here.
http://desktoppub.about.com/library/fonts/dd/uc_shlop.htm
I also hand cut the jagged border. Here's a link to my Halloween challenge if you want to join in the fun.
http://www.scrapbook.com/forums/showtopic.php?tid/1565185/


Thursday, October 6, 2011

October Going in Circles Challenge

Hello! I decided to host another circle challenge at Pages in Time. The twist is to use a ring, or circle with a hole in it. I created my circle by first cutting my ring out of white cardstock using my Cricut. I then applied gesso and laid rope on top. After it dried I painted it brown and then used walnut stain reinker to go over the rope. The leaves were cut out of white cardstock and inked with various fall colors before gluing to the outside of my ring. I did a lot of misting on the other papers and masked some leaves using larger cutouts from my Cricut (Mother's Day Bouquet). I hope you'll join me and show me your circle ring.
http://pagesintimestoresite.ning.com/forum/topics/october-going-in-circles-challenge