Sunday, November 25, 2018

Winter Wishes Card


     To start the holiday season, I created a festive card for a December birthday, using Distress Inks and Emerald Creek Embossing Powders, for the Winter Wishes Blog Hop with Eileen Hull


     The colors were inspired by this beautiful palette used for the November Inspirational Card Challenge @ Scrapbook.com


     I made the background by smooshing Distress Inks (Pine Needles and Evergreen Bough) onto white cardstock, and embossing the snow and snowflakes with Emerald Creek (Enhanced Ivory Pearl) EP. Then I tore around the edges, and embossed them with (Soft Fallen Snow)EP. 


     The main image, sentiment, and edges of the card base, were embossed with EC (Charred Gold) EP. Then I colored the wreath with Distress Inks and a couple of Lindy's Sprays. 


     The strip of lace was embossed with EC (Enhanced Ivory Pearl), along with the dots of the pink background, colored with Distress Ink (Victorian Velvet). Then I added beads to the wreath, along with a few Pine Cone Charms, lightly embossed with (Soft Fallen Snow) Embossing Powder, and strung with green fiber. 


Thanks for looking!

***********************
Challenges Entered:


 Embellishments: Pine Cone Charms


Thursday, November 22, 2018

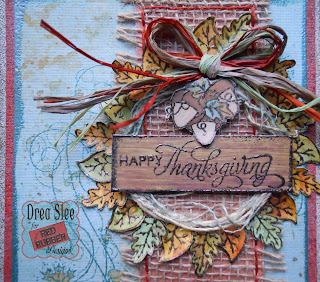
Happy Thanksgiving ~ Red Rubber Designs DT

     Happy Thanksgiving! This holiday season, try adding burlap to your next project to create a natural look full of texture and dimension, that's perfect for Fall or Winter. I made a banner with it, on a card featuring an assortment of Autumn Rubber Stamps from Red Rubber Designs


      Autumn Swirls were embossed onto the background with Emerald Creek Baked Texture (Patina Oxide), after smooshing with Distress Inks (Bundled Sage and Rusty Hinge). It's matted with cardstock, embossed with more Baked Textures (Chunky Rust), and (Dirty Sand) on the base.


     I did some hand-stitching around the burlap banner, backed with orange cardstock. 


     The wreath started with some fibers that I saved from some packaging. 


     Then I embossed the leaves, acorns, and sentiment with Emerald Creek (Burnt Copper Leaves) Embossing Powder, using the Filled With Blessings Unmounted Rubber Stamp for the leaves, and the Contemporary Greetings Unmounted Rubber Stamp for the sentiment. 


     The acorns were embossed with the Give Thanks Cling Mounted Rubber Stamp, and topped with a raffia bow.


     Check back soon for the Winter version of this card, using burlap and stamps from Red Rubber Designs!

********************************


Challenges Entered:


Wednesday, November 21, 2018

Lego Birthday Card

       
     Today I was very happy to spend time and celebrate with my adorable nephew for his second birthday, as he lives far away and I'm not able to see much of him! Since he loves blocks, I dug up this old Lego paper to make this card for him. 


     This sketch used for the November Inspirational Card Challenge @ Scrapbook.com made it easy and quick to do. 


     I used some of the black strips to make the two. 


     And finished it up with some Bo Bunny Double Dot Jewels. 

   
     Thanks for looking!


Tuesday, November 20, 2018

Bo Bunny (Land of Wonder) ATC's ~ FotoBella DT


     Hi everyone! The Bo Bunny (Land of Wonder) I Want It All Bundle from FotoBella.com is packed full of fun and whimsy, making this set of ATC's so quick and easy to make! 


     Just visit the FotoBella Blog for a step-by-step tutorial.Thanks for looking!

*************************


Friday, November 16, 2018

Button Day with Bo Bunny (Land of Wonder) ~ FotoBella DT

     Hello and happy National Button Day! I'm so excited to be posting my third annual project for the FotoBella Design Team, celebrating this special day dedicated to BUTTONS! This year I dug into my own stash, to create this mixed media piece made from cardboard and the Bo Bunny (Land of Wonder) I Want It All Bundle from FotoBella.com


     I love recycling pieces of cardboard, but especially the circles, like the large one used here, saved from a frozen pizza! The smaller one was left over from a set of pans, and both started with a coat of Prima Marketing Black Gesso. Then I glued red, black, and blue buttons to the rim of the larger circle, along with some FotoBella Vintage Charms. Next, I covered them with a light coat of black gesso, so the original colors could show through. After it dried, I highlighted all of the texture with Prima Marketing Metallique Waxes (Bronze Age and Vintage Gold), and finished the edges with some red fiber.


     The smaller circle was given additional texture with Prima Marketing Patina Effect Paste (Blue). Then I added dies from the Noteworthy pack, rubbing the edges of the center one with Metallique Wax (Vintage Gold). To resemble a button, I added some large grommets with my Crop-A-Dial II Big Bite, strung with some black and gold fibers. 


     I overlapped part of the key die cut with the bottle, onto the larger circle, adhering it with some pop dots. 


     The other key comes from the Layered Chipboard. Then I finished the edges of the smaller circle with some black and gold fibers. 


     Thanks for looking, and shop FotoBella.com for your Buttons and the Bo Bunny (Land of Wonder) Bundle


*********************

Sunday, November 11, 2018

Bo Bunny (Land of Wonder) Dali Layout ~ FotoBella DT

     Hi everyone! Today I'm sharing a Design Team layout using the Bo Bunny (Land of Wonder) I Want It All Bundle from FotoBella.com. This whimsical collection was the perfect match to scrap one of my favorite paintings, melting clocks not included!


     To enhance the melting clocks, I cut the (Land of Wonder) paper and a sheet from the Bo Bunny (Land of Wonder) 12 X 12 Coordinating Double Dot Paper Bundle, into a curvy design. Then I used my finger to apply Bo Bunny Stencil Paste (Gold) to the edges, securing the right side of my page with a gear from a FotoBella Vintage Charm


     After smearing a little Bo Bunny White Gesso to the background, I used some old alpha stamps on the banner, and inked the edges with Distress Ink (Black Soot).


     All of the banner pieces are from the Noteworthy pack. Then I applied Bo Bunny Stencil Paste (Gold) to the Bo Bunny Royal Stencil, included in the Bo Bunny Sunshine Bliss I Want It All Bundle, to make the key. 


     Finally, I hand-stitched the black vines. 


     Thanks for your visit, and get the Bo Bunny (Land of Wonder) I Want It All Bundle at FotoBella.com

***********************
Challenges Entered:


Thursday, November 8, 2018

Dream the Future ~ Red Rubber Designs DT

     Happy Thursday! I've been playing in my art journal again, to create this page featuring the Dream, Beautiful Butterflies, and My Sunshine Rubber Stamps from Red Rubber Designs!


     I started by adding lots of texture to the background, beginning with a piece of cheesecloth adhered with Prima Marketing Soft Matte Gel. Then I added strips of lace and trims, a couple of small keys, and some pieces of Tim Holtz Chains, and covered it all with Prima Marketing White Gesso. Once it dried, I colored it with a few Lindy's Sprays (Tiffany Lou Blue, Delphinium Turquoise, and Afternoon Delight Denim). Then I used my Stamperia (Steampunk Mechanism) Stencil with Prima Marketing Patina Effect Paste, applying the blue and brass with a stipple brush, to create the gears and bigger keys. The diamond/stars were done with the Bo Bunny Stickable (Oh My Stars) Stencil.


     Additional texture was added to the background, chains, and cardboard with Prima Rust Pastes (Brown and Red).


     The main image and "Dream" was stamped with the Dream Cling Mounted Stamp using Ranger Jet Black Archival Ink, and embossed with LG Midnight Pewter EP onto white cardstock, colored with Lindy's Sprays (Tiffany Lou Blue and Delphinium Turquoise).


     I used chipboard for the rest of the title, embossing it with LG Hyacinth Blue Jade EP.


     Then I went over the letters with Patina Effect Pastes.


     All of the flowers and leaves were stamped with the My Sunshine Stamp, and the butterflies with the Beautiful Butterflies Stamp, all embossed with LG Midnight Pewter EP onto white cardstock, colored with LG Sprays (Pineapple Paradise, Hag's Wart Orange, Cajun Carneliun Red, Steampunk Sepia, and Ponderosa Pines Olive) and one Magical (Rowdy Rizzo Red from the Go Greased Lightnin' Set).


************************************


Challenges Entered:


Magicals: Rowdy Rizzo Red from the Go Greased Lightnin' Set


More Than Words ~ November Future and Stars ( I used Future in my title, and the stars were done with Prima Brass Paste using the Bo Bunny Stickable Oh My Stars Stencil. They're not the typical star, so I hope it counts).

Art Journal Journey ~ Vintage or Modern (I tried combining both by using some old trims and laces combined with my newest purchase of the gears and chains, and creating old rust with colorful butterflies and flowers/leaves.)

Thursday, November 1, 2018

Graphic 45 (Garden Goddess) Layout ~ FotoBella DT

     Hello again! I'm back with a layout featuring the Graphic 45 (Garden Goddess) I Want It All Bundle from FotoBella.com.


     I took my corner punches out for this page, using the Graphic 45 (Garden Goddess) 12 X 12 Collection and the (Garden Goddess) 12 X 12 Patterns and Solids Pad. Then I used my Blending Tool to ink the edges with Distress Inks (Worn Lipstick and Mowed Lawn), also used on the Ephemera cards. I fussy-cut part of the flower on one of them, overlapping this old photo of myself when I was fourteen, on vacation in Hawaii. So please ignore the acid washed jeans. Lol!


     Then I used permanent inks to stamp all of the flowers and leaves with the Basic Grey Enjoy the Journey Stamp. I also smooshed Distress Ink (Worn Lipstick) on some of the flowers, spritzed them all with water, and scrunched them up for dimension. 


     The canopy of leaves on top, was stamped with Memento (Cottage Ivy) ink. 


     Finally, I added some border strips from the Graphic 45 (Garden Goddess) Stickers, and bamboo for some tropical flair. 


     Thanks for your visit, and get the gorgeous Graphic 45 (Garden Goddess) I Want It All Bundle at FotoBella.com.

*****************************
Challenges Entered: