Tuesday, July 31, 2012

Sapphire Flower Tutorial

I can't believe it's already the last day of July! Summer sure is going fast! I finished this page just in time for quite a few challenges. I used 4 different punches for the Punch it up Challenge at Flying Unicorn. We had to use a vintage image, so I used this photo that I saved awhile ago online somewhere. It's the first in a series of vintage pics that I want to scrap.I'll get to the others some other day, when the mood strikes. I also did this for Scrap for help where we had to use a feather. Of  course I used a peacock feather. I'm also entering this into the July Monochrome Challenge at Scrapbook.com to use liberty blue, and the Sparkle and Bling Challenge at Funtoolas.
I made the frame by cutting out an oval shape from a gift box using my Cricut.Then I applied Liquid pearls around the frame, painting over the whole frame with gold glaze.

Here's a butterfly that I already had printed. I just stitched the gold antennaes. I'm pretty sure I got the image at Swirlydoos.
For the Punch it up Challenge we had have at least 5 handmade flowers, so I came up with these. It's actually an adaptation of some flowers I saw online, but have such a different look, that I wanted to share.

Supplies:
Circles cut out of blue cardstock using the Cricut
Glue
Glossy Accents
Glitter
Distress Ink (Chipped Sapphire)
Bling for the centers

Directions:
To make the largest flower, cut out 5 circles with your Cricut at 1 1/2", 2", 3", 4", and 5".
Using a pencil divide your circles into 5 sections.
Use those lines as a guide to make your petals. Carefully tear in between the lines like this.
This gives a boxy look which I didn't like with my page, so I rounded all the ends of my petals.

Next ink all the edges of your flowers with Chipped Sapphire Distress Ink.
For the next step, you can either spray your flowers with water or Glimmer Mist. Then shape and curl all your petals up.
Now use Glossy Accents to cover the insides only of your flowers. Do one flower at a time, adding glitter before your glue dries.
Glue all your layers together, starting with the largest one on bottom. Finish it off with a blue rhinestone in the center.This flower was done using larger pieces of glitter, but I also made some smaller ones using a finer glitter. I couldn't decide which one I liked better, so I used them both. What's your favorite?


Wednesday, July 25, 2012

Turkish Trinkets

I just love the concept for the Lay it on me Challenge at Flying Unicorn this month! We got to choose any shape we want, and layer and overlap it to make a background. I decided to go with squares, wanting to make a quilt design. But just as I was putting down the last square, I realized that I hadn't layered any of my squares. I was ready to do another page for this challenge, because I loved the white lines in between the squares I cut from some older Basic Grey (Boxer Collection) papers. But then the light bulb went off in my head, and I decided to cut smaller squares out of tissue paper and decoupaged them onto the pp squares. We also had to use buttons, which are a mix of vintage and new, but so cute because they're so small . I had so much fun with this challenge, that I want to do it again, but  with another shape. You still have a week left if you want to play!

I used a scroll for my journaling which is rolled up and tied with some gold silk ribbon. Here's what it says.

Here's a closer look at the buttons and squares. As you can see my tissue squares aren't perfectly aligned, but I love the texture that the decoupage creates.

Thanks so much for stopping by!

Monday, July 23, 2012

Prima Giveaway

Wow! Check out this fabulous giveaway at Ingvild Bolme's new blog. She does such amazing work! I just entered myself.

Wednesday, July 18, 2012

Seems like yesterday

I've been meaning to post this page I made as a gift for my Grandma Norton for Mother's Day. I love this old photo of her children, my dad included, who like me, is the oldest! I started by using cardboard for the background, inking and distressing it. I did some machine stitching, and used my dearly departed Great Grandma's buttons on here.I'm entering this into the July Heritage Challenge at Scrapbook.com.
A close-up.
TFL!

Sunday, July 15, 2012

Ink to Impress

I was so excited to get my new Summer Distress Inks, that I created this whole page inspired by the colors, and made for the "Ink to Impress" challenge at Flying Unicorn. I broke out my masks and inks to create the floral  patterns. All the flowers, except for the larger pinks ones, were stamped and embossed, before coloring with inks. I cut the butterflies using my Cricut, (Serenade cartridge) and layered and inked them.
Here's a close-up of the flowers.
Thanks for looking, and for each and every comment! I really do appreciate it!

Tuesday, July 10, 2012

Act naturally

I hope everyone is staying cool today! It sure is hot in Reno right now! Perfect day to scrap  inside with the air conditioner on. I just finished this page that I made for a few challenges.
My inspiration for this page started with this beautiful sketch that my friend Amarilys made for Scrap that.
 I knew immediately after seeing it that I wanted to do a nature page, using all creams with a touch of brown for the July Monochrome Challenge at Scrapbook.com. I got the twist of using a doily, which was also a requirement for the ABC Challenge there using the letters D for doily, E for embossing, and F for fussy cutting. I cut the branches out with my Cricut (home decor cartridge) and embossed them with distress embossing powder. I stamped and fussy cut all the butterflies and dragonflies. I also used cheesecloth for the first time, and absolutely LOVE it!! I dyed it first with some antique linen distress reinker. I applied it to the whole background, machine stitched around it, and then cut the edges. I also made the leaves using the Mother's Day Bouquet cartridge for the Cricut. Here's a close up of the stamping and stitching. 
Thanks so much for dropping by!

Saturday, July 7, 2012

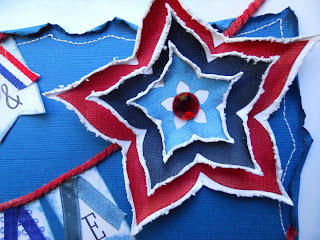
Freedom Flower Tutorial

   I had such a great 4th of July! I hope you did too! I did this 2 pager documenting last years celebration. It's my example for the July Sewing Challenge that I host at Scrapbook.com. The twist this month is to stitch some stars and stripes. I machine stitched around the blue cardstock, and hand-stitched the stripes (on the journaling) and stars. There's still plenty of time if you want to join us.
This started out as one page. Obviously with such a big title, it wasn't working for me. So when I saw this sketch for the July 2 page sketch challenge at Scrapbook.com, it was just the inspiration I needed.
I masked and misted the star paper on the left. I made the flowers to resemble stars and added a touch of bling in the centers for the Red, white, and blue challenge at Funtoolas, where the twist is to add bling.

Here's a close-up of the journaling.
A close-up of some stitched stars.

FREEDOM FLOWER TUTORIAL

Supplies: 
red, white, light blue, and dark blue cardstock
Cricut (Mother's Day Bouquet cartridge)
Glue
Distress inks
bling for the centers

Directions:
Cut flower #1 out of red cardstock at 3 3/4", dark blue at 2 1/2", and light blue at 1 1/2"
Ink the edges with Distress Ink.
Glue onto white cardstock and cut around the flower leaving some white on the edges. It doesn't have to be perfect since we're going to distress the edges anyway. I used my distressing tool, but if you don't have one, you could always use your scissors.
Now just shape your petals up, while giving it a little pinch with your fingers. After shaping all of your flowers, glue them together, and add some bling to the centers. 
I thought this was a fun, patriotic flower! I hope you try it! 

Sunday, July 1, 2012

Watermelon banner and July reveal for PMB!

I'm so happy and proud to have been chosen as part of the new DT at the Paper Mixing Bowl! Ever since I discovered this really fun site back in April, I've been scrap cooking with them every month. I'm so excited to  reveal my first LO for them as a design team member!
Take a look at this month's recipe for strawberry shortcake.

The main ingredient is red strawberries, so red is the predominant color. 

Utensils:
Contrasting paper patterns-I used polka dots and stripes.
Ribbon- I used lots of different ribbons on this page
Banner-I made the banner and will be showing you how in a minute. It's SO easy!
Die cuts/stickers-I used my Cricut to cut the title and make the banner.
Textured paper- I wasn't able to use any textured paper, but distressed the edges of my papers to  give it a little bit of texture.

Directions:
I wrote about a summer tradition using Summer, as a journaling prompt. Here's a closer look.

The watermelon banner was so simple to make, that I almost didn't make this tutorial, but decided to do it anyway. I started by cutting a 3 inch circle out of  dark green cardstock using my Cricut, a 2 3/4" circle out of lime green, and a 2 1/2" circle out of red.  After distressing the edges, glue your circle together like this.
Then cut it into eighths. 
You could probably skip this part if you wanted to, but I inked the edges of the watermelon with red ink.

Then I used black puffy paint to create seeds.

Now just assemble your banner however you'd like. I just attached mine to some black string. Thanks for looking!