
I'm on the design team for Pages in Time, and recently we were challenged to use postcards on a LO or project. So I decided it was the perfect opportunity to work on my bucket list, which I've been wanting to do for the last couple of years. So after a lot of thought I made my list on plain white paper, and then inked it in various colors with my blending tool. I did a lot of stamping and embossing, including the stitched border, coins, small postcards, key, map flowers, and Paris stamp above the smallest map flower. I've gotten quite a few requests on how I made the map flowers, so I thought I'd show you in my first tutorial.

Here's a close-up of the largest map flower.
 Step 1.
Cut out 4 flowers ( I used my Cricut (Mother's Day bouquet cartridge) from white cardstock. If you don't have this exact cartridge, then try using another shape as long as the petals aren't too skinny, so you can see the stamping. I cut mine at 3", 2 1/2", 2", and 1 1/2".
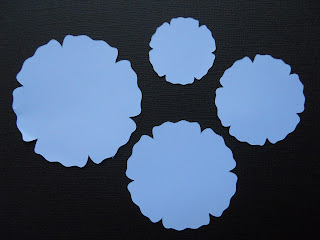
Step 2.
Use your blending tool to apply Tim Holtz Distress inks. I used Tumbled glass, spun sugar, and dried marigold.
 Step 3.
Use globe stamp to cover all the flowers. I bought mine at Michael's craft store, but if you don't have a globe or map stamp you can always use a real map. Another option is printing a map onto white paper and then inking over it.I stamped mine using Walnut Stain distress ink and then lightly went around the edges with it.

 Step 4.
Pinch in the centers of each petal with your fingers, without making any creases.
 Step 5.
Glue all the layers together starting with the largest flower on the bottom. For the center I used a regular gold office brad. I dipped it into distress embossing ink and then into Walnut Stain distress embossing powder, heating it with a heat gun.Finally I used Liquid Pearls in Petal pink to make small dots around the brad.


Here's a close-up of the largest map flower.

Cut out 4 flowers ( I used my Cricut (Mother's Day bouquet cartridge) from white cardstock. If you don't have this exact cartridge, then try using another shape as long as the petals aren't too skinny, so you can see the stamping. I cut mine at 3", 2 1/2", 2", and 1 1/2".

Step 2.
Use your blending tool to apply Tim Holtz Distress inks. I used Tumbled glass, spun sugar, and dried marigold.

Use globe stamp to cover all the flowers. I bought mine at Michael's craft store, but if you don't have a globe or map stamp you can always use a real map. Another option is printing a map onto white paper and then inking over it.I stamped mine using Walnut Stain distress ink and then lightly went around the edges with it.


Pinch in the centers of each petal with your fingers, without making any creases.

Glue all the layers together starting with the largest flower on the bottom. For the center I used a regular gold office brad. I dipped it into distress embossing ink and then into Walnut Stain distress embossing powder, heating it with a heat gun.Finally I used Liquid Pearls in Petal pink to make small dots around the brad.


great tutorial! TFS!
ReplyDeleteWel come to the blogging world. Your blog looks amazing and what a great first entry. your bucket list page is very cool
ReplyDeleteFab flowers Andrea! Love this tutorial, and your blog is beautiful!
ReplyDelete