Wednesday, December 27, 2017

Simple Stories Vintage Blessings Autumn Layout ~ FotoBella DT

     Hello, and welcome to my blog! I originally printed this 8" X 10" photo, that I took in South Lake Tahoe, for a different project that luckily didn't work out, because I love how it looks here with the Simple Stories Vintage Blessings Collection from FotoBella.com.


     The quote was cut from the Vintage Blessings Collection Kit, and inked along the edges with Rusty Hinge Distress Ink, using Ground Espresso Distress Ink on the paper behind it. Then I added the acorn from the Bits & Pieces, and the Chipboard flower on top. 


     As I looked through my Bits & Pieces, I came up with the title, highlighting "Autumn" against the yellow texture paste that I applied behind it, with my Bo Bunny Palette Knife.  


     The branch and tab that I stamped with the date, is also included with the Bits & Pieces


     With my Blending Tool, I applied Wild Honey Distress Ink to the edges of the striped paper, adding the tree sticker that comes in the Vintage Blessings Collection Kit to the corner. 


     Thanks for looking, and shop FotoBella.com to pick up this beautiful fall collection, and so much more.  


Thursday, December 21, 2017

Holly Swirls Card Set ~ Red Rubber Designs DT

     Stamping is a great way to make multiple cards, so I created this set featuring the Holly Swirls Unmounted Rubber Stamp from Red Rubber Designs, which includes four different holiday sentiments. 


     The colors and background were inspired by this months color challenge at Lindy's Stamp Gang.


     The first thing I did was to sprinkle a sheet of 12" X 12" white cardstock with course salt, which will make four cards.  Then I sprinkled with some Magical Powders (Rizzo's Rowdy Red, Greased Lightnin' Green, and Sassy Sapphire) and sprayed with water. The card below shows a heavier use of the salt, which I brushed off after drying, and when combined with the Magicals leaves a beautiful effect that's impossible to duplicate, making each card one of a kind. 


     With so much color, I went with LSG Purely White Embossing Powder along the edges and punchwork, and to stamp the Holly Swirls and sentiment for snowy, frosty look. 


     Then I used a paintbrush and water with my Magical Powders to color the holly and leaves, which really brought out the design. 


     The inside was stamped with the Christmas Blessings Unmounted Rubber Stamp using Memento (Lady Bug) Ink, and my wish to you as well. 


Thanks for looking, and shop Red Rubber Designs for a great variety of Winter & Christmas Stamps


**********************************


Challenges Entered:


From the Lindy's Stamp Gang Online Store I used Purely White Embossing Powder, Rowdy Rizzo Red and Greased Lightnin' Green from the Go Greased Lightnin' Flat Magicals, and Sassy Sapphire from the Drop Dead Diva Shimmer Magicals.


Tuesday, December 19, 2017

Winter Art Journal Page ~ FotoBella DT

     The magic of Winter is almost here, so I captured the season in my art journal, using lots of texture for the FotoBella Design Team, with some Mixed Media from FotoBella.com.


     The background was created with white fibers, made to mimic trees, and a couple of pieces of lace to mimic hills, applied with Prima Marketing's Soft Matte Gel. Once dry, I applied a light coat of Prima Marketing's Heavy White Gesso. When that dried, I spritzed the sky with Vibrant Turquoise Dylusions Mica Spray and Brushed Pewter Distress Spray Stain. Next came some embossed snowflakes, and falling snow made with Prima Marketing's Salvage District Clock Stencil and Snowflake Paste.


     I dug through some of my older Bundles to come up with the tag that I embossed "Winter" on, using Bo Bunny's Woodland Winter Collection.


     The deer was a great find, also from the same bundle, sprinkled with some snow using Prima Marketing's Glass Glitter Pearl Flakes, which I also added to the bottom of the page, adhered with Soft Matte Gel.


     I used the Snowflake Paste again to make the snowman with a circle stencil, and on the twigs that I grabbed right outside of my door, used for his arms. Then I added some beads, buttons, and ribbon made into his scarf.


     I love all of the texture and shimmer on here, using supplies from FotoBella.com!


     Thanks for looking!

***************************************
Challenges Entered:


Mixed Media & Art ~ Magic Time (I took inspiration from the colors, deer, snow, and trees). 


Monday, December 11, 2017

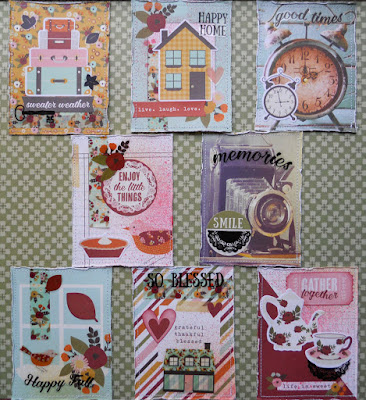
Simple Stories Vintage Blessings ATC's ~ FotoBella DT

     I'm still fairly new at making ATC's, but this set came together pretty quickly and easily with the Simple Stories Vintage Blessings Collection from FotoBella.com.


     Visit the FotoBella Blog for a step-by-step tutorial and supply list to make your own! 


Saturday, December 9, 2017

Christmas Card Day ~ FotoBella DT

     Today is Christmas Card Day, so I made a card to spread some cheer using bright colors and some mixed media from FotoBella.com.


        I started with some white cardstock that I embossed with Prima Marketing's Old Town Stamp using Ranger's Jet Black Archival Ink and Ranger's Gold Tinsel Embossing Powder. Then I colored the design with a paintbrush using Candied Apple, Twisted Citron, Lucky Clover, and Antique Bronze Distress Spray Stains. The circular design reminded me of a stained glass window, so I embossed it onto clear acetate, adhered with Glossy Accents, and framed with some greenery that I coated with Prima Marketing's Snowflake Paste.


     A holiday sentiment to finish it off! 


Season's Greeting's to you too! 

***********************************
Challenges Entered:


Time Out Challenges ~ #98 (I took inspiration from the colors and patterns)


Saturday, December 2, 2017

Simple Stories Vintage Blessings Layout ~ FotoBella DT

    Hello! Today I have a layout that I scrapped of some fall foliage featuring the Simple Stories Vintage Blessings Collection from FotoBella.com.


     The larger birds with the quote was cut 4" X 6" from one of the papers in the Vintage Blessings Collection Kit, and inked along the edges with Fossilized Amber, Rusty Hinge, andAged Mahogany Distress Inks. The smaller bird was added from the Bits & Pieces package. 


     Don't throw away the strips from the ends of your papers! I used a couple of them to frame the aqua paper, inking the edges of the plaid strip with Ground Espresso Distress Ink.


     Then I added a couple of strips of Vintage Blessings Grateful Washi Tape to the top of my page.


      For some flair and dimension, I finished it off with a few pieces of Chipboard.


     Thanks for looking, and shop FotoBella.com for this collection and many more!


Thursday, November 30, 2017

Poinsettia Birthday Card ~ Red Rubber Designs DT

     Hello and welcome back to my blog! Today I have an embossed card for those upcoming December Birthdays, that could easily become a holiday card by simply changing the sentiment with some featured Rubber Stamps from Red Rubber Designs!


          A birthday sentiment and holiday greeting, along with some other basic sentiments, can all be found with the Sophisticated Sentiments Unmounted Rubber Stamp. 


      To create the festive red background, I applied many layers of Candied Apple Distress Ink with water onto white cardstock, waiting for each layer to dry before adding the next. Then I used white embossing powder on the Poinsettia, and rest of the stamping.


     I love the border around the edges, created with the Background Soup Unmounted Rubber Stamp!


     Thanks for looking, and shop Red Rubber Designs for a great selection of Winter & Christmas Cling Mounted Stamps, as well as Christmas Unmounted Rubber Stamps!

**********************************


 Challenges Entered:


Monday, November 27, 2017

Cyber Monday Mixed Media Page ~ FotoBella DT

     Cyber Monday is finally here, which means deals and sales are to be found everywhere online today, including at FotoBella.com! So I created another page in my art journal to mark the occasion, using some mixed media for the FotoBella Design Team.


     There's lots of layers on the background, starting with some torn book pages that I gathered from some of my Bo Bunny Ephemera Packages. Over that I applied a coat of Prima Marketing's Heavy White Gesso, letting it dry, before adding some background stamping using Prima's Salvage District Clock Stamp with Ranger's Jet Black Archival Ink. Then I applied Prima Marketing's Black Gesso to the Tim Holtz Dot Fade Stencil with one of my Bo Bunny Palette Knives. I used some large alpha stencils with white gesso to spell SALE, and then sprayed my page with Candied Apple Distress Spray Stain. Then I masked "Cyber Monday" with White Linen Dylusions Paint, and used Brushed Pewter Distress Spray Stain with my fingers to rub over some of the dots. To deepen the red of the title, I used a paintbrush to apply another coat of the Candied Apple Distress Spray Stain.


     I used a punch to make the tags, stamping SALE with Candied Apple Distress Ink, and inking the edges with Black Soot Distress Ink. I also used the Candied Apple Distress Ink to highlight today's date on the mini calendar that I printed out for November, and to stamp more texture with Bo Bunny's Rough It Up Stamp.


     To make the FotoBella girl, I simply traced her from one of my Clear Storage Boxes for Bundles, and used those pieces with some cardstock to piece her back together. Again I used Candied Apple Distress Ink to make her shirt, adding some dimension to her earring and bracelets with White Opal Liquid Pearls.


     I hope I've inspired you today to not only scrap, but to shop for all of those deals, especially at FotoBella.com!

********************************
Challenges:

Thursday, November 16, 2017

Button Day Cards ~ FotoBella DT

     Happy National Button Day! I can't believe another year has already gone by since my post here celebrating one of my favorite embellishments! I got into my late grandma's stash to create a couple of cards using some of my older Bundles from FotoBella. Pinterest is always full of great ideas, and inspired this cute, little, snowman family.


     The background was done with Hickory Smoke, Pumice Stone, and Weathered Wood Distress Inks spritzed with some water. Then I used an old toothbrush to apply snow using White Linen Dylusions Paint. The actual snow texture, which I absolutely LOVE, was done with Prima Marketing's Snowflake Paste, used on the hills and the tree sticker applied with Bo Bunny's Palette Knife!


     The snowmen were made with three buttons, knotted at the eyes, with scraps of ribbon for the scarves. Then I cut the hats from black cardstock, coating them with Black Diamond Stickles, also used on the edges of the sentiment.


     This other card was made for my nephew, and again uses up some older Bundles, including Bo Bunny's Pop Quiz Papers with Black Soot Distress Ink applied to the edges.


     After printing the bus onto white cardstock, I applied Glossy Accents to the windows, and Orange Peel Stickles to the lights. Black buttons make perfect wheels, atop the embossed music notes stamped with Ranger's Jet Black Archival Ink


     Bo Bunny Bundles and Ephemera Packs almost always have buttons in them, including chipboard ones. Don't be afraid to mix up different collections like I did on this banner strung together with some twine. 


     You can never have enough Buttons, so shop FotoBella.com to add to your collection! 


Challenges: