Monday, June 8, 2020

Altered Shell Tin

     Even though we got hail and rain here in Reno yesterday, Summer IS coming, so I took out my shells and altered this metal tin that measures 2 1/2". 


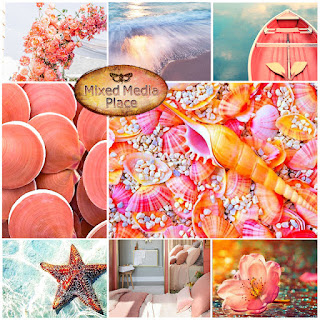
     I was inspired by the colors, shells, starfish, and water from the beautiful moodboard for the May 2020 Challenge @ Mixed Media Place!


     Since the silver tin was shiny, I lightly went over it with  sandpaper, before covering it with white gesso, so it won't peel off later. Unfortunately I learned this the hard way on a recent project, that I had to redo because I skipped that first step. Then I cut a 2 1/2" circle from a used dryer sheet, and adhered it inside of the tin with Ranger Multi Medium Gloss, creating ripples and texture with the end of my Prima Double Sided Texture Paintbrush. I also added the gloss to Art Alchemy Sparks (Mermaid Sparkle) to create a glaze, before painting the inside with two coats. To highlight the ripples, I painted over them with Art Alchemy Metallique (White Pearl) Paint, which really brought the water to life. After adhering the shells and starfish, I added some Prima (Pearl) Glass Glitter. 


     To protect the clear lid, I placed a 2 1/2" circle on top, before adhering the small shells and covering them with white gesso. Then I used Prima 3D Matte Gel to apply Prima Mini Stones in between the shells. Once it all dried, I painted it with Lindy's Gang Magicals (Hi Maintenance Magenta, Tears on my Pillow Tangerine, Bling-y Blonde, and Cuckoo Clock Cardinal), also used on the larger shells. After a few coats, I went over it with some touches of white gesso. 


     The outer part of the tin was done by creating a wavy texture with the end of my Prima Texture Brush, using Ranger Multi Medium Gloss, and adding it to my paints as a glaze. At first I repeated what I did to the inside, painting it with Art Alchemy Sparks (Mermaid Sparkle). But even after highlighting the texture with (White Pearl) paint, it felt like it was competing with the inside, so I went over it with a coat of Art Alchemy Sparks (Black Raven), followed by another coat of (Mermaid Sparkle) and touches of (White Pearl). Much better!


     Thanks for your visit! 

*******************
Challenges Entered:


Friday, June 5, 2020

Prom 2020 Mini Album

     A few months ago, when my Son told me his Senior Prom was going to be March 7th, I thought it was strange to be having it so early. But then the state of Nevada went into quarantine the very next weekend, so I'm so happy and thankful that he had that experience, unlike so many others during these times. He had such a great time, so I wanted to preserve those memories for him in this 6" X 6" mini album. Part of his graduation gifts, which was just a couple of days ago, and one that he will always cherish! 


     The original accordion album was old and ugly, so I covered it with a coat of black gesso and Emerald Creek (Black Cherry) Aroma Embossing Powder. The chipboard letters also got black gesso, and were embossed with EC (Midnight Sparkle) EP.


     I was so pleased with my first order @ Creative Embellishments, and my first project was this 2020 Shaker, window included! After coating all of the pieces with white gesso, the back piece was embossed with EC (Midnight Sky) EP, and the sides and top pieces with EC (Silver Sparkle) EP. Then I filled it with blue and silver confetti. Silver Sparkle Embossing Powder was also used on the base with the pearl, super glued over a metal flower, with silver elastic cording to hold it all together.  


     Now for the inside! The first two pages were made with some sprays and a stencil to replicate ripples, embossed with Emerald Creek (Fractured Ice) EP. 


     The wooden camera was covered with black gesso and Finnabair Metallique Wax (Old Silver). 


          I used EC (Midnight Sky) Embossing Powder again on the date, and paper edges behind the middle photo. 


     A staple was added to the ribbons. 


     The next two pages were also done with sprays (Lindy's Afternoon Delight Denim and Blueprint Sketch Distress Spray Stain).


        The stars were done with the Tim Holtz (Falling Stars) Stencil using Dylusions (After Midnight) Paint with a Mini Blending Tool. 


          Then I used the same paint to mask a strip of drywall tape across the bottom. 


     To add more photos, I made some tags with pockets made from black cardstock and the Tim Holtz (Stripes) Stencil, embossed with EC (Silver Sparkle) Embossing Powder. 


     Both tags were covered with colored tissue papers, and stamped with the Prima (Art Daily Planner Collection) Stamp Set, embossed with Emerald Creek (Onyx Frost) and (Hammered Metal) Embossing Powders.


     The last two pages are on the back. 


     Lots of stamping and stencil work on these pages, with EC (Silver Sparkle) Embossing Powder around the edges and matting a couple of the photos.


     The chipboard music note had been in my stash for awhile, and was previously painted with glossy black paint. 


     Thanks for looking, and hope you're doing well!

***************************
Challenges Entered:


Friday, May 29, 2020

Congrats 2020 Card

     Unfortunately, like so many others in the class of 2020, my son won't be having a graduation ceremony, so I wanted his card to be extra special! 


     My design inspiration came from Sketch #537 at Mojo Monday!


     To make the background, I smooshed some Lindy's Gang Sprays (Afternoon Delight Denim and Cathedral Pines Green) together onto a piece of white cardstock. After drying, I used a die cut circle as a mask, sprayed around it with the same colors, and added touches and splatters of Distress Spray Stain (Brushed Pewter). Then I embossed the stitched circles with Emerald Creek Embossing Powders (Midnight Sky and Burmese Jade), also used on the star and edges. Congrats was done with some old chipboard letters covered with black gesso and embossed with EC (Mirror Platinum) Embossing Powder, giving it some awesome shine! The rest of the sentiment was done with some Thickers. 


     Emerald Creek (Mirror Platinum) was also embossed around the card base, made from grey cardstock, and to the star.


     Thanks for looking, and congrats to all of the classes of 2020!

*************************
Challenges Entered:

Mojo Monday ~ #537 


Tuesday, May 26, 2020

Birdcage ATC's

     Hello and hope you're doing well! Before the Spring season ends, I wanted to make sure to use these Bo Bunny wooden birdcages that I found in my stash, featured on my latest set of  ATC's (Artist Trading Cards). 


     The soft colors and textures were inspired by the Lindy's Gang May Color Challenge


     I started with just enough recycled pieces of kraft board to make three ATC's measuring 2 1/2" X 3 1/2". After giving them a light coat of white gesso, I applied more through a couple of Tim Holtz Mini Stencils (Doodle Art 1 and Doodle Art 2). Then I added color with Lindy's Gang Sprays (Hottie Patottie Hot Pink, Sea Mint Green, and Brushed Nickel) and Magicals (Drop Dead Gorgeous Green and Oom Pah Pah Pink), followed by touches of Finnabair Metallique Wax (Old Silver). 


      The frames were cut from the Bo Bunny (Sunshine Bliss Collection), and the edges finished with Distress Ink (Black Soot). Since I popped up the center frames, I made nests for the birdcages to sit on with some small pieces of colored cheesecloth. I left it white and natural to back my cards with. 


     Each card got a different embossing powder added around the edges, to the birdcages after a coat of white gesso, and to emboss the leaves with LG (Purely White, Spring Leaf ChartreuseQueen Sheba's Silver, and Black Forest Black) Embossing Powders. 


     The flowers were stamped with (Jet Black) Archival Ink and colored with LG Sprays (Sea Mint Green and Hottie Patottie Hot Pink) and Magical Shaker (Oom Pah Pah Pink). Then they were fussy-cut, layered, curled, and finished with a dot of (Pewter) Liquid Pearls.


     The journaling strips or titles were printed onto white cardstock using Word, smooshed with the same Lindy's colors, and finished around the edges with (Black Soot) Distress Ink. 


Thanks for looking!

     ********************************
Challenges Entered:


Simon Says Wednesday Challenge ~ Recycle (Kraft board used for card bases)

Monday, May 11, 2020

Into the Forest Canvas

     Hello and happy Monday! I just love trees, the moon, and the color green, reflected on this mixed media canvas!


     So of course I was instantly inspired by the May Mood Board at Art Daily Cafe.


     Right away I knew I was going to use this magazine image of a forest, and gave it a coat of clear gesso. To bring it to life, and make a tree, I added texture with cheesecloth and natural twine. Then I painted it with Art Alchemy Paints (Opal Magic Green-Gold, Sparks Fairy Wings, and Metalliques Green Olive and Dark Forest). To create branches, I covered the twine with Prima Black Gesso, also used through the Tim Holtz Mini Birch Stencil to create the big trunk, along with the skinnier ones hiding behind the shrubs.


     Wanting to create moonlight, I added a circle of (Picket Fence) Distress Crayon and Finnabair Matte Wax (Patina Green) onto the top right. The moon and butterflies were embossed onto white cardstock with the Finnabair Art Daily Dream Without Fear Stamps, using Emerald Creek (Onyx Frost) Embossing Powder. Then the butterflies were colored with Distress Inks (Pine Needles and Forest Moss), and along with the moon, given two coats of EC (Lime) Baked Texture. 


     I also used Finnabair Antique Brilliance Wax (Lucky Emerald) to the edges of the canvas and over the black gesso, as shown on the tree trunk.


     No need for gesso on the greenery. I painted an ombre effect with Art Alchemy Paints starting on the bottom with Metallique Dark Forest, followed by Metallique Green Olive, and topped with Sparks (Fairy Wings). Then I added sparkle to the "berries" with (Eucalyptus) Stickles. 


     Torn strips of recycled cardboard were painted with the same paints before adding the quote. But first it was printed onto white cardstock, colored with Distress Inks (Pine Needles and Forest Moss), and embossed with two coats of Emerald Creek (Lime) Baked Texture.  


     The same techniques were done with the witchy woman embossed with Emerald Creek (Onyx Frost) EP onto white cardstock, using the Finnabair Trust the Magic Stamp, colored with the same two Distress Inks, and finished again with two coats of EC (Lime) Baked Texture. Then I added some thread to the top of her head before adding the small embellishments. The flowers, key, gears, and screws were made with the Finnabair Moulds (Art Noveau and Mechanica) from paper clay, and either painted or finished with wax over black gesso. In addition to the green waxes used throughout the canvas, I also added touches of Metallique (Old Silver) to some of the embellies. 


     Thanks for looking, and stay safe! 

************************
Challenges Entered:


Monday, May 4, 2020

Color OUTSIDE the Lines ~ Red Rubber Designs DT

     Hello! Hoping to bring cheer and happiness to you all with my new art journal spread, featuring stamps from Red Rubber Designs and some of the new Dylusions Paints


     I started by randomly stamping the larger checkers with the Designer Diamonds Unmounted Rubber Stamp using (Jet Black) Archival Ink, and the smaller ones with the Background Blocks Stamp.  Then I stamped the text with the Well Defined Backgrounds Stamp onto torn strips of white tissue paper, adhered with clear gesso. 


      The first layer of painting was done by spritzing my pages with water before adding paint, which created more of a wash instead of the drips I was visualizing. So I tried it again but with more water added to my paints and none to my pages, which helped the drips to fall. Because I wanted to use the colors of the rainbow, and the new Dylusions Paints are so bright and vivid, I started on the left with Pink Flamingo, followed by Tropical Sangria, Mango Punch, Lemon Drop, Sour Appletini, Blue Hawaiian, Blue Lagoon, and added the original (Crushed Grape) to the end since the new set doesn't include purple. I also splattered each color along the bottom. 


     "Color" was masked with an old Tim Holtz Alpha Mask using a Mini Blending Tool with (Black Marble) Dylusions Paint. Then I purposely drew outside of the lines with the (White Linen) Dylusions Paint Pen, doing the same thing with the drips but with the (Black Marble) Paint Pen. 


     The rest of the titlework was stamped with the Distressed Typewriter Bet Stamp (no longer available) using (Jet Black) Archival Ink, with highlights done with the (White Linen) Dylusions Paint Pen. 


     Thanks for looking, and whatever your situation, try to stay positive! 

     *************************


Challenges Entered:


The Artistic Stamper ~ May Journaling (Used art journal and background text)