Friday, August 30, 2013

Fishville Flower Tutorial

Happy Labor Day Weekend!!! Before searching out some sales and spending time with family, I wanted to share my latest work with you, including another flower tutorial.

These gorgeous colors were inspired by the August Design Seeds Challenge at Scrapbook.com.I did the twist with my distressed sharp corners. It's also my entry for the August 5 Ingredients Challenge to use
1.teal
2.patterned paper background
3.buttons
4.2 photos
5.paper strips

I used foam Thicker's for the title and shaded the bottom alphas with Distress Ink (peacock feathers and spiced marmalade).

To make my paper strips I started with a sheet of white cardstock, which I misted with Glimmer Mists (Bahama blue, Valencia, It's black,  and dark purple), and Lindy's Stamp Gang Mist (Tibetan Poppy Teal). After it dried, I tore the strips and used water to curl the edges over. Then I applied Stickles (mermaid) over the strips to make them sparkle. After layering them together I glued down some fibers and yarns to give them even more texture.

While going through my stash of handmade flowers, I found the perfect one with the top smaller one next to the title. There's so many fun color choices you can make with these, that I decided to make some more to share with you!

I started by cutting some flowers out of white cardstock using my Cricut (Storybook cartridge). Make sure to use the shadow feature and the shift button before pressing S, which will say hibiscus. Cut one at 3", 2", 1 1/2", and 2 at 1".

Using some scissors, cut the stems off.

Pick 3 different inks and use your blending tool to apply them to your flowers. I used spiced marmalade, peacock feathers, and evergreen bough).

Then wet your flowers and scrunch them from the centers.

After opening them up I shaped the petals towards the middle. For the bud I scrunched my smallest 1" flower and opened up a petal or 2 to fold over. It's kinda hard to explain so I hope you can tell from the photo.

Starting with the largest flower on the bottom, layer and glue the rest of your flowers. Cut the middle bud a little at the end, before gluing in the center of your flower.

Your flower should now look like this. If you want to give it some shimmer like I did, then just add some Glimmer Mist (dazzling diamond).

The flower on top was made the same way, except I switched the orange marmalade out for dusty concord instead. I'm sure you can come up with a color combo that'll be just right for your page!

As always, thanks for stopping by!

Monday, August 26, 2013

Tiny the Turtle

Happy Monday! I hope everyone had a great weekend! I just want to share  this page that I made for my Aunt who is recouping from surgery. She's a little obsessed with turtles and has real and fake ones all over her house. So I decided to scrap this photo of one of her real turtles named Tiny.

I was inspired by the bonus sketch for the August Monthly Sketch Challenge at Scrapbook.com.

I started with this very old grass paper that I've had since I first started scrapping. I had to use it here though, and mixed it with some Tim Holtz "lost and found" papers. After inking and water distressing the edges, I also machine stitched around them, using different colored green threads. I created a shell texture with some gesso, inks, and mists near the flower and top right side by the grass. The title was made from some old green alpha stickers that I covered with embossing powder. The small flower was leftover from my handmade stash, and I paired it with a leaf to cover the twist for the 4 Categories Challenge at Scrapbook.com, for category 2, to use mostly green and at least one leaf.

I got the large flower from my dear scrapping friend Anna C.  It was an off white but I sprayed it with some Glimmer Mist (forest green) and Lindy's Stamp Gang Mist (mystic malachite) to match the greens. Thank you Anna!! Then I just added some grass behind it. Thanks for looking!

Thursday, August 22, 2013

Fishing on Father's Day

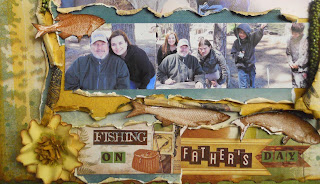
Now that this hectic month has finally settled down a little, I was able to play with my new Bo Bunny "Trail Mix" collection. This is my new favorite line from them at the moment, and love how it looks with these photos from Father's Day a couple of years ago. I just want to point out that I didn't do any fishing here nor do I ever! Lol!

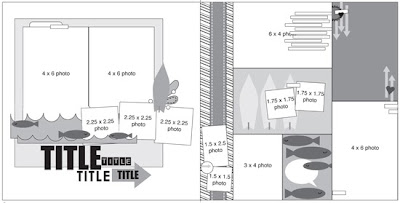
This is based off of this fun and creative sketch, done for the August Sketch Challenge at Scrapbook.com.It is also my entry for the August Color Challenge to use yellow, green, and brown with the twist of using nature photos. 

I started by masking the trees in the background using some mists. I inked and water distressed all of my edges. I used the cardstock stickers to make my title and for the journaling stips on the right. The fish were cut out from pp and then applied with Glossy Accents to make them shiny.
The flowers were left over's from my handmade stash that I altered a bit from the original. I thought I had made a tutorial for them, but I guess not, since I couldn't find them. The green Petaloo vines were a RAK from Flying Unicorn. Thanks Alda! 

And thank YOU for stopping by!

Friday, August 16, 2013

My final reveal for BOAF

It has been such an honor to design with the fabulous kits that Amy puts together for BOAF! Even though my 6 month term is almost up, I still have soooo much product left from all my previous kits, that is sure to keep me busy. I did this 2 pager using the Glitz design "color me happy" collection and the cardstock that comes in the main August kit and the extras.

I started by tracing and cutting out the yellow and green scallops from the cardstock. Then I used my Cricut Expression to cut out the white m's. I altered the black Thickers with some white paint and used an old m&m sticker for the center of the O. 

The stickers were just perfect for these photos and were the only thing that I added here from my own stash. 

I love this peekaboo which I used to cover part of the photo!  

For my next LO I used the Simple Stories "I heart Summer" collection. My son's favorite season is Summer, so I had to use this photo of him getting out of the pool from a couple of years ago. 

I cut out a frame from the I heart Summer paper and distressed the inside edges. I used the I heart Summer banner to cover the sentiment on the Pebbles Inc. library cards/pockets, and layered 2 of them before adding some stickers that you can buy with the extra embellishments. The yellow glittery buttons were leftover from the July Kit and made the perfect addition to my sun.

I used some Glitz washi tape, which unfortunately is sold out, and paired it with the fun strips of tape stickers from Simple Stories.I also used Smooch for the first time and used it to color the hearts a sparkly red, but it's kinda hard to see here. 

I finished it off with some black stitching all around the photo. Thanks so much for looking!


Saturday, August 10, 2013

I heart this kit! BOAF August Reveal

Happy Saturday! I'm really excited to show you what I've been doing with the awesome August Kit at BOAF! For this first page I scrapped some very old photos taken at Disneyland in CA. The top photo is me and my little sister, and the bottom one is of my Mom and Grandpa.

I was inspired by this first sketch from Page Drafts. I started with this cute cloud paper from Simple Stories "I heart summer" collection, part of the extra pp's you can buy here. I stamped the grid along the right with a Prima stamp. The circle banner is a Glitz peekaboo that I cut in half and applied with Glossy Accents.Then I lightly went over the thickers that come in the main kit with white ink.

Even though it's kinda subtle, I used white Pebbles Inc.chalk on the black cardstock background, and on the chalk tape that I used for part of the title to mimic clouds. I used a white pen to make the stripes on the yellow cardstock and for the Disneyland title. I continued the lines of the striped paper along the bottom with hand stitching in the same colors. I also used my twisted stitching to stitch around my photos. 

For this next page, I scrapped this photo of my little sister all grown up from the Disneyland page, being silly in Ireland.

I was so happy to finally use my new Martha Stewart punch that I've had for a few months now, on this flamingo Bazzill Basics cardstock that you can buy here. I was inspired by the second to the last July Pagemaps. I used my own doilies and mixed them with the Simple Stories pp's. I used a Pebbles pocket card to make my title using the Lily Bee alpha stickers from the May Kit! I just love those!!

I couldn't have made this page without the pin, surfboard, ice cream, and heart balloon stickers that you can buy with the extras here. They were just perfect for this photo! I finished it off by hand stitching a circle around the photo using white embroidery thread.

Thanks for looking!

Tuesday, August 6, 2013

Technique Tuesday for BOAF "Mixed with Glitz"

Mixed media that is. I had so much fun using a mix of  techniques on this page that I made, using the Color me happy collection from Glitz design that came in the new August kit at BOAF! I  just found this photo of my son when he was just 2 years old a couple of weeks ago, and thought it would be perfect with all of the rainbow of  colors. He lays with his elbows out just like his dad. Lol!

I was inspired by this sketch used for the August Sketch Challenge at Scrapbook.com.

After choosing black cardstock for my background, I rounded the corners and distressed the other side of the "color me happy hearts" paper. Then I lightly used some of my mists, most of which I've gotten from past kits. Starting on the left is Mister Huey's sunshine, which actually comes out more of an orange, which is why I also used marigold Glimmer mist. The chalkboard Glimmer mists are mantis and cornflower daze. I tried to keep most of the misting in the center of the page and made a huge boo boo on the left side. Thankfully the striped paper covered it right up.

After that dried I applied some gesso onto this polka dotted stencil from the Crafter's Workshop. I placed the stencil along the top right and bottom left of the page. 

Once it dried, I broke out my Distress inks and my grid stamp from Tim Holtz, using it along the bottom and right side edges of where I knew I wanted to place my photo. Then I used it again on the light blue cardstock I matted my photo on. I used a zigzag stamp for the yellow circle and a dotted one for the green circle. The light blue cardstock comes with the main kit, but the yellow and green are extras that you can buy here.

To finish off this page I decided to use the transparent heart peek-a-boo as a pattern for my hand stitching, poking holes all around it. I also added some buttons from my own stash to go over the circles that I cut out from the Glitz polka paper, which is also an extra. 

Here's a closer look at some of the misting, gesso, and stitch work. 

I hope you enjoyed the different techniques that I shared with you, and that you'll try them for yourself! 

Thursday, August 1, 2013

Everlasting Love

I just LOVE this old photo of my grandparents, and decided to use it as my example for the monthly Stamping Challenge that I host at Scrapbook.com. My Grandma recently passed away, but I'm comforted with the thought of her being with my Grandpa again. I love and miss them both SO much!!

I started with some Kaisercraft papers and misted a doily stencil on the top left
.
I fussy cut some of the flowers, wetting them and letting them air dry to give them a little dimension. I stamped the diamond grid under the flowers and the frame along the top right of the photo. I did the twist for the month of stamping around my photo. I stamped a border with brown ink and then filled in the dots with a light pink marker.

The large flower was also stamped, and for the center I used a vintage button that once belonged to my Great Grandma, which was my Grandma's mom. I love how well it goes with her outfit! I finished it off with a few more flowers and my title, part of which is a rub-on (LOVE). Thanks for looking!