Showing posts with label distressing. Show all posts

Tuesday, December 17, 2013

Woodland Snowflake Tutorial ~ Fotobella DT

I'm so excited to share my first tutorial for Fotobella using Bo bunny's Woodland Winter I want it all bundle! I'm just in LOVE with this collection of GORGEOUS papers and embellies, not to mention the colors!! Perfect with these snow pics of mine.

I started by using some Glimmer Mist (slate) and reninker (antique linen) on the background. Then I used a snowflake stamp. The distressed edges were covered with Gesso. Here's a closer look at the typed journaling, which was one of the ingredients for this month's 5 Ingredients + yours challenge @ Scrapbook.com. The other ingredients were to use the color navy, ribbon, something stamped, and 3 pictures.

To make the snowflakes start by gathering some twigs outside. Using the Woodland Blizzard paper fussy cut out some snowflakes. I decided on this one that I used on the top left of my LO. Then pick another paper and cut out a circle slightly larger than your snowflake. I used Woodland Winter Journal.  Now cover the edges with gesso and glue your snowflake onto it. 

Break your twigs into 6 equal pieces, and cover with Gesso.


Glue the twigs onto your snowflake, using the center design as your guide.

Now find some bling for the center. I used this pearl to mimic a snowball.

Then cut pieces from another snowflake and glue under the circle, in between the twigs. Here's the finished result.

You can get so many different looks just by combining different snowflakes, papers, and gems. Here's the other one that I made.

If you don't have Gesso you could always use white paint. Stickles or Smooch could also work to make your snowflakes sparkle. Just have fun with it!


Saturday, November 2, 2013

@ THE PARK ~ Bo Bunny (Trail Mix Collection)

   After receiving a stack of fabulous photos that my Sister-in-law took of my nephews, I knew that this was the one that I HAD to scrap, especially when I saw how perfect it looks with Bo Bunny's Trail Mix Collection.

   I was inspired by this sketch from last month's sketch challenge at Scrapbook.com. I just replaced the hearts with circles, but will probably use this again with the hearts, because I think it would make a beautiful wedding or Valentines page.

   The background gears were masked with Distress Inks (peeled paint and gathered twigs). The helm was cut with my Cricut Expression (Life is a beach cartridge), and inked with gathered twigs. I painted the "@" in the title with a cream acrylic paint to match the paper it's on. The dragonflies were stamped, cut out, and inked.

  After cutting out all of the circles, I machine stitched over them, and created a net like the one on the bridge in the photo. The curvy, uneven stitch lines make this my example with the twist, for the Sewing Challenge that I host @ Scrapbook.com. After all the sewing was done, I glued rope around the the circles.I finished up the page with a leaf and some buttons. Here's a closer look at the stitching on the bottom.

   I hope you're all having a great weekend! I'm getting ready to start on my next page.Thanks for stopping by!


Saturday, October 19, 2013

Journey for a jacket

Happy Saturday! I hope everyone is enjoying the weekend. I just finished this page yesterday of me and my husband, and our journey to retrieve back our son's brand new jacket.

Journey was the topic for this month's challenge at Once Upon A Sketch. Here's the sketch that I was inspired by.

I started this page with the wrinkled background, which was white cardstock that I inked, wet and crumpled. Then I used a Tim Holtz clock mask with some Glimmer Mists (copper, harvest orange, and it's brown). I used a compass mask to create the scallops, which were embossed with Distress Embossing Powder in vintage photo. I used this throughout the page to give the illusion of rust, which is one of the colors for the October Monochrome Challenge @ Scrapbook.com. I included the twist of a cog with some of my masking, like on the clock that I cut out. The flower was made from some leftover parts that I had in my stash. I just misted it with the same colors that I used on the background, and added a brown crystal.

I cut the keys from some Tim Holtz paper and strung them through a chain, which I also covered with Distress Embossing Powder in vintage photo. I love how it really looks like rust, and used it on both brads, the journaling pages, the black alpha thickers, and over the black, grungy dotted, stamping.

I finished this page off with black stitching over the scallops, and the old wooden buttons that I recently inherited from my Grandma Norton. Here's a look at the journaling.

The first word on this page is "and" which is hiding under the brad.

And the last page.

Thanks for looking!!


Friday, October 11, 2013

Birthday Cards for my nephews

Happy Birthday to my oldest nephew Alex who turned 12 today! His brother turned 10 last week, so happy belated Birthday to you too Roan! I miss you boys soooo much!! I made both of their cards using My Mind's Eye (handsome) collection. Here's the first one that I made for Roan.

It was based off of this sketch used for the October Card Sketch Challenge @ Scrapbook.com.

I took advantage of the numbers paper and used it again for Alex's card, using the 12 this time. Both of the pinwheels were already made, making both of these cards quick and easy to do.

The sketches helped too. Here's the 2nd one that I used for Alex's card.

Thanks for looking! Be sure to check back tomorrow for a fun Halloween tutorial. Have a great weekend!


Wednesday, September 4, 2013

Live Life Beautifully

Happy hump day!! I'm here to share my latest LO with you of some old photos of me and my Uncle, who unfortunately passed away a couple years ago. I was very close to him ever since I was young and cherish every memory I have with him!!

I did this for quite a few challenges at Scrapbook.com, starting with the September PageMaps Challenge, using sketch #1.

This is also my entry for the Bo Bunny Flower and Brad Challenge, to use at least 50% Bo Bunny products, and at least 2 photos, 1 flower, and 6 brads. I used the Weekend Market line, which is most of the papers, except for the light blue cardstock in the background, and the woodgrain paper, which I've had forever. The brads were brown but I painted them gold. I used exactly 10 of them to get the twist in for the September 4 Categories Challenge for Category 1 to use brads. I used 4 large ones on the Be You tag, and the rest on the suitcases, which were fussy cut, and stacked.

This is also my example for the Stamping Challenge that I host, with the twist of stamping text and numbers. I stamped the post card, text under the title, the postage mark on the right, some numbers and more postage marks over the brown flower, and the date on the Remember tag. My Uncle and I used to write letters to each other when I was younger, so it was important to me to include the post card and postage marks.

Thanks for looking!

Monday, August 26, 2013

Tiny the Turtle

Happy Monday! I hope everyone had a great weekend! I just want to share  this page that I made for my Aunt who is recouping from surgery. She's a little obsessed with turtles and has real and fake ones all over her house. So I decided to scrap this photo of one of her real turtles named Tiny.

I was inspired by the bonus sketch for the August Monthly Sketch Challenge at Scrapbook.com.

I started with this very old grass paper that I've had since I first started scrapping. I had to use it here though, and mixed it with some Tim Holtz "lost and found" papers. After inking and water distressing the edges, I also machine stitched around them, using different colored green threads. I created a shell texture with some gesso, inks, and mists near the flower and top right side by the grass. The title was made from some old green alpha stickers that I covered with embossing powder. The small flower was leftover from my handmade stash, and I paired it with a leaf to cover the twist for the 4 Categories Challenge at Scrapbook.com, for category 2, to use mostly green and at least one leaf.

I got the large flower from my dear scrapping friend Anna C.  It was an off white but I sprayed it with some Glimmer Mist (forest green) and Lindy's Stamp Gang Mist (mystic malachite) to match the greens. Thank you Anna!! Then I just added some grass behind it. Thanks for looking!

Thursday, August 22, 2013

Fishing on Father's Day

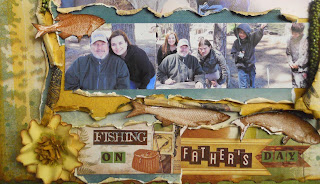
Now that this hectic month has finally settled down a little, I was able to play with my new Bo Bunny "Trail Mix" collection. This is my new favorite line from them at the moment, and love how it looks with these photos from Father's Day a couple of years ago. I just want to point out that I didn't do any fishing here nor do I ever! Lol!

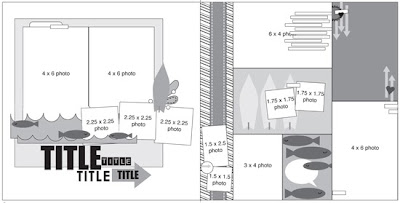
This is based off of this fun and creative sketch, done for the August Sketch Challenge at Scrapbook.com.It is also my entry for the August Color Challenge to use yellow, green, and brown with the twist of using nature photos. 

I started by masking the trees in the background using some mists. I inked and water distressed all of my edges. I used the cardstock stickers to make my title and for the journaling stips on the right. The fish were cut out from pp and then applied with Glossy Accents to make them shiny.
The flowers were left over's from my handmade stash that I altered a bit from the original. I thought I had made a tutorial for them, but I guess not, since I couldn't find them. The green Petaloo vines were a RAK from Flying Unicorn. Thanks Alda! 

And thank YOU for stopping by!

Tuesday, July 16, 2013

Backyard BBQ

Hello and happy Tuesday! I'm back to share my latest with you. I scrapped these photos of me and my husband enjoying a BBQ at my parents house, using Prima's "firefly" collection.

I took my inspiration from this month's Design Seeds Challenge at Scrapbook.com. I really love this color combo, and whatever that drink is, it sure looks refreshing!

I started by masking the left side of my LO with a Prima floral mask and some mists. I cut the title from white cardstock on my Cricut, and then used my blending tool and 3 different Distress Inks to color it in. The grass was also cut with my Cricut (plantin schoolbook cartridge) and then covered with lime stickles.

I misted the flowers with the bling in the centers, and made the rest using my wild fire flower tutorial. Of course I used different inks to match my page, but I also curled my flower petals more inwards instead of out.

Thanks so much for stopping by!


Sunday, July 14, 2013

More Summer Fun with the BOAF July Kit

I hope everyone is having a fabulous summer so far, and taking lots of great photos! Then you can use them with this fun July Kit from BOAF. For this first page I was inspired by this photo and challenge.

I started with the kraft cardstock from Bazzill and misted it with 3 different mists, including the cornflower chalkboard Glimmer Mist that I got as an extra with the April Kit. I also misted the beautiful burlap flowers by Pink Paislee.


The We R Memory Keepers patterned papers that I used can by bought here.I cut and rolled the chevron paper to create a frame for this page. The starfish and seagulls were cut with my Cricut using the Life is a Beach cartridge. I stamped and embossed the title. I finished it up with the chipboard shell stickers from Bo Bunny that you can buy with the extras.

For this next page I wanted to use the bright and fun colors that are in the kit.  I just love this photo that I scrapped of my brother and his son!

As much as I love all of the cardstock that comes with the kit, including all of the extras, I had to use my own blue cardstock for the background because I wanted to mimic the water in the pool. The patterned papers are Bo Bunny's "Key Lime" collection. The chipboard sun that comes in the main kit was painted first, before adding some yellow stickles to it.

Under the sun I used my Tim Holtz Mixed Media stamp with some paints to create the dots. Then I used bubble wrap for the rest, making this my entry for the Scrap for Help challenge this month. The splashes were cut from the Bo bunny pp.

I masked part of my title with Distress Inks, and used the Bo Bunny chipboard "swim" letters for the rest. I finished this page off by gluing some of the Queen and Co. twine that came in the kit, across my page.
Thanks so much for looking!